















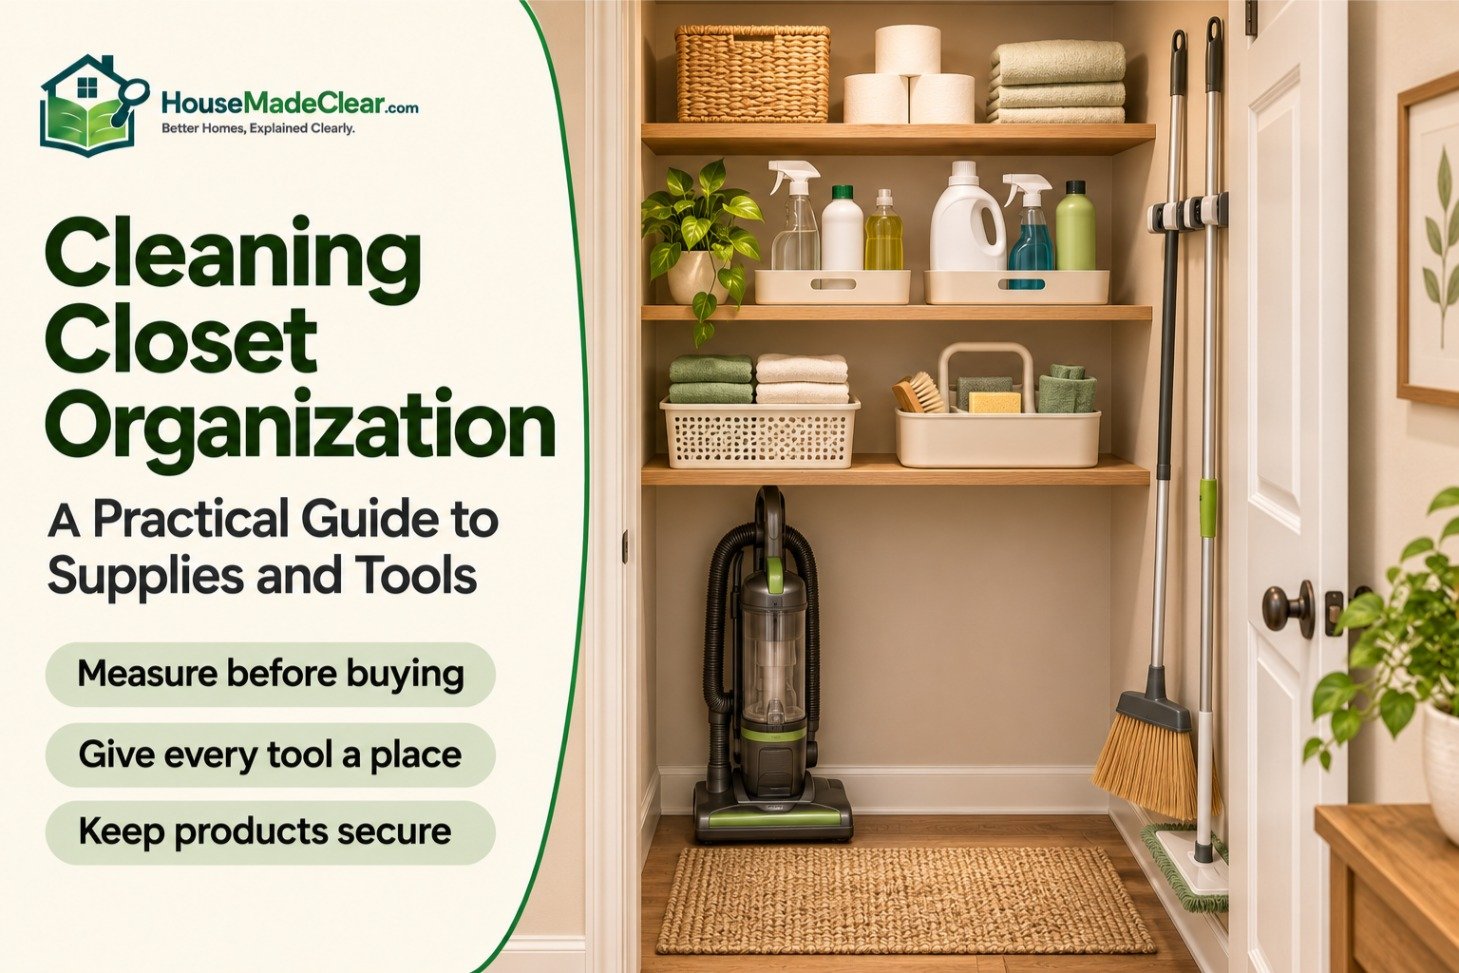
Cleaning closet organization starts with giving each item a place you can reach without moving everything else.
Brooms need upright space. A vacuum needs a clear parking spot. Bottles need secure storage, while clean cloths should stay separate from wet or dirty tools.
The most useful layout depends on what you own and how you clean. A narrow cupboard holding a mop and four bottles needs a different arrangement from a utility closet containing a vacuum, buckets, and bulk supplies.
This guide explains how to organize both, with storage ideas, measuring steps, and an example layout.
Quick Answer
To organize a cleaning closet:
- Sort the contents and remove items that belong elsewhere.
- Check product labels and container condition.
- Reserve full-height space for the vacuum, broom, and mop.
- Put frequently used supplies within comfortable reach.
- Use suitable trays for bottles and separate storage for clean cloths.
- Move lightweight backups to less accessible shelves.
- Secure cleaning products against access by children and pets.
Measure the loaded caddy, vacuum attachments, and door opening before buying organizers.
The layout works when you can retrieve one item and put it back without rearranging the closet.
Cleaning Closet Storage at a Glance
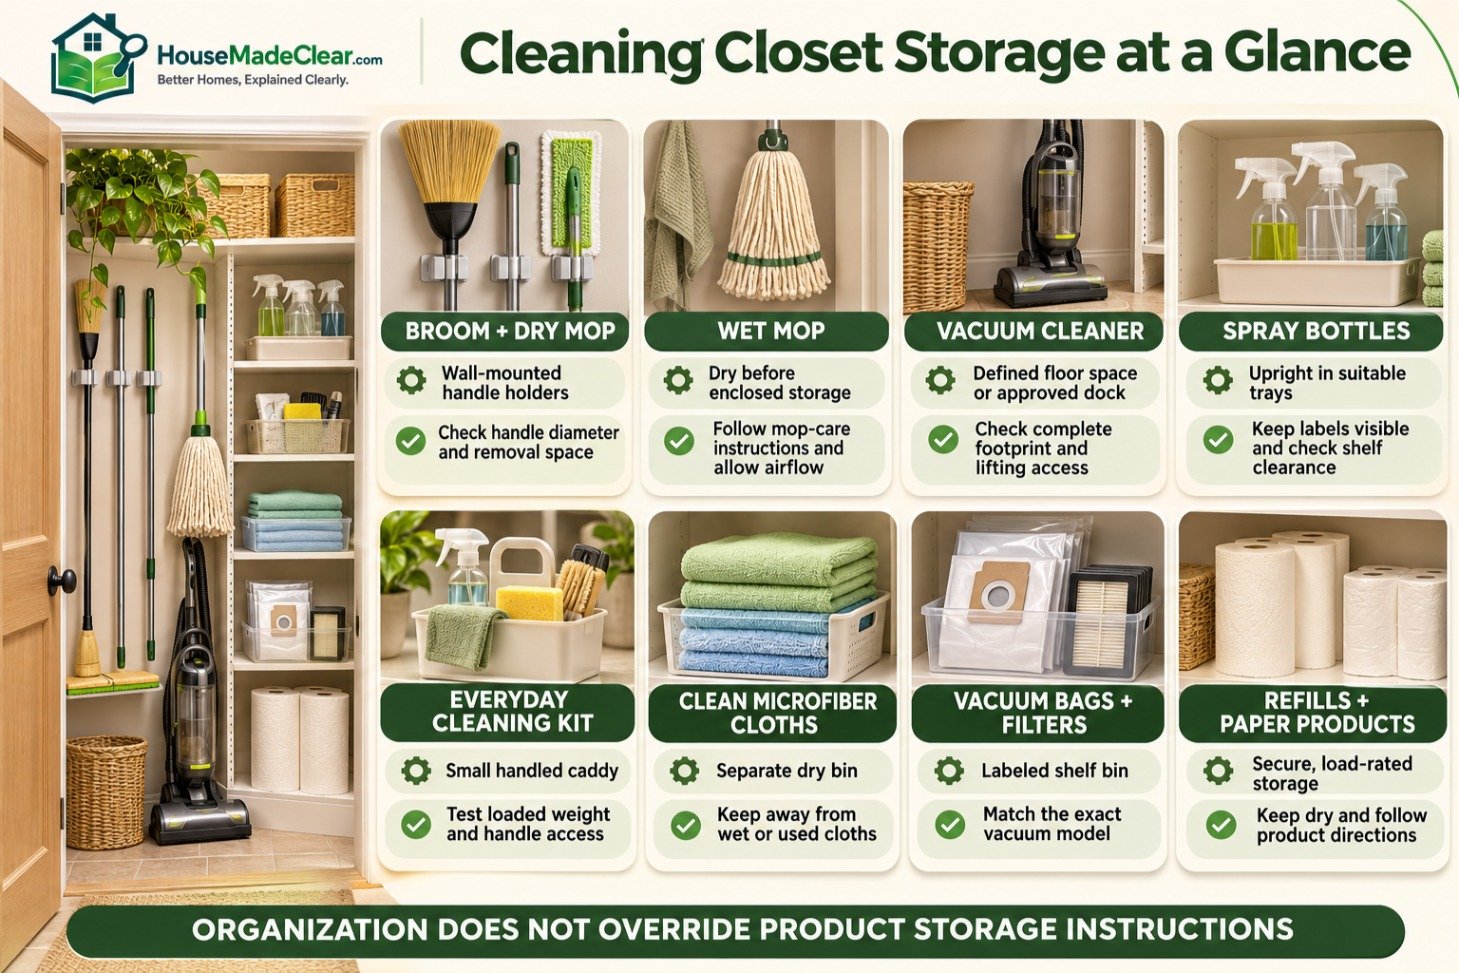
| Item | Practical Storage Method | What to Check |
|---|---|---|
| Broom and dry mop | Wall-mounted handle holders | Handle diameter and removal space |
| Wet mop | Suitable drying location before closet storage | Mop-care instructions and airflow |
| Vacuum cleaner | Defined floor space or approved wall dock | Complete footprint and lifting access |
| Spray bottles | Upright storage in suitable trays | Labels, compatibility, and shelf clearance |
| Everyday cleaning kit | Small handled caddy | Loaded weight and handle access |
| Clean microfiber cloths | Separate dry bin or shallow basket | Easy access and separation from used cloths |
| Brushes and dusters | Hooks, holders, or divided bin | Whether the item is clean and dry |
| Spare bags and filters | Labeled shelf bin | Exact vacuum model compatibility |
| Paper products | Dry upper shelf | Reach and clearance from other supplies |
| Refill containers | Secure, load-rated storage | Weight and product storage directions |
Product labels determine where chemicals can be stored together. A tray organizes containers, but it does not make incompatible products suitable for shared storage.
How to Organize a Cleaning Closet Step by Step
Step 1: Sort the Closet Contents
Work through one section at a time, keeping products secured while the closet is open.
Start with four groups:
- Products and tools used regularly
- Occasional supplies
- Refills and replacements
- Items needing disposal or another storage location
Move unrelated household overflow to its proper place.
Common examples include:
- Gift bags
- Unused décor
- Old electronics
- Shoes
- Luggage
- Unsorted paperwork
Keep food, medicines, and personal-care products in their appropriate storage areas.
If toiletries have migrated into the cleaning closet, our bathroom countertop organization guide explains where everyday products and backups can go.
Step 2: Check What You Actually Use
Review supplies by the surfaces they clean.
| Cleaning Task | What to Check |
|---|---|
| Floors | Whether the cleaner suits the flooring |
| Glass | Whether you already have an open bottle |
| Bathroom fixtures | Which products suit the actual finishes |
| Dusting | Whether several tools do the same job |
| Vacuum maintenance | Whether bags and filters fit the current machine |
| Specialty cleaning | Whether the product is still needed |
A product earns its space when it has a clear use.
Check dates where the label provides them. Look for damaged closures, missing labels, and containers in poor condition.
Set questionable products aside securely for appropriate guidance. Avoid opening or combining unknown contents to identify them.
Step 3: Measure the Closet and Opening
Record the dimensions of the space you can actually use.
Measure:
- Interior width
- Interior depth
- Clear shelf openings
- Doorway width
- Floor space below the lowest shelf
- Space behind the closed door
- Door swing
- Baseboard projection
The doorway may be narrower than the closet interior. A caddy can fit on the shelf yet catch against the door frame when removed.
Check utilities too. Keep required access to equipment, valves, panels, and ventilation openings clear.
Step 4: Measure the Largest Equipment
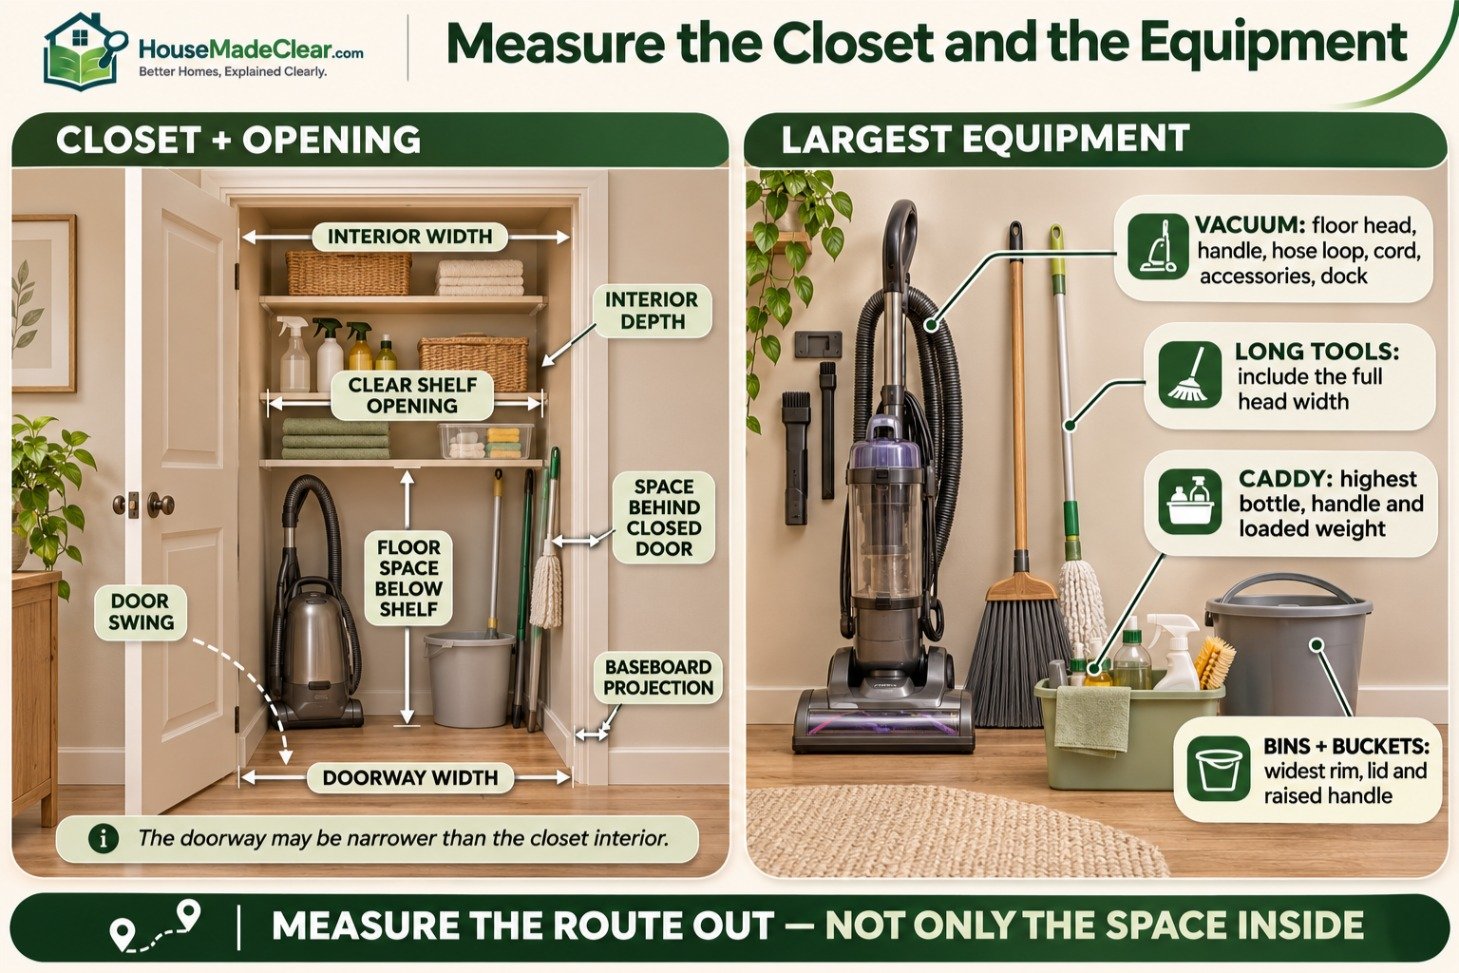
Put the vacuum together as it is normally stored.
Include:
- Floor head
- Handle
- Hose loop
- Wrapped cord
- Attached accessories
- Charging dock, if used
Then measure the broom, mop, bucket, and caddy.
For long-handled tools, include the width of the head. Two narrow handles can still need considerable space if their heads overlap.
Do this before deciding where shelves should end.
Step 5: Assign Storage Locations
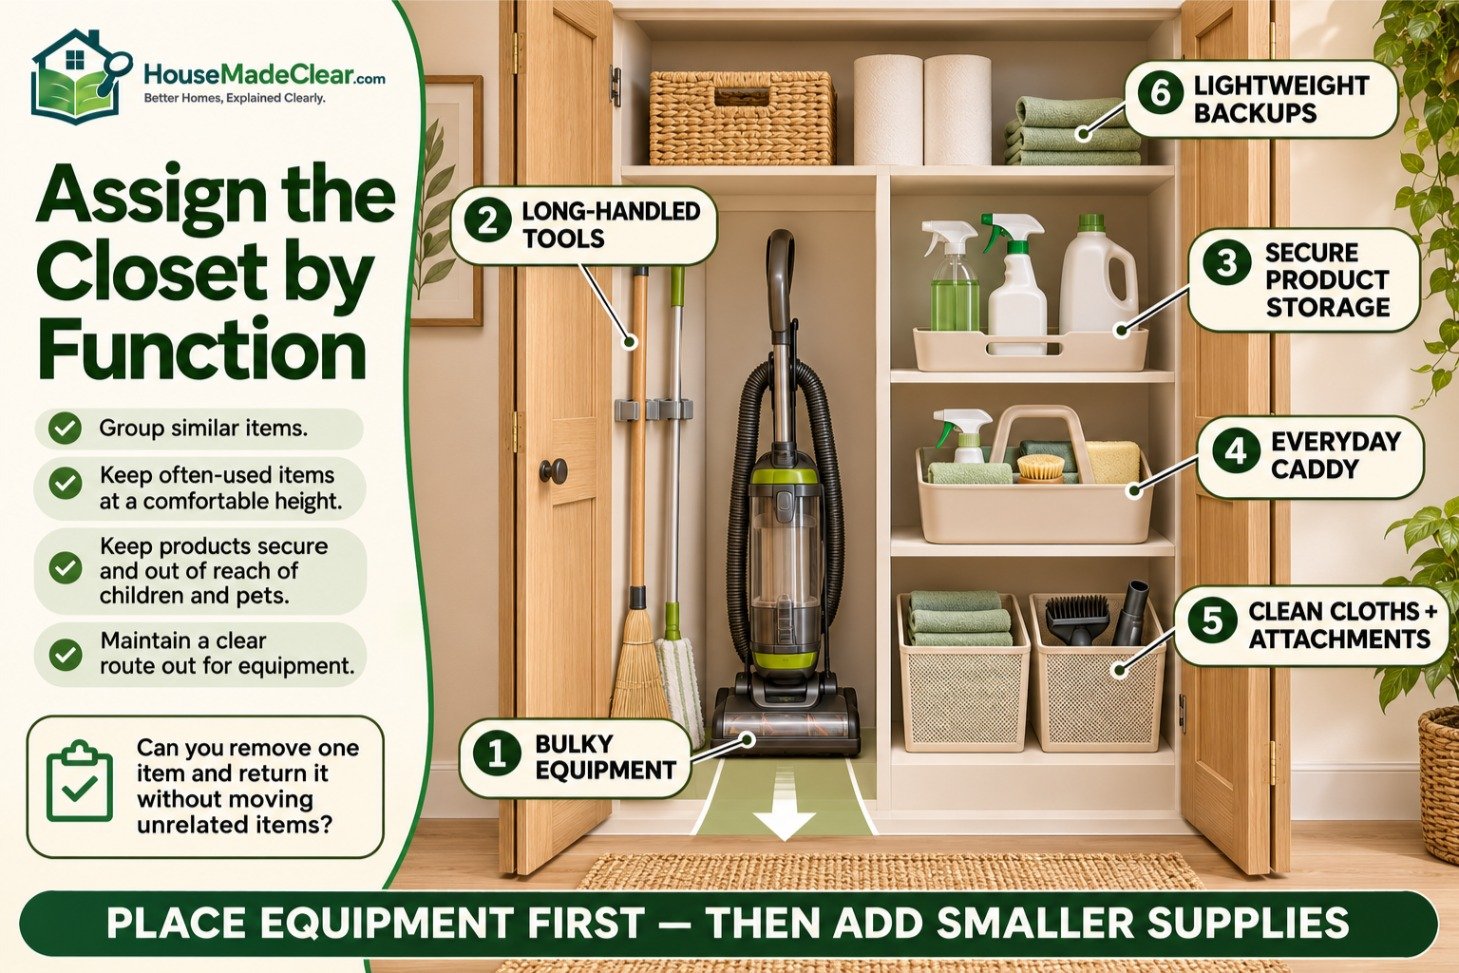
Place equipment first, then add the smaller supplies.
A useful order is:
- Vacuum or other bulky equipment
- Long-handled tools
- Secure product-storage section
- Everyday caddy
- Clean cloths and attachments
- Lightweight backups
Choose locations around the person who uses the closet. A heavy loaded caddy should be easy to lift with a controlled movement.
If reaching it requires standing on tiptoe or pulling it over another container, change the position.
Step 6: Test the Layout Before Installing Hardware
Use the actual tools and temporary boxes to test the arrangement.
Check whether you can:
- Remove the vacuum without lifting the bucket
- Lift the caddy without tipping bottles
- Release the broom from its holder
- Reach the cloth bin
- Open the door fully
- Return each item with little effort
Only then choose permanent hooks, shelving, or organizers.
1. Reserve a Clear Parking Spot for the Vacuum
The vacuum is often the largest item in a cleaning closet. Give it a defined location with a direct route to the doorway.
Floor-Standing Vacuums
Keep enough room to pull the machine out without snagging:
- The hose
- Cord hooks
- Wheels
- Floor head
- Nearby bottles
Avoid stacking supplies on the vacuum or wrapping other equipment around its handle.
If it is awkward to lift, store it where you can roll it out.
Wall-Mounted Vacuums
Use the manufacturer-approved dock and mounting method.
Check:
- Wall construction
- Fastener requirements
- Dock height
- Space to lift the vacuum free
- Charger instructions
- Access to an appropriate outlet
A wall dock needs clearance above the machine if removal involves lifting it upward.
Keep the charging area clear according to the appliance instructions.
2. Hang Brooms and Mops Along One Side
Wall-mounted holders can free the closet floor and prevent handles from falling across the opening.
Choose holders that match the handle diameter and tool weight.
How to Position the Holders
Place each tool against the wall before marking the holder position.
Check the complete outline, including:
- Broom bristles
- Mop head
- Dustpan
- Telescoping sections
- Grip or hanging loop
Stagger holder heights if this prevents the heads from colliding.
Allow room to pull a handle forward when releasing it. A holder mounted behind deep shelving may become difficult to use.
Keep Wet Tools Out Until Ready for Storage
Follow the mop’s cleaning and drying instructions.
Give freshly rinsed heads and brushes a suitable place to dry. Return them once they are ready for enclosed storage.
If the closet repeatedly becomes damp, find the source before adding more organizers.
3. Use One Manageable Caddy for Routine Cleaning
A caddy is useful when the same supplies travel between rooms.
Start with a small selection of products suitable for the tasks you perform. Follow their storage and handling instructions when deciding what can travel together.
What Can Go in the Caddy?
Depending on your routine, it might hold:
- A suitable cleaner
- Clean cloths
- A small brush
- Gloves
- A scraper approved for the surface
Keep the handle clear enough to grip securely.
A caddy packed above its rim is difficult to carry and makes product labels harder to read.
Check the Loaded Weight
Fill it before choosing its shelf.
Pick it up and carry it along your usual route. If it feels awkward, reduce the contents or use smaller task-specific kits.
Refill containers can remain in secure storage.
For a caddy used around the washer or a utility sink, our small laundry room ideas include ways to arrange supplies in tight working spaces.
4. Put Bottles in Suitable Removable Trays
Trays help keep bottles upright and make a shelf section easier to remove for inspection.
Choose a tray that is:
- Stable on the shelf
- Suitable for contact with the stored products
- Easy to lift when loaded
- Deep enough to contain bottle bases
- Low enough to allow a firm grip
Follow product instructions for separation and storage.
Check the Tallest Bottle
Measure with the spray trigger and closure in place.
Then add the clearance needed to lift it over the tray lip.
A bottle may stand comfortably inside a shelf opening but still be difficult to remove individually.
Keep Labels Visible
Face the product name toward the opening.
Avoid covering the original directions with decorative labels. If you label the tray, describe the contents or task clearly.
Examples include:
- Floor-care products
- Bathroom cleaning
- Glass-cleaning supplies
Check compatibility before grouping products by task.
5. Give Clean Cloths Their Own Dry Storage
Clean cloths should be easy to grab without reaching past bottles or dirty tools.
A shallow bin or divided basket works well.
Choose a Simple Sorting Method
Use categories that match your household.
Possible groups include:
- General wiping cloths
- Glass cloths
- Bathroom cloths
- Dusting cloths
Separate them by a familiar color system or use labels.
Everyone using the closet should understand the arrangement.
Decide Where Used Cloths Go
Choose a separate place for used cloths according to the products involved and the cloth-care instructions.
Ordinary damp cleaning cloths need appropriate handling before laundering. Cloths contaminated with solvents, oils, or other hazardous materials may require different handling and disposal.
Return only clean, dry cloths to the fresh-cloth bin.
6. Store Vacuum Attachments Beside the Machine
Loose accessories are easy to lose behind other supplies.
Keep the attachments for the current vacuum in one location.
Useful options include:
- A divided bin
- Compatible wall clips
- The vacuum’s onboard storage
- A shallow shelf basket
Label Replacement Parts Accurately
For bags and filters, record:
- Brand
- Vacuum model
- Part number
- Quantity remaining
Keep the packaging if it provides that information.
Check old attachments before keeping them. Accessories from a previous vacuum can occupy valuable shelf space for years.
7. Use Door Storage for Lightweight Items
The inside of a door can hold shallow storage where the door and organizer are suitable.
Good candidates include:
- Empty reusable gloves
- Small dry brushes
- Lightweight dusters
- Empty spray accessories
- Lightweight replacement pads
Keep chemicals within the secured storage arrangement chosen for the household.
Test the Door Closed

Measure the organizer’s depth and add the projection of its contents.
Check whether it hits:
- Shelf fronts
- The vacuum handle
- Bottle triggers
- Broom heads
- Door hardware
A pocket can fit between shelves and still hit a tall bottle.
Follow the organizer’s mounting and load instructions. Some hollow-core doors need specific fixings, and over-door hooks can affect closure.
8. Give Backups a Fixed Amount of Space
Refills and replacement supplies should have a visible limit.
Use one defined shelf section for items such as:
- Spare cloths
- Vacuum bags
- Replacement mop pads
- Paper products
- Unopened product backups
Store chemicals wherever their labels and the household’s security needs require.
Use a Simple Restocking Note
Keep a short list inside the door or on your phone.
| Item | Open or In Use | Backup | Buy When |
|---|---|---|---|
| Vacuum bags | One installed | Two spare | One spare remains |
| Mop pads | Two in rotation | One spare | A pad needs replacing |
| Cleaning cloths | Current set | Small reserve | Worn cloths reduce the usable set |
| Regular cleaner | One open bottle | One sealed bottle | Backup becomes the open bottle |
These are examples. Set quantities around your actual use and available storage.
Check the closet before shopping. Bulk buying only helps when the products can be stored appropriately and used within their recommended life.
How Much Shelf Space Do Cleaning Supplies Need?
Measure your actual containers instead of using a single spacing throughout the closet.
| Storage Item | Measurement to Take |
|---|---|
| Spray bottle | Height including trigger |
| Loaded caddy | Highest bottle or handle |
| Lidded bin | Height with lid and handles |
| Vacuum filter box | Complete package dimensions |
| Cloth basket | Loaded height |
| Large refill | Width, depth, height, and filled weight |
Calculate Clear Shelf Height
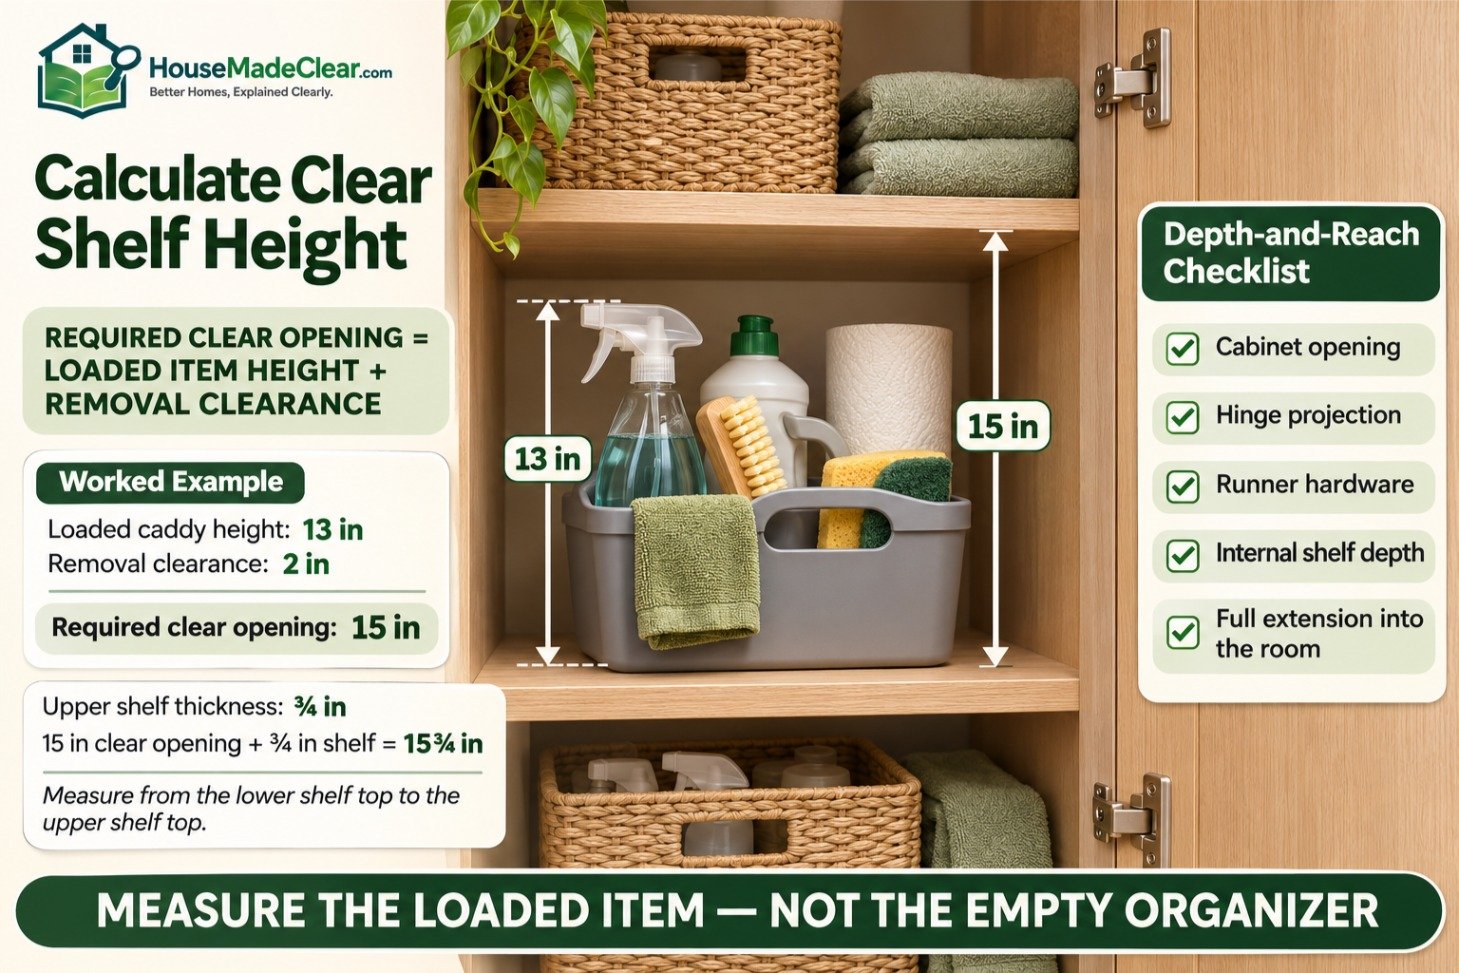
A useful planning calculation is:
Required clear opening = Loaded item height + removal clearance
Suppose a caddy measures 13 inches high when loaded.
If you test it and need 2 inches above it to grip and remove it comfortably, plan for a 15-inch clear opening.
Measure from the top of the lower shelf to the underside of the shelf above.
Account for Shelf Thickness
A 15-inch clear opening and a ¾-inch-thick upper shelf occupy 15¾ inches of vertical space from the lower shelf’s top to the upper shelf’s top.
This distinction matters when marking shelf positions.
Our closet shelf height and spacing guide explains how to measure clear openings and account for shelf thickness.
Check Depth and Reach
A deep shelf can conceal several rows of bottles.
Before adding a pull-out organizer, measure:
- Cabinet opening
- Hinge projection
- Runner hardware
- Internal shelf depth
- Full extension into the room
Check whether you can use it with the door in its normal open position.
A shallow tray may be simpler when you only need one row of supplies.
Example Layout for a 30-Inch-Wide Cleaning Closet
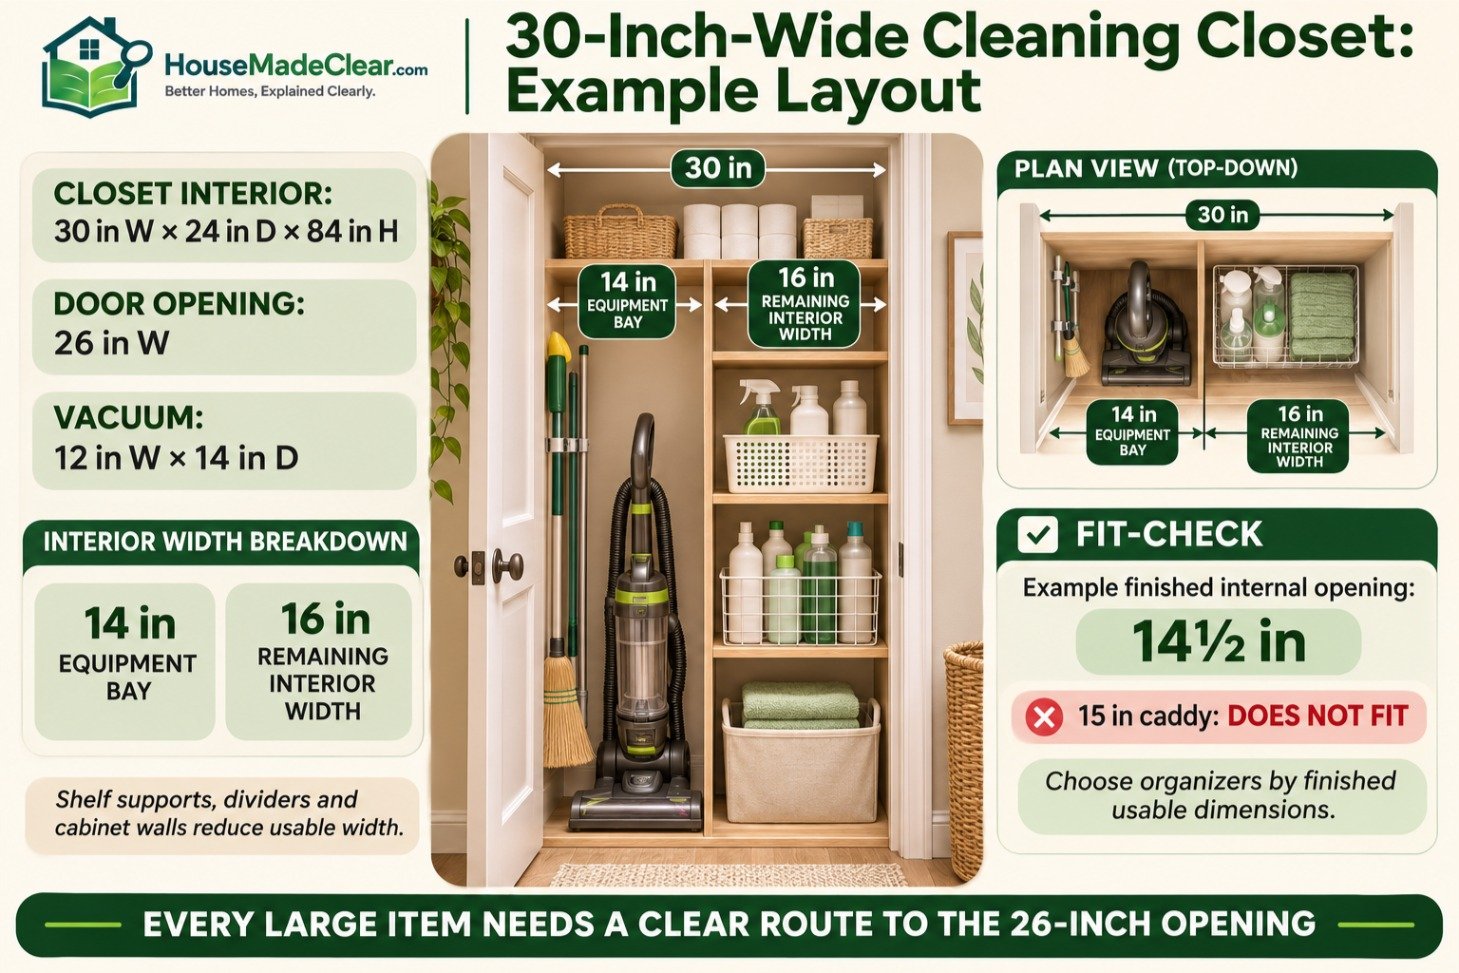
Suppose the closet has a finished interior measuring:
- 30 inches wide
- 24 inches deep
- 84 inches high
The door opening is 26 inches wide.
Your vacuum measures 12 inches wide by 14 inches deep, including its stored accessories.
Divide the Floor Area First
Reserve a 14-inch-wide equipment bay on one side. In this example, that leaves 16 inches of interior width for a separate storage section.
| Area | Example Use |
|---|---|
| Equipment bay | Vacuum parked at the front |
| Side wall of equipment bay | Broom holders, if tool heads clear the vacuum |
| Adjacent storage section | Secured product storage and cloth bin |
| Upper area | Lightweight dry backups |
These are layout assumptions for this example. Shelf supports, dividers, and cabinet walls reduce the usable width.
Check the Opening Before Choosing Bins
Suppose the storage section has 16 inches of exterior width, but its internal opening is only 14½ inches after construction.
A 15-inch-wide caddy will fail at that opening.
Choose the caddy using the finished usable dimensions. Then test removal through the closet doorway.
Test the Complete Routine
Pretend you are starting a normal cleaning session.
- Open the closet.
- Remove the vacuum.
- Take out the caddy.
- Retrieve a clean cloth.
- Return the equipment.
- Close and secure the storage.
If any step requires moving unrelated items, adjust the layout.
The example works only if each large item has a usable route to the opening.
Where Should Cleaning Chemicals Be Stored?

Follow the storage directions on each product label.
For households with children or pets, use secured storage that prevents access. Poison Control recommends retaining original containers and keeping hazardous cleaning products away from children, including locked storage for especially dangerous products. Its guidance also warns against mixing bleach with ammonia-containing or acidic cleaners. See Poison Control’s cleaning-product precautions.
Keep Products Identifiable
Retain:
- The original container
- Product name
- Directions
- Warning information
- Original closure
Use shelf and tray labels to make the closet easier to navigate.
Check Storage Conditions
Look for label requirements covering:
- Temperature
- Sunlight
- Heat sources
- Moisture
- Ventilation
- Separation from other materials
A hot garage, damp bathroom, or cupboard beside heating equipment may be unsuitable for particular products.
Choose the location after checking the contents.
Separate Products According to Their Instructions
Avoid collecting every chemical in one large tub.
Products with incompatible storage requirements need appropriate separation. Keep liquid products positioned so a leak cannot run into other containers or supplies.
A tray provides organization and limited spill containment. It does not replace the storage requirements on the label.
Small Cleaning Closet Ideas
Keep Full-Height Storage on One Side
Shorten or omit shelves in the equipment bay if the closet construction allows it.
This gives the broom, mop, or upright vacuum room to stand while the other side holds smaller items.
Measure the tool heads as well as the handles.
Choose Smaller Refills
Large refill containers can consume an entire shelf.
If you struggle to lift or store them, compare a smaller package with the storage space it frees.
The right quantity depends on how quickly you use the product.
Use Fewer, More Specific Bins
Useful labels include:
- Clean cloths
- Vacuum accessories
- Spare pads
- Paper refills
A large “miscellaneous” basket usually becomes difficult to search.
Use a separate home for any item that repeatedly disappears into it.
Store a Bucket Where You Can Remove It Easily
Measure the bucket’s widest rim and raised handle.
If it stores beneath a shelf, check the movement needed to pull it out. A bucket placed behind the vacuum may be inconvenient enough that it never returns there.
Store dry, suitable accessories inside it only if they can be removed together without spilling.
How to Organize Cleaning Supplies Without a Closet
A dedicated closet is useful, but several smaller storage locations can also work.
| Available Space | Suitable Approach | Main Check |
|---|---|---|
| Utility-room cupboard | Secured product section plus tool hooks nearby | Access around appliances |
| Hall cabinet | Closed storage for dry equipment and permitted products | Product conditions and household access |
| Under-sink cabinet | Secured storage where suitable | Plumbing, leaks, and usable openings |
| Freestanding utility cabinet | Adjustable shelves and full-height tool bay | Stability, anchoring, and load rating |
| Small laundry area | Compact caddy and separate tool parking | Washer lids, appliance doors, and service access |
When Sharing a Linen Closet
Keep towels and bedding in their own section.
If the household needs chemical storage, a separate secured cabinet may be more suitable than placing bottles among linens.
Use the linen area for dry, clean items such as cloths and replacement pads where appropriate.
When Using a Freestanding Cabinet
Follow the cabinet’s assembly and anti-tip instructions.
Check:
- Shelf load limits
- Door-opening space
- Floor stability
- Required wall anchoring
- Whether the interior fits the tallest tool
The cabinet’s overall dimensions do not reveal its full internal capacity.
Common Cleaning Closet Organization Mistakes
| Mistake | Why It Causes Problems | Better Approach |
|---|---|---|
| Installing shelves before measuring equipment | The vacuum or mop may not fit | Reserve the equipment bay first |
| Buying bins using exterior measurements | Openings and handles reduce usable space | Measure internal dimensions |
| Putting heavy refills overhead | Retrieval becomes awkward | Use secure storage at a manageable height |
| Mixing clean and used cloths | Fresh supplies become difficult to identify | Provide separate collection points |
| Storing damp tools immediately | Moisture remains inside the closet | Follow drying instructions first |
| Keeping obsolete attachments | Current accessories become harder to find | Match parts to the equipment you own |
| Overloading the door | Closure and hardware may be affected | Use shallow, lightweight storage |
| Buying organizers before reducing duplicates | The closet stays crowded | Sort first, then fill specific gaps |
How to Maintain the Closet
Give returned items a quick check after each cleaning session.
- Close product containers.
- Put tools back in their holders.
- Return clean supplies to the correct bin.
- Handle wet tools before enclosed storage.
- Note anything that needs replacing.
When shopping, check the backup section first.
Review damaged or unwanted products separately. The U.S. Environmental Protection Agency recommends following disposal directions and checking local household hazardous-waste options for applicable products. It also warns against mixing leftover hazardous products. Corroding containers require special handling guidance. See the EPA’s household hazardous-waste guidance.
Avoid putting an unidentified or deteriorating container back into the regular supply rotation.
Cleaning Closet Organization Checklist
Before finalizing the layout, confirm:
- Bulky equipment has a clear route out
- Long-handled tools fit without overlapping the opening
- The loaded caddy is comfortable to carry
- Product storage follows the labels
- Hazardous products are secured
- Original labels remain readable
- Clean cloths have separate dry storage
- Vacuum attachments match the current machine
- Backup quantities are visible
- Shelves and holders suit the load
- Door organizers clear the shelves
- Utilities remain accessible
- The closet door closes fully
Frequently Asked Questions
What is the best way to organize a small cleaning closet?
Reserve space for the largest equipment first. Hang long-handled tools where their heads remain clear, then add a manageable caddy, a clean-cloth bin, and a small backup section. Keep chemical storage secure and consistent with product labels.
How do you store brooms and mops in a narrow closet?
Use suitable wall-mounted handle holders. Test the complete tool before installation, including the head and the movement needed to release it. Stagger heights if the heads collide. Follow the mop’s drying instructions before returning it to enclosed storage.
Should all cleaning supplies go in one caddy?
Pack the supplies needed for a specific routine, subject to product compatibility. Leave refills and occasional products in appropriate storage. A caddy is easier to use when it stays light enough to carry comfortably.
How deep should cleaning closet shelves be?
Choose depth around the actual containers and available access. Measure the loaded tray or bin, including handles. A deep shelf may suit a bucket or bulky package, while smaller bottles are easier to see in a shallow row.
Can cleaning supplies be stored under the sink?
They can be stored there when product conditions, plumbing clearance, and household security needs are met. Check for leaks and use appropriate secured storage. Keep products separate from food, medicines, and personal-care supplies.
How do you organize a cleaning closet on a budget?
Use existing suitable bins to test the layout. Remove obsolete accessories and unnecessary duplicates. Spend first on a specific gap, such as a correctly rated broom holder or a tray that fits the shelf opening.
Why does my cleaning closet smell musty?
Check for damp mop heads, wet cloths, plumbing leaks, and other moisture sources. Dry and clean tools according to their instructions. An unexplained strong chemical odor needs appropriate investigation before the closet returns to normal use.
Where should heavy cleaning products go?
Use load-rated, secured storage at a height where the intended user can lift them comfortably. Keep product storage conditions and access restrictions in place. Avoid putting large containers overhead simply to free a lower shelf.
Final Thoughts
A useful cleaning closet gives the vacuum, long-handled tools, everyday supplies, and backups their own accessible locations.
Start with measurements. Test the layout with the real equipment, and buy organizers only where they solve a specific problem.
Keep the setup easy to reset so the next cleaning session starts with supplies you can find.







[…] Cleaning Closet Organization: A Practical Guide to Supplies and Tools […]
[…] Cleaning Closet Organization: A Practical Guide to Supplies and Tools […]
[…] Cleaning Closet Organization: A Practical Guide to Supplies and Tools […]