
















A shelf above the washer sounds useful until the lid hits it. A folding table looks like an upgrade until you have to move it to open the dryer. In a small laundry room, the best project starts with one question. What gets in your way when you do a load?
Quick Answer
For a small laundry room with a top-loading washer, put storage on a side wall and leave the space above the lid clear. With side-by-side front loaders, a removable counter can give you room to fold. In a laundry closet, try a hanging bag, a fold-flat basket, or a shallow shelf you can reach from the doorway.
Before you buy anything, open the room door, washer, and dryer. Stand where you normally unload clothes. The space you can still use from that position is where your first project belongs.
Which DIY Project Fits Your Laundry Room?
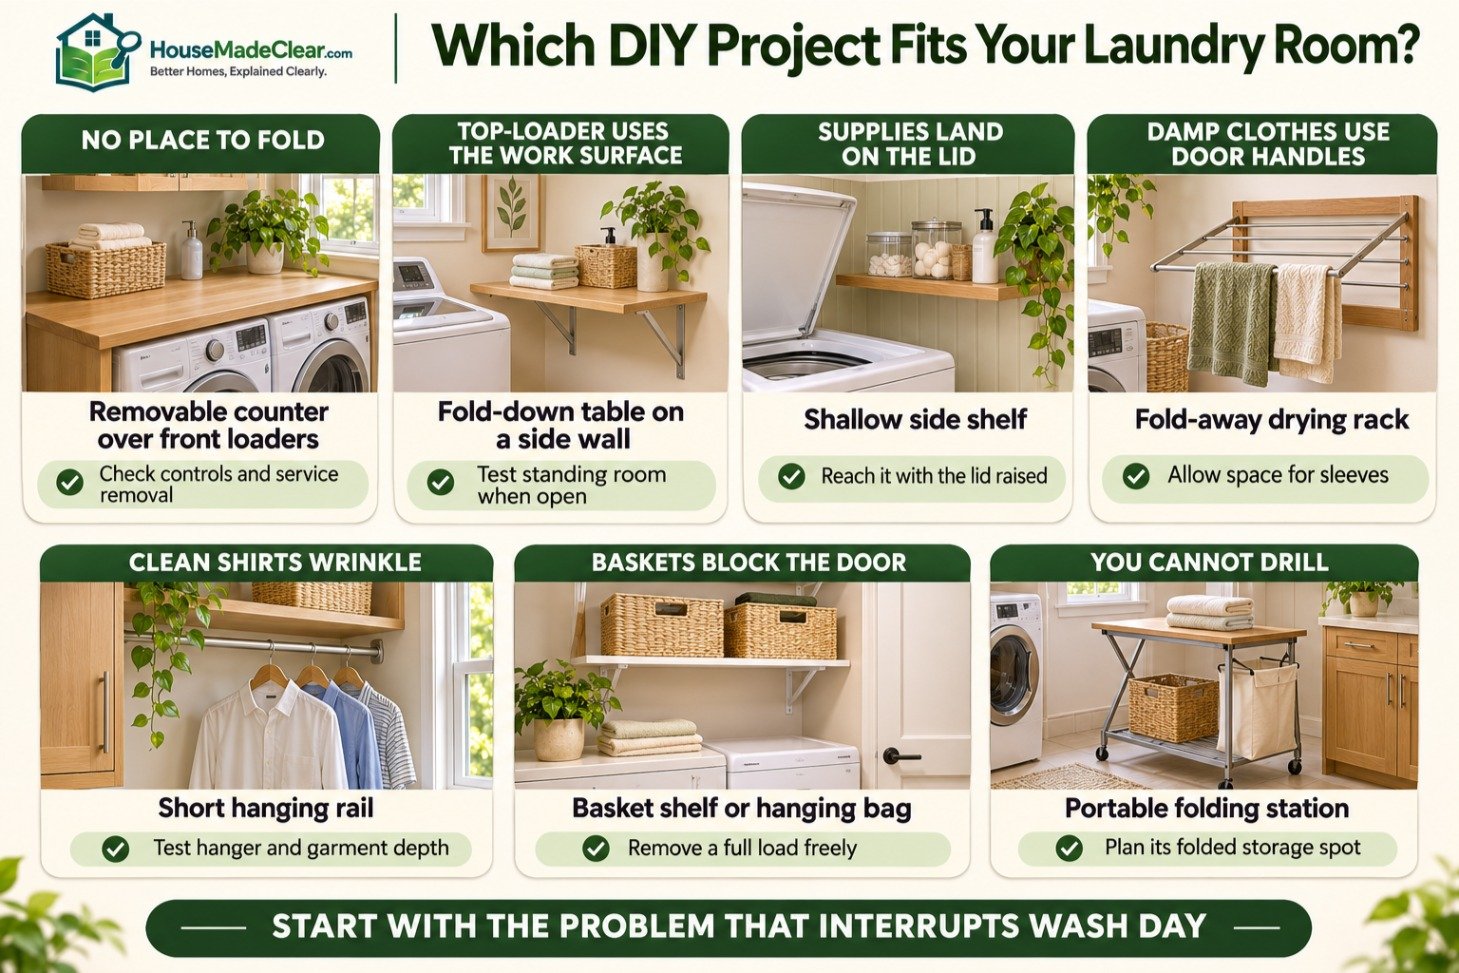
| If this happens on wash day | Start with this project | Check before you buy |
|---|---|---|
| You fold towels on the bed | Removable counter over front loaders | Can you reach the controls and remove the counter for service? |
| A top-loader takes up your only work surface | Fold-down table on a side wall | Can you stand in front of it when it’s open? |
| Supplies end up on the washer lid | Shallow side shelf | Can you reach the shelf while the lid is raised? |
| Damp shirts hang from door handles | Fold-away drying rack | Where will the sleeves hang when the rack is full? |
| Clean clothes wrinkle before you put them away | Short hanging rail | Will a shirt on a hanger clear the wall and the machines? |
| Baskets block the doorway | Basket shelf or hanging laundry bag | Can you remove a full load without moving anything else? |
| You rent and can’t drill | Portable folding station | Where will the folded table live between loads? |
Measure the Room With the Machines Open

You need a tape measure, a basket, and a piece of cardboard. Take the measurements with the machines in their installed positions. A washer can sit farther from the wall than its published depth suggests because the hoses need space behind it.
Start with these four checks.
- Open the washer. For a top-loader, measure from the floor to the highest point of the raised lid. For a front-loader, mark where the open door reaches. Pull the detergent drawer out, too.
- Unload the dryer. Put your basket where it actually goes. Bend down and reach the back of the drum. That patch of floor is already in use, even when it looks empty.
- Check the wall. Locate the water shutoffs, outlets, dryer duct, and any service panels. Keep those areas accessible. Before drilling, identify suitable wall supports and check for concealed pipes and wiring.
- Test the proposed addition. Cut cardboard to the depth of the shelf or table. Hold it in place while someone opens the doors. For a drying rack, hang a shirt over the edge so you can see the space the laundry will occupy.
Use the installation guide for your appliance model when checking required clearances and closet ventilation. Whirlpool’s washer and dryer sizing guide explains which room and appliance measurements to collect.
12 DIY Small Laundry Room Ideas
1. Add a removable folding counter over front-loading machines
Best for side-by-side front loaders when you have nowhere to fold a full load.
Before choosing a countertop, unfold your largest bath towel over the machines. Fold it the way you usually do. You’ll see how much width you actually use and whether a full wall-to-wall counter is worth building. Also check where your hips meet the front edge. A deep surface can feel awkward if you already find the machines tall.
Use a smooth, moisture-resistant top with finished edges. Rough plywood can snag knits, and an unfinished edge is unpleasant to lean against. If you use wood, finish the cut edges as well as the top.
Support the counter independently on suitable brackets, wall cleats, or side panels. Keep the appliance clearances specified in the manuals. Plan how the top comes out when a machine needs service. In a tight alcove, two lift-out sections can be easier to remove than one long slab.
One final check often changes the design. Stand in front of the closed washer and pull out the dispenser drawer. A deep front lip can block the drawer or hide its fill markings even when the main door opens freely.
2. Fit a shallow shelf beside a top-loading washer
Best for a top-loader whose lid makes the wall behind it hard to reach.
Stand beside the open washer and reach toward the nearest side wall. That’s a useful spot for a small shelf. It lets you pick up a mesh wash bag, stain brush, or measuring cup without leaning across the drum.
Choose the depth by measuring what will sit there. Lay your items on a piece of cardboard, then trim the cardboard until everything fits in a single row. Hold it against the wall. If the edge catches your shoulder when you unload the washer, shorten the shelf or move it farther along the wall.
A small front lip helps keep loose items in place. Keep it low enough to lift out a cup with one hand. If you’re adding a second shelf, measure the tallest item with its cap or handle in place. Leave room above it for your fingers. Our closet shelf height and spacing guide shows how to measure the usable opening between two shelves.
3. Install a fold-down table where you can stand and fold
Best for a narrow room with a free end wall and no permanent counter.
The wall opposite the door is often worth testing first. A table there can open across the end of the room while leaving the route to the washer clear. On a long side wall, the same table may cut directly across your path.
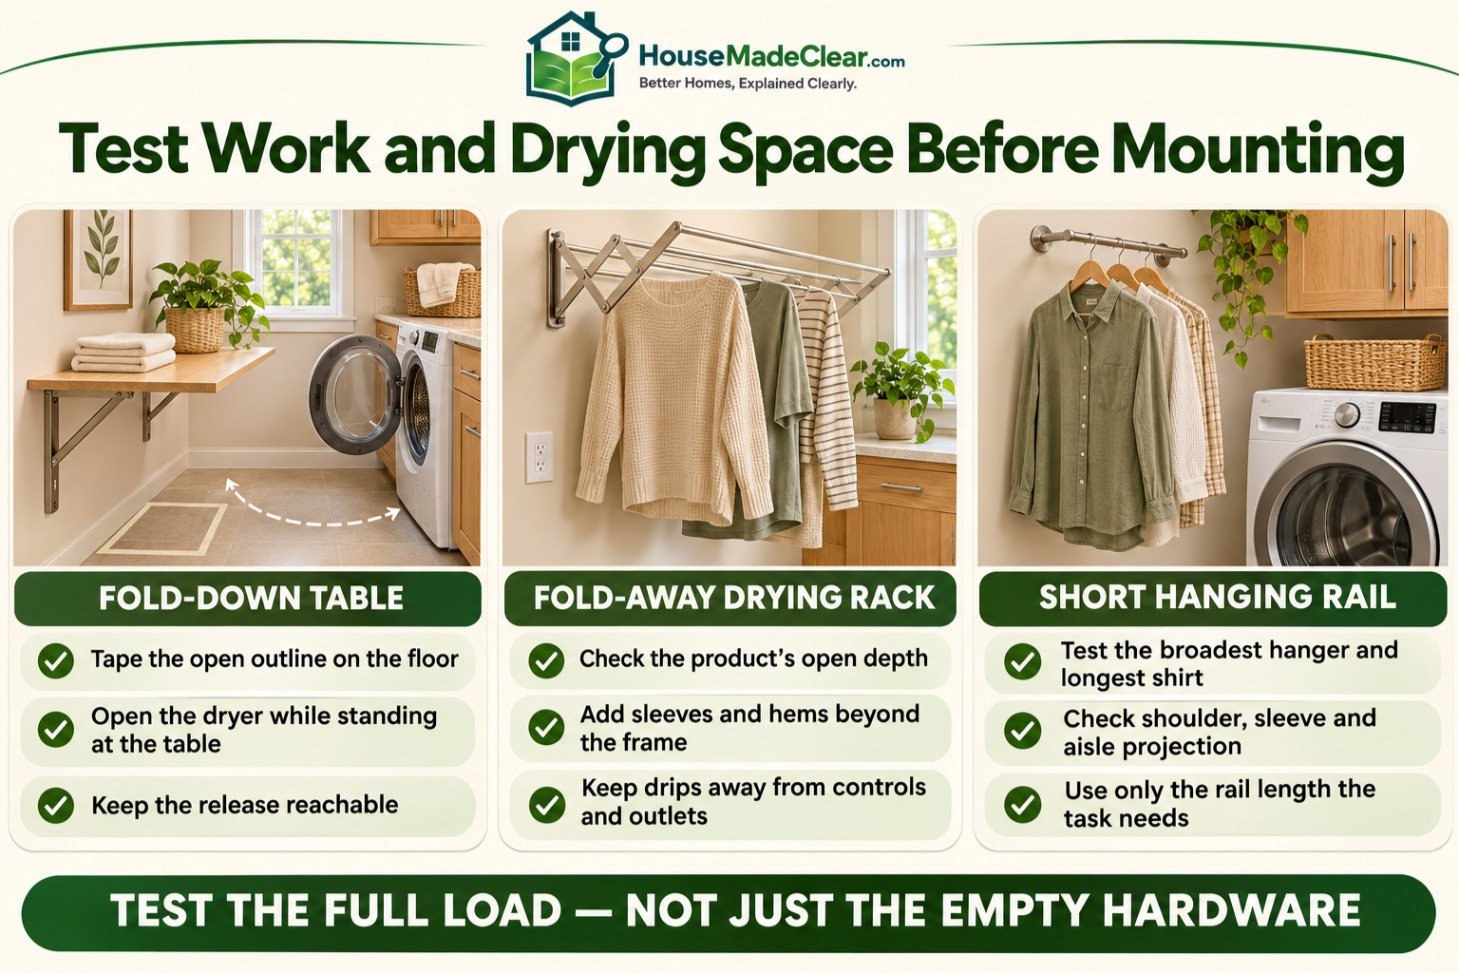
Tape the proposed tabletop outline to the floor. Stand at its front edge holding a towel. Now ask someone to open the dryer. If you have to step aside, try a shallower top or a different wall before ordering hardware.
Use folding brackets rated for the finished top and its intended load. Follow the bracket maker’s mounting instructions for your wall. Choose a release you can reach from the front, particularly if one end of the table sits against a cabinet. Check that the table stays securely closed when folded.
Think about what happens halfway through a load. If the table blocks the dryer while it’s open, you’ll have to clear the folded clothes before you can fetch the rest. A smaller table that stays usable through the whole job earns its space.
4. Mount a fold-away drying rack for clothes you air-dry
Best for households that regularly wash a few items that can’t go in the dryer.
Pick the rack using the garment you dry most often. A compact accordion rack may suit socks and delicates. A shirt needs enough drop for the hem to hang freely. A sweater with a dry flat label needs a supported horizontal surface, such as a folding mesh rack.
Check the rack’s open depth on the product drawing. Then hold a damp-size load’s worth of empty hangers or garments in that area. Clothes can extend past the frame. A long sleeve may land on clean towels or across a cabinet handle.
If you hand-wash at a utility sink, the wall above it can be a good spot for drip-drying when the sink is free. Keep dripping garments away from appliance controls and electrical outlets. Use fittings rated for the wall and the weight of wet clothes.
Before mounting, decide how often the rack will stay open overnight. In a pass-through laundry room, that answer can rule out an otherwise convenient wall.
5. Give freshly dried shirts a short hanging rail
Best for shirts and uniforms that wrinkle while the rest of the load is being folded.
A drying rack can stay occupied for hours. A short rail beside the dryer serves a different purpose. Keep a few empty hangers on it, take out a shirt, and hang it straight away. A full closet rod is usually more rail than this job needs.
Test the location with your broadest hanger and longest shirt. Hold both at the proposed height. Check the shoulder nearest the wall and the sleeve nearest the aisle. A bare rod can look tucked away while a shirt on it projects into the doorway. Our closet rod height guide explains how hanger depth and garment length affect placement.
If the only free wall is narrow, consider a fold-out valet hook. It holds a small batch of hangers and folds back afterward. Put it on the side where you naturally stand after closing the dryer door. That small detail makes it easier to hang shirts before the next armful comes out.
6. Make a parking spot for one clean laundry basket
Best for a basket that keeps landing in front of the dryer.
Look for an unused lower shelf in a cabinet or an open bay beneath a counter. The aim is to slide the empty basket out as the dryer finishes, fill it, and carry it away. A basket hidden behind a hinged door is less convenient if the open cabinet and dryer doors compete for space.
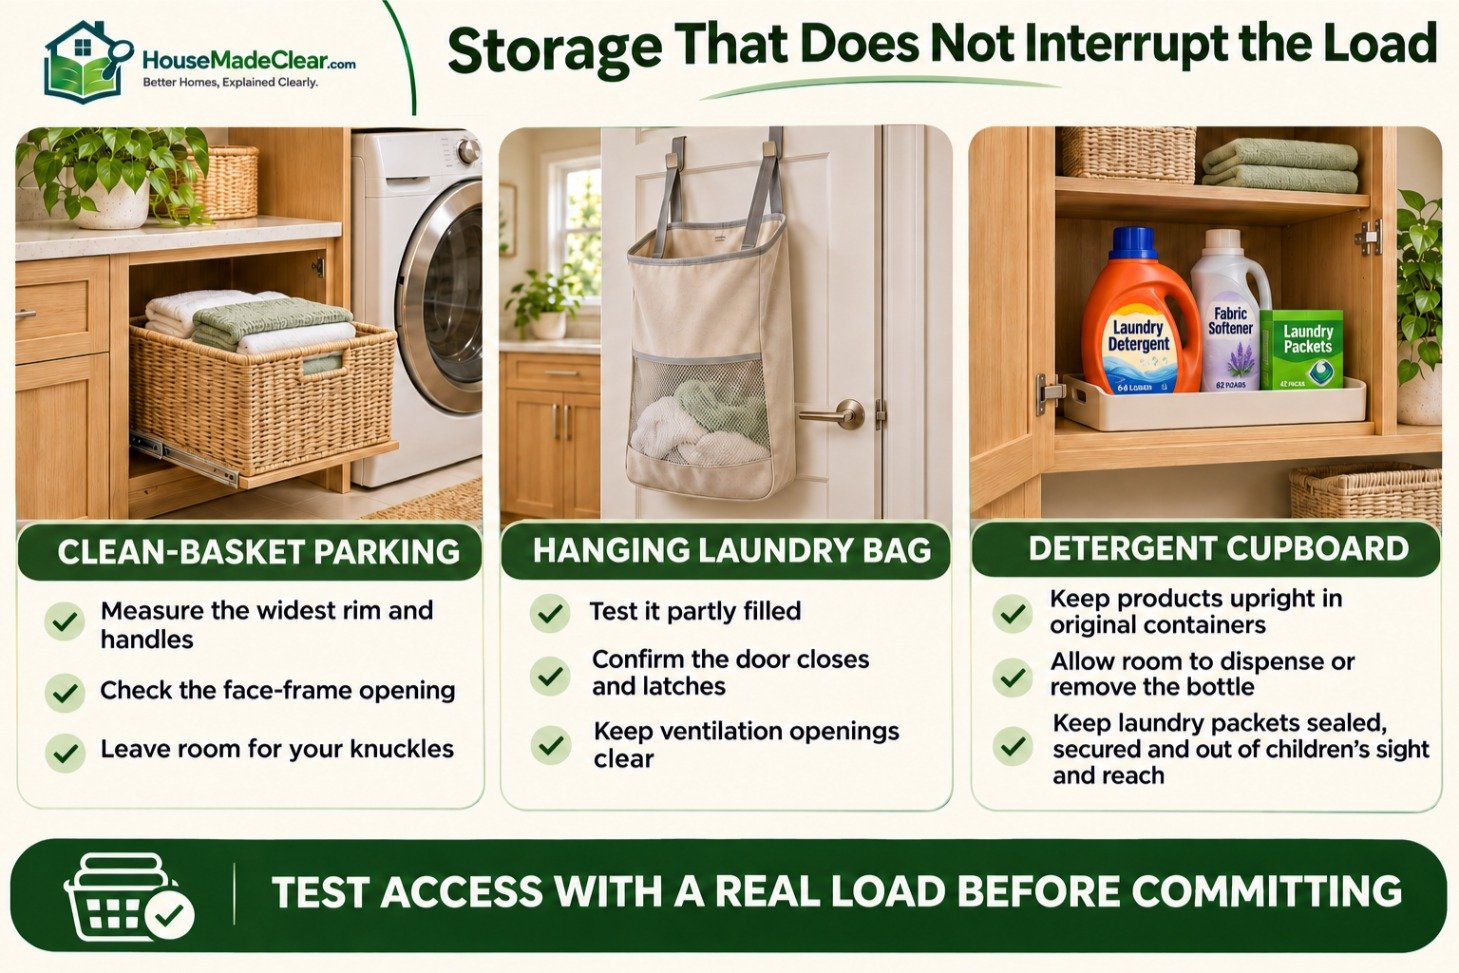
Measure the basket across its widest rim, including the handles. The base is often narrower. On a cabinet with a face frame, measure the front opening as well as the interior. A basket can fit comfortably inside a cabinet yet jam halfway through its doorway.
Try the fit with folded towels inside. A soft-sided basket can bulge under load, and a rigid basket needs room for your knuckles. If you have to turn it sideways to get a grip, choose a smaller basket or a different bay.
For a shared laundry room, clips with household members’ names are enough to identify finished loads. You can use the same shelf for each person’s basket in turn.
7. Hang a washable bag where dirty clothes collect
Best for a laundry closet without floor space for a hamper.
Pick the location by watching where the clothes pile up. If everyone changes in a bedroom, hang the bag there. Carry it to the washer on wash day. A hamper beside the machine does little for a pile that forms two rooms away. Our small bedroom storage guide covers hamper placement when there’s no closet.
Choose a bag with handles you can lift off the hook using one hand. A wide opening works better for bath towels than a narrow drawstring neck. If the bag slips off whenever you add clothing, use a hook that fits both handles without pinching them together.
For an over-door hook, test the door with a partly filled bag before deciding on the spot. The empty bag tells you very little. Make sure the door closes and latches, and keep ventilation openings clear. Check the hook’s load limit. A smaller bag that one person can carry is more useful than a large one that has to be emptied on the floor.
8. Turn part of an existing cabinet into a detergent cupboard
Best for a family laundry room where bottles crowd the work surface.
Gather the products you use in an ordinary week. Set them on a removable tray in their original containers. A tray with a low front edge makes it easier to lift out a bottle and wipe up a small drip. Put refills in a separate spot so you can see when the open bottle is running low.
Check how you dispense your detergent. If a bottle has a push-button spout, leave room for the measuring cup underneath. Try the movement with the cupboard door open. If the bottle must hang over the shelf edge to dispense, take it out for use or choose another shelf.
Give laundry packets particular care. The U.S. Consumer Product Safety Commission advises keeping liquid packets sealed in their original packaging and locked up out of children’s sight and reach. A decorative jar loses the original closure and product information. Choose a cupboard that can be secured, then organize the remaining shelf space around the original package.
9. Set up a narrow cart beside a stacked washer and dryer
Best for a stacked pair with usable floor space on one side.
Start by measuring the alcove at floor level, halfway up, and at the cart’s handle height. Baseboards can narrow the bottom. Door trim can narrow the front. Compare the smallest opening with the cart’s widest part, including wheels, handles, and raised edges.
Only use space left after accounting for the appliance’s installation requirements. A gap reserved for ventilation, hoses, or service access needs to stay available. If the cart fits only when it presses against the appliance, choose a different location.
Give the cart a job. The top tray might hold clothespins and mesh bags. The lower shelf could hold a clean basket. Before buying a pull-out cart with three or four tiers, tape its full pulled-out length on the floor. Can you stand beside it and reach the bottom shelf? In a narrow closet, a shorter two-tier cart can be easier to use.
If you usually unload from the hallway, check the threshold as well. Small wheels that catch on it can turn a convenient pull-out into something you have to lift every time.
10. Make a portable folding station for a rental
Best for renters and anyone who folds several loads at once.
A freestanding folding table lets you choose where the work happens. Try it near the laundry doorway, at the end of a hall with clear access, or in the room where most of the clean clothes belong. Folding beside the dresser can save a second round of sorting.
Use a table you already own for a trial. Fold a sheet and a stack of towels on it. Check whether the surface rocks, whether the near edge digs into your wrists, and whether there’s room for the finished stack. A compact table is enough if the basket can sit alongside it.
Choose its storage spot before you buy. Measure the folded thickness, including feet and hinges. Also check whether you can turn the folded table through the doorway. A table that fits behind a cabinet can still be too long to swing into that gap.
If you already have a clear dining table near the laundry, a washable folding mat may be the only purchase you need. Roll it up and store it with the clean basket.
11. Build a small stain-treatment caddy you can carry to the sink
Best for a laundry room with no utility sink or a sink in another room.
If you walk to the kitchen or bathroom to treat a mark, keep the supplies for that job together. A handled, washable caddy can hold a stain brush, a clean white cloth, and the product you use for the affected garment. Follow the product directions and garment care label.
Choose the caddy by its destination. If it goes into a bathroom, measure the ledge beside the basin. A long rectangular caddy may balance poorly there. A compact one with a flat base is easier to set down while you work.
Return the caddy to secure storage after use. Keep products upright in their original containers. A caddy with removable dividers is easier to clean if a cap leaks. If laundry products share storage with household tools, these cleaning closet organization ideas can help give the caddy, mop, and vacuum their own accessible locations.
Leave enough empty space to grasp the handle without touching a brush or bottle. That sounds minor until you’re carrying a wet shirt in the other hand. If everything you use is already at the sink, skip the caddy and give those supplies one designated cupboard spot instead.
12. Sew a hanging pocket for mesh bags and small wash items
Best for a laundry closet where small items disappear behind the machines.
Make one shallow fabric pocket for mesh wash bags, spare clothespins, and the small items you use before starting a cycle. An old pillowcase or a piece of washable canvas works well. Size the opening around your largest folded mesh bag so you can see and grab it.
Fold the fabric to the depth you want, hem the upper edge, and stitch the sides. Add two hanging loops so the pocket stays open when you reach inside. If you prefer a no-sew version, use a small fabric tote with short handles on existing hooks.
Pick the position from the doorway. You should be able to grab a wash bag before loading the machine, including when the washer lid is up. Keep the pocket away from appliance vents, controls, and moving doors.
A second pocket is useful if you regularly find loose socks after a load. Keep the first pocket for clean supplies and the second for socks awaiting a match. Beyond that, extra compartments tend to make a simple holder harder to use.

What Fits in a 5-by-6-Foot Laundry Room?
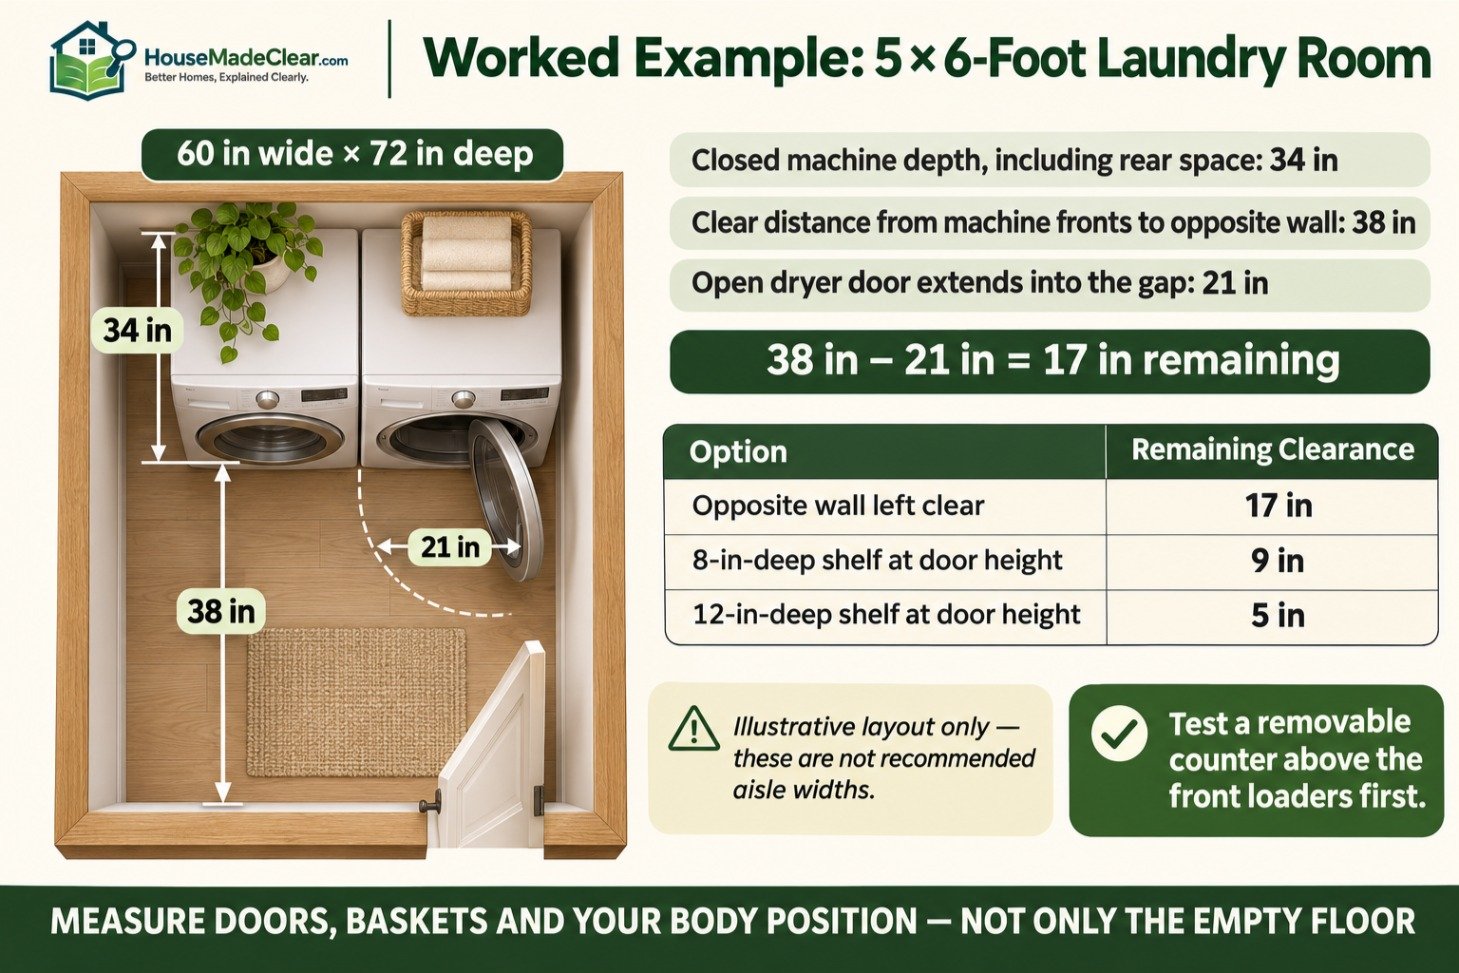
Suppose your room measures 60 inches wide by 72 inches deep. Two existing front-loading machines sit on the back wall. The front of the closed machines is 34 inches from that wall, including the space behind them.
That leaves 38 inches from the appliance fronts to the opposite wall. Now open the dryer. In this example, its door extends another 21 inches toward that wall. At the tip of the open door, the gap drops to 17 inches.
| With the dryer door open | Space remaining directly in front of the door |
|---|---|
| Opposite wall left clear | 17 inches |
| An 8-inch-deep shelf on that wall, at door height | 9 inches |
| A 12-inch-deep shelf on that wall, at door height | 5 inches |
These figures illustrate one layout. They aren’t recommended aisle widths. Door shapes, hinge positions, and the space you need to load a basket vary.
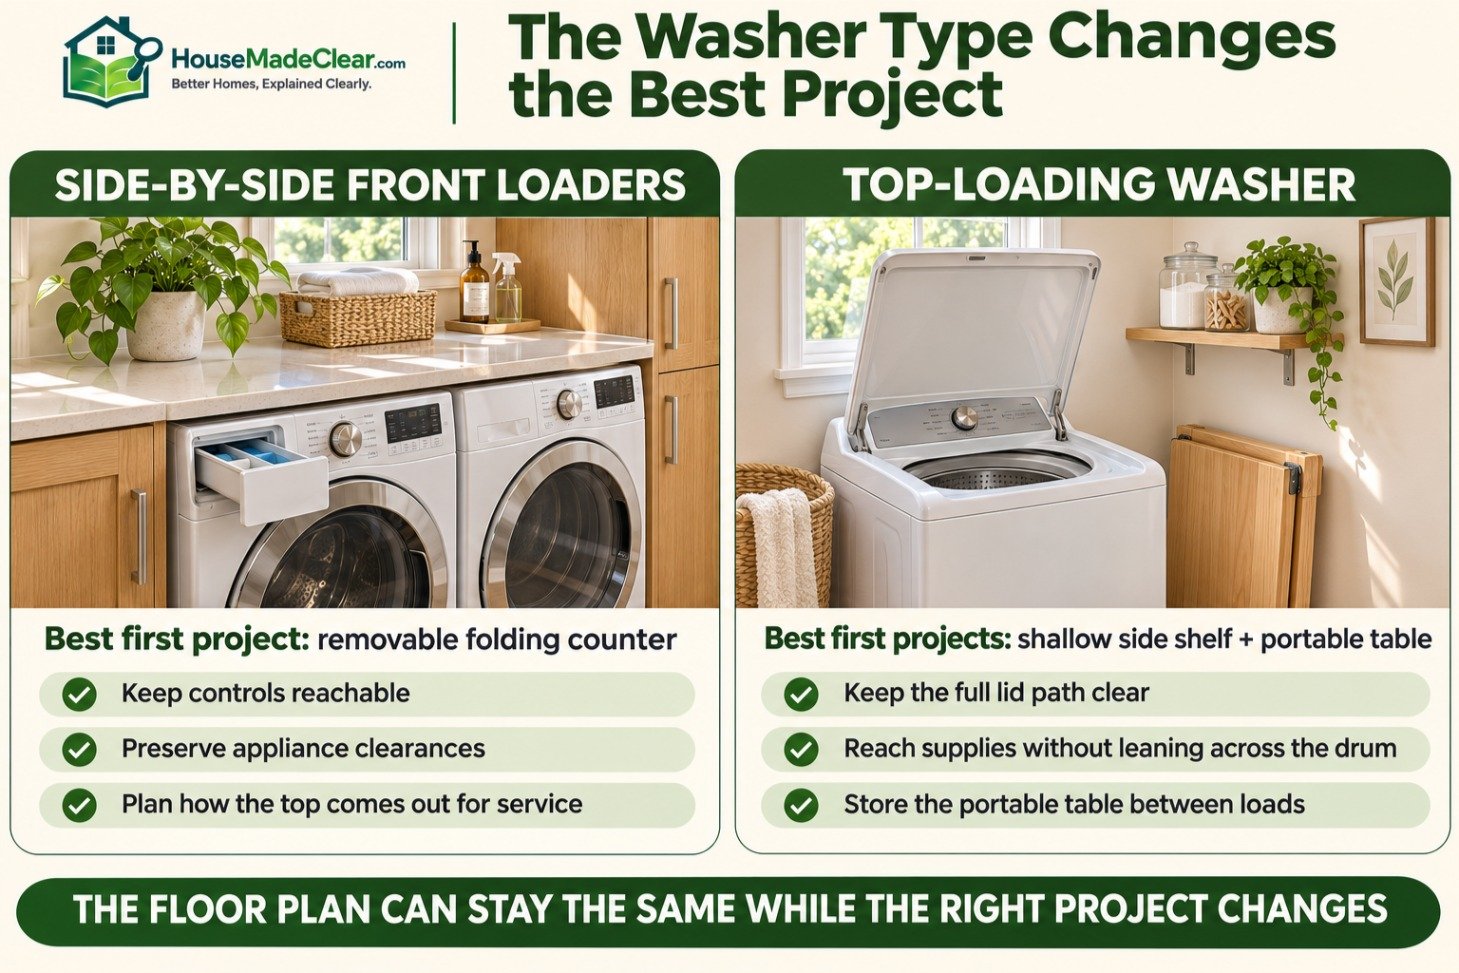
In this room, I’d test a removable counter above the front loaders first. It provides a place to fold without taking more depth from the aisle. If the owner wants a drying rack as well, I’d test the side wall beyond the dryer door’s swing. Someone can hold the open rack in position while the person who usually does the laundry unloads a basket.
Now change just one detail. Suppose the washer is a top-loader. The full counter loses its advantage because it would cover the lid. A shallow side shelf and a portable table outside the room become a better combination. The floor plan stayed the same. The way the washer opens changed which projects fit.
Which Project Should You Do First on a Small Budget?
Start with the purchase you can test for free. Borrow a basket from another room. Put a towel on an existing table and fold one load there. Hang an empty mesh bag from a hook you already own. After one wash day, you’ll know which change saved you a trip or freed a surface.
Spend on permanent hardware when you know what it needs to do. If you air-dry two shirts a week, a folding valet hook may be enough. If you air-dry a whole load of delicates, put the money toward a rack with the right drying area. If your clean basket already sits comfortably under a counter, there’s little value in building a custom pull-out.
For a visual refresh, repair or refinish the surface you see most often. On an open shelf, that might be a chipped front edge. In a laundry closet, it might be the scuffed wall behind the machines. One clean finish and a clear work surface can do more for the room than a set of matching containers.
Frequently Asked Questions
How can I make a windowless laundry closet easier to use?
Look for the spot where your body casts a shadow as you work. If you can’t see the detergent markings or read a care label, a rechargeable task light on a suitable shelf may help. Test the position while standing in the doorway. Choose a light suitable for the location and install it according to its instructions.
Where can I keep an ironing board in a small laundry room?
Measure the board folded, including its feet. Then pick a spot where you can lift it out without hitting the ceiling or knocking another item loose. A holder on a suitable wall can work for a full-size board. If you only press collars or cuffs, a tabletop board that fits in an existing cupboard takes up less room.
Is it worth removing laundry closet doors to gain space?
First, identify what the doors actually block. Bifold doors can hide part of a side shelf even when fully open. Moving the shelf inward may solve that problem with less work. If you plan to change the enclosure, check the appliance installation requirements, including ventilation. In a rental, confirm what changes the owner permits.
How do you organize a laundry room that doubles as a hallway?
Walk through while someone else unloads the dryer. Notice where the second person has to pause or turn sideways. Keep that stretch clear for passing. Put a folding table in the next room or use a basket that leaves with each finished load. In a shared hallway, a project earns its place when the room still works for the person walking through it.







[…] 12 DIY Small Laundry Room Ideas That Make Wash Day Easier […]
[…] 12 DIY Small Laundry Room Ideas That Make Wash Day Easier […]