













How to Hang Curtain Rods? Hanging a curtain rod looks simple until you start measuring.
A rod installed slightly too low can make the window look smaller. One mounted too narrowly may stop the curtains from opening fully. Uneven brackets can leave the rod visibly crooked, and using the wrong fastener can make the entire installation feel unstable.
The good news is that hanging curtain rods becomes much easier when you follow the right order:
Measure → mark → level → choose the right fasteners → install brackets → test the rod → hang the curtains.
Quick Answer
To hang a curtain rod:
- Measure the window.
- Decide how high and how far beyond the window the rod should extend.
- Mark both bracket positions.
- Confirm the marks are level.
- Check whether the screws will enter studs or require suitable wall anchors.
- Drill pilot holes if required.
- Install the brackets securely.
- Place the rod in the brackets.
- Check the rod with a level.
- Hang the curtains and make final adjustments.
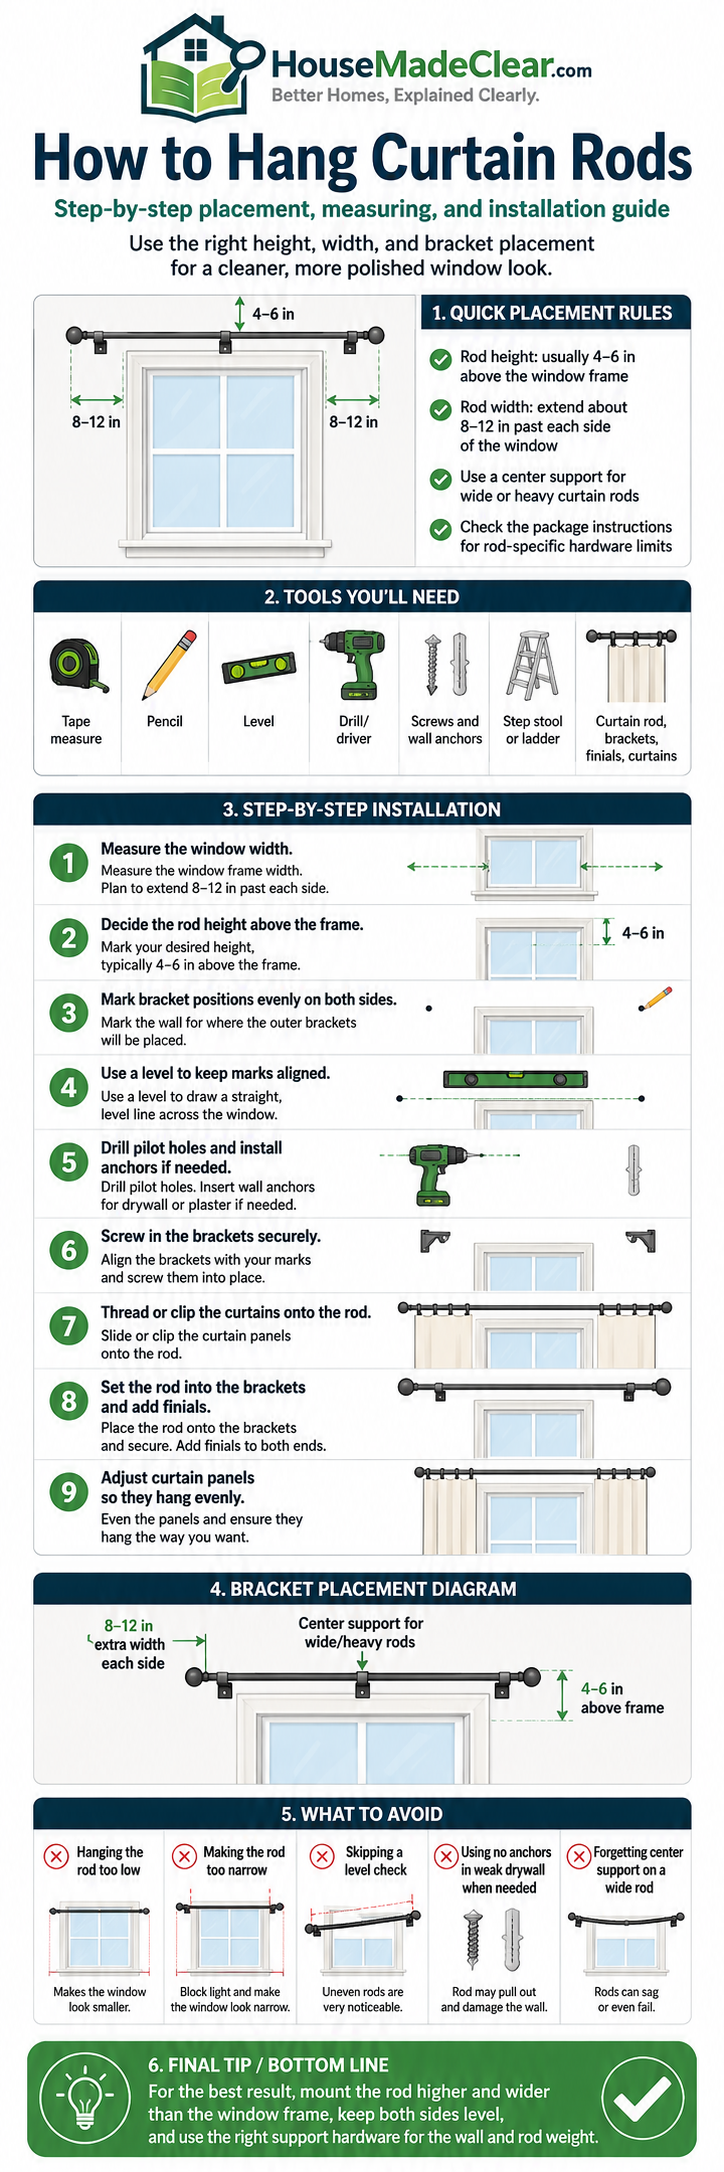
For many standard windows, positioning the rod approximately 4–6 inches above the window frame and extending it roughly 4–8 inches beyond each side where wall space allows is a useful starting point—not a rigid rule.
Exact placement should depend on the window, ceiling height, curtain length and available wall space.
If you are still deciding the vertical position of the rod rather than how to install it, start with House Made Clear’s guide to how high to hang curtains.
What You Need to Hang a Curtain Rod
Gathering everything before you begin makes the installation much easier.
You will typically need:
- Curtain rod
- Curtain rod brackets
- Screws supplied or recommended for the brackets
- Suitable wall anchors if required
- Tape measure
- Pencil
- Level
- Drill
- Appropriate drill bit
- Screwdriver or drill-driver
- Stud finder
- Step ladder
Depending on your wall and curtain system, you may also need:
- Masonry drill bit
- Specialty anchors
- Center support bracket
- Longer screws
- Curtain rings
Do not automatically substitute random screws or anchors for the hardware supplied with the rod.
The correct fastening method depends on:
- Wall material
- Rod weight
- Curtain weight
- Bracket design
Always follow the curtain-rod manufacturer’s installation instructions when they differ from general guidance.
Step 1: Decide Where the Curtain Rod Should Go
Do not start drilling immediately.
The first job is determining the finished position of the rod.
You need to decide:
- Rod height
- Rod width
- Bracket location
These three measurements determine how the entire window treatment will look.
How High Should You Hang a Curtain Rod?
For many standard windows, placing the rod several inches above the upper window frame usually creates a more balanced appearance than mounting it directly on top of the trim.
A useful starting point is around:
4–6 inches above the window frame
where the available wall space and curtain length allow.
Higher placement can make the treatment appear taller.
But there is no reason to force every curtain rod against the ceiling.
Consider:
- Ceiling height
- Crown molding
- Window height
- Curtain length
For detailed measurements for 8-, 9- and 10-foot ceilings, see House Made Clear’s How High Should You Hang Curtains? guide.
How Far Should the Rod Extend Past the Window?
A curtain rod is usually wider than the actual window.
A practical starting point is approximately:
4–8 inches beyond each side
where wall space allows.
Example
Window width:
60 inches
Rod extension:
6 inches each side
Finished rod span:
60 + 6 + 6 = 72 inches
This wider placement gives open curtains somewhere to stack beside the window instead of covering as much of the glass.
Why Rod Width Matters
Suppose you mount the rod exactly as wide as the window.
When the curtains are open, some of the fabric will remain in front of the glass.
That can:
- Reduce visible window area
- Reduce daylight
- Make the treatment feel narrow
A wider rod can make the window treatment appear broader while allowing more fabric to stack against the wall.
But do not extend the rod blindly.
Check for:
- Adjacent walls
- Cabinets
- Light switches
- Furniture
- Artwork
- Another nearby window
Step 2: Measure the Window
Measure the outside width of the window trim or frame.
Write the measurement down.
Example:
Window width = 62 inches
Now decide how far the rod will extend.
If you choose:
6 inches per side
then:
62 + 12 = 74-inch total span
That gives you the approximate distance between the outer ends of the curtain treatment.
Measure Before Buying the Rod
Do not assume every adjustable curtain rod fits every window.
Check the manufacturer’s stated rod range.
For example:
A rod marketed as:
48–84 inches
may work for a 74-inch installation.
But a:
28–48 inch
rod obviously will not.
Also consider whether extending an adjustable rod close to its maximum length affects how rigid it feels.
For very wide installations, a larger or stronger rod may be preferable.
Step 3: Check Curtain Width Before Finalizing Rod Width
Rod installation should also work with your curtain panels.
For many ready-made curtains, a useful starting point is a combined curtain width around 1.5–2 times the finished rod width.
Example:
Rod width = 72 inches
For 1.5× fullness:
72 × 1.5 = 108 inches total fabric
For 2× fullness:
72 × 2 = 144 inches total fabric
If your panels are too narrow, installing a very wide rod may leave the curtains looking stretched when closed.
Before drilling, check House Made Clear’s full guide to how wide curtains should be.
Step 4: Confirm Curtain Length
Rod height affects where the curtains finish at the bottom.
If you already purchased curtains, measure them before setting the rod height permanently.
For most living rooms and bedrooms, curtains usually look best when they:
- Touch the floor
- Float roughly ½–1 inch above it
- Break very slightly
If your curtains are 84 inches long but you mount the rod too high, they may stop several inches above the floor.
If they are 96 inches long and you mount the rod too low, they may drag excessively.
House Made Clear’s guide to whether curtains should touch the floor explains how to coordinate rod height with 84-, 95/96-, 108- and 120-inch curtain lengths.
Step 5: Decide the Bracket Positions
Most curtain rods have:
- Left bracket
- Right bracket
Wide rods may also require:
- Center support bracket
Do not position the bracket at the very end of the rod without checking how the finial and curtain rings need to operate.
Bracket placement should follow the manufacturer’s instructions.
Typically, the outer brackets sit somewhere near the chosen ends of the treatment while allowing enough rod beyond them for:
- Finial
- End stop
- Curtain return where applicable
Create a Bracket Template
If the rod brackets do not include a paper template, you can create your own.
Use:
- Cardboard
- Paper
Mark:
- Screw holes
- Bracket height
Then use the same template on both sides of the window.
This can reduce small positioning errors.
Step 6: Mark the First Bracket
Use a tape measure to locate your first bracket.
For example:
Window top to rod position:
5 inches above
Window side to rod position:
6 inches beyond
Mark the bracket location lightly in pencil.
Do not drill yet.
Step 7: Mark the Second Bracket
Repeat the same measurement on the opposite side.
Do not simply measure from the floor.
Floors and ceilings are not always perfectly level.
It is better to establish the rod position relative to:
- Window
- First bracket
then verify with a level.
Step 8: Make Sure the Curtain Rod Will Be Level
This is one of the most important steps.
Place a long level or laser level between the bracket marks.
Confirm that both sides line up.
A rod that is only slightly crooked can be surprisingly noticeable once long curtains are hanging from it.
Should You Measure From the Ceiling?
You can use the ceiling as a reference, but do not rely on it exclusively.
In older homes:
- Ceilings can slope
- Window trim can be uneven
- Floors can be uneven
The goal is for the finished curtain treatment to look level.
Use an actual level.
Should You Measure From the Floor?
Again, not by itself.
If the floor slopes slightly, matching the exact floor distance on both sides could make the rod itself crooked.
Use:
- Window measurement
- Level
- Finished curtain length
together.
Step 9: Find the Wall Studs
Before drilling, determine what is behind the planned bracket locations.
A stud finder can help identify wood framing behind drywall.
If a bracket can be fastened securely into a stud, that can provide a strong mounting point.
But the ideal visual bracket location does not always line up with a stud.
That is where appropriate wall anchors may be necessary.
Do Curtain Rods Have to Be Mounted Into Studs?
Not always.
Many curtain rods are installed in drywall using properly selected anchors when studs are not located at the required bracket positions.
However, the correct fastener depends on:
- Wall material
- Curtain weight
- Rod weight
- Bracket
- Manufacturer requirements
Do not assume a lightweight plastic anchor is suitable for every rod installation.
Heavy curtains may require more substantial fastening.
When Stud Mounting Is Particularly Useful
Try to use secure framing when practical for:
- Very long rods
- Heavy blackout curtains
- Heavy velvet curtains
- Double rods
- Layered curtains
- Frequently operated curtains
The wider and heavier the treatment, the more important the mounting system becomes.
Step 10: Identify Your Wall Type
Before choosing fasteners, determine whether you are drilling into:
- Drywall
- Plaster
- Wood
- Masonry
- Concrete
- Tile
Each may require a different installation method.
Hanging Curtain Rods on Drywall
For drywall, you may have two basic situations.
Bracket Over a Stud
A suitable screw may be able to fasten directly into the framing.
No Stud Behind Bracket
You may need a suitable hollow-wall anchor.
The anchor must be appropriate for:
- Wall thickness
- Load
- Screw size
Use the hardware manufacturer’s instructions.
Hanging Curtain Rods on Plaster Walls
Older plaster walls require more care.
Plaster can:
- Crack
- Chip
- Be thicker than drywall
A stud finder may also behave differently depending on wall construction.
Avoid forcing large screws without understanding what is behind the plaster.
For older or uncertain construction, a professional may be worthwhile—especially for heavy curtains.
Hanging Curtain Rods on Brick or Concrete
Masonry installation usually requires:
- Masonry-compatible drill bit
- Appropriate masonry fastener or anchor
Do not use ordinary drywall anchors in solid masonry.
The rod manufacturer’s instructions may specify compatible fasteners.
If you are unfamiliar with drilling into masonry, professional installation may be the safer choice.
Hanging Curtain Rods on Wood
Mounting into solid wood can be straightforward.
Possible examples include:
- Wood trim
- Solid wood wall
- Exposed framing
Use screws appropriate for the hardware and wood thickness.
Avoid mounting heavy rods into thin decorative trim unless the structure behind it can properly support the load.
Can You Hang a Curtain Rod on Window Trim?
You can in some situations, but wall mounting often gives you more flexibility to position the curtains:
- Higher
- Wider
than the window frame itself.
Mounting directly to trim may also limit your ability to create the taller/wider visual effect used with many modern curtain installations.
Step 11: Mark the Screw Holes
Hold the bracket against the wall at your marked position.
Check:
- Height
- Level
- Orientation
Then mark each screw hole.
Repeat on the other side.
If there is a center bracket, mark that too.
Step 12: Drill Pilot Holes if Required
A pilot hole can make screw placement easier and more accurate.
Use the drill bit size recommended for:
- Screw
- Anchor
- Wall material
Do not make the hole larger than required.
An oversized hole can reduce how securely an anchor grips.
Step 13: Install Wall Anchors if Required
If your installation requires anchors:
- Drill the correctly sized hole.
- Insert anchor according to manufacturer directions.
- Make sure it seats properly.
- Install screw through bracket.
Do not reuse damaged anchors.
If an anchor spins freely in the wall or does not tighten correctly, stop and correct the installation rather than hanging the rod anyway.
Step 14: Attach the First Bracket
Position the first bracket over the prepared holes.
Insert screws.
Tighten until secure.
Do not overtighten to the point that you:
- Damage drywall
- Strip screw
- Deform bracket
The bracket should sit firmly against the wall without movement.
Step 15: Attach the Second Bracket
Install the opposite bracket the same way.
Before tightening everything completely, confirm the bracket orientation matches the first side.
This is particularly important with brackets that have:
- Adjustable arms
- Decorative shapes
- Front and rear rod positions
Step 16: Install the Center Support Bracket
Wide rods often need a center support.
Do not skip it merely because the rod appears straight before the curtains are installed.
Once fabric weight is added, an unsupported rod can sag.
Use the manufacturer’s recommendation for:
- Maximum unsupported span
- Number of brackets
Do not invent your own support spacing if the rod instructions specify it.
Where Should the Center Bracket Go?
For a symmetrical two-panel curtain arrangement, it normally sits near the center of the rod.
Before fastening it, check whether:
- Curtains need to travel across the center
- Rod design allows center movement
- One large panel will cross the bracket
Some curtain systems are designed differently.
Follow the hardware design.
Step 17: Assemble the Curtain Rod
Adjustable rods may consist of:
- Inner tube
- Outer tube
- Finials
- Connectors
Assemble the rod according to the instructions.
Do not fully tighten telescoping sections until you confirm the final length.
Step 18: Put Curtain Rings or Panels on the Rod
Depending on curtain style, you may need to add the fabric before placing the rod into the brackets.
Grommet Curtains
Slide the rod through the grommets.
Rod-Pocket Curtains
Feed the rod through the pocket.
Curtain Rings
Slide rings onto the rod before installing the finial.
Pinch-Pleat Curtains
Hooks usually attach to curtain rings or carriers.
Make sure the panel orientation is correct before lifting the rod into place.
Step 19: Place the Rod in the Brackets
Carefully set the rod into the supports.
If it is a long rod, having another person help can prevent:
- Wall damage
- Bent rod
- Dropped hardware
Do not let the rod scrape the wall.
Step 20: Check the Rod With a Level
Once the rod is sitting in the brackets:
- Place level on top.
- Check horizontal alignment.
- Stand back.
- Look at the rod relative to window and ceiling.
If it is not level, correct the bracket before finishing.
Do not assume the curtains will hide a crooked rod.
They often make it more obvious.
Step 21: Tighten Bracket Set Screws
Some brackets have small screws that hold the rod in place.
Tighten them according to the manufacturer instructions.
These can prevent the rod from:
- Sliding
- Rotating
- Lifting during curtain operation
Step 22: Install the Finials
Finials are decorative end pieces.
Depending on the rod, they may:
- Screw on
- Push in
- Tighten with set screw
Install both.
Make sure they do not interfere with:
- Wall
- Corner
- Furniture
Step 23: Hang and Arrange the Curtains
Once everything is secure, arrange the curtain folds.
For two panels:
- One panel left
- One panel right
Check that they:
- Meet comfortably in center
- Hang evenly
- Reach correct floor position
- Open without catching
Step 24: Check Curtain Length Again
Now that the curtain is hanging, inspect the bottom.
Does it:
- Float
- Touch
- Break
- Puddle
as intended?
If not, possible adjustments include:
- Raising/lowering bracket slightly
- Changing ring position
- Hemming curtains
Do not make permanent alterations until the curtains have been fully hung and allowed to settle.
How to Hang Curtain Rods Without a Level
A level is strongly recommended.
If you do not own one, many smartphones include level functions, but a physical level is usually easier for long installations.
You can also:
- Measure bracket-to-bracket height carefully
- Check relative to window
But visual references alone are less reliable.
For a permanent installation, buying or borrowing an inexpensive level is worthwhile.
How to Hang Curtain Rods Evenly
To keep brackets even:
- Create one measurement system.
- Use a template.
- Mark both sides.
- Use a level.
- Check before drilling.
Do not measure one side from:
window frame
and the other from:
ceiling
because small building irregularities can create different heights.
How to Hang Curtain Rods on a Wide Window
Wide windows require extra attention to rod strength.
Check whether the rod requires:
- Center bracket
- Multiple support brackets
- Larger diameter rod
Long telescoping rods can sag under heavy fabric.
For a large opening, the hardware should be chosen for the span rather than only for its appearance.
How to Hang Curtain Rods for Blackout Curtains
Blackout curtains can be heavier than lightweight decorative panels.
Pay attention to:
- Rod strength
- Bracket strength
- Wall fastening
- Center support
For light control, you may also want the rod to extend sufficiently beyond the sides of the window.
Curtain width matters too.
If blackout panels are too narrow, light may enter around the edges and center.
See House Made Clear’s curtain width guide for calculating adequate fullness.
How to Hang Curtain Rods for Sheer Curtains
Sheers are generally much lighter.
But the visual measurements remain important.
Consider:
- Higher rod placement
- Wider rod
- More fullness
Lightweight sheers often look better with generous gathering.
How to Hang a Double Curtain Rod
A double rod supports two layers.
Common arrangement:
Rear Rod
Sheer or light-filtering curtain
Front Rod
Main decorative or blackout curtain
Double rods carry more total fabric, so secure installation becomes even more important.
Follow the manufacturer’s bracket and fastener requirements.
How Far Apart Should Double Curtain Rods Be?
The exact spacing depends on the bracket system.
You need enough separation so:
- Rear curtain hangs freely
- Front curtain does not crush it
Most double-rod hardware has fixed or adjustable spacing.
Use the designed configuration instead of improvising.
How to Hang Curtain Rods Over Blinds
Curtains and blinds are commonly layered.
Before installing the rod, check whether:
- Blind sits inside window frame
- Blind sits outside frame
- Blind valance projects outward
The curtain rod needs enough projection from the wall that the curtain can move without rubbing heavily against the blind.
Adjustable curtain brackets are useful here.
How Far Should a Curtain Rod Stick Out From the Wall?
This is called projection or return distance.
The rod needs to sit far enough from the wall for the curtains to clear:
- Window trim
- Blinds
- Shades
- Handles
There is no universal number.
Use the bracket’s adjustable depth and the specific window treatment.
How to Hang Curtain Rods in a Corner
Corner windows require careful planning because finials and curtain stacks can collide.
Possible solutions include:
- Separate rods
- Corner connector
- Specialty track
Measure both window treatments together before drilling.
A standard rod with large decorative finials may not fit into a tight corner.
How to Hang Curtain Rods Near the Ceiling
High-mounted rods can create a taller appearance, but installation becomes less forgiving.
Check:
- Crown molding
- Ceiling clearance
- Finial clearance
- Curtain length
Do not install brackets so close to the ceiling that:
- Rod cannot be removed
- Finial hits molding
- Curtain rings cannot move
Should Curtain Rods Be Mounted Halfway Between the Window and Ceiling?
Sometimes, but not as a universal rule.
If there is substantial wall space above the window, a position around the middle can create balanced proportions.
For shorter distances, placing the rod several inches above the frame may make more sense.
The exact height depends on the room.
Should Curtain Rod Brackets Be Outside the Window Frame?
For most modern floor-length installations, yes.
Mounting brackets outside the frame allows:
- Wider rod
- More stack-back
- Larger-looking window
Mounting directly onto the frame can still be appropriate for:
- Specialty windows
- Limited wall space
- Specific hardware
How Far From the Window Should Curtain Rod Brackets Be?
If the rod extends around 4–8 inches beyond each side, the brackets will typically be positioned within that general outer area depending on the rod design.
Do not confuse:
Rod extension
with
exact bracket location.
The finial and rod end often continue beyond the bracket.
Follow the hardware instructions.
Should Curtain Rod Brackets Be the Same Distance From the Window?
Usually, yes.
For a symmetrical window:
Left extension = right extension
creates a balanced appearance.
For example:
6 inches left
6 inches right
But asymmetrical architecture may require adjustment.
A window near a corner may have much less wall space on one side.
How to Hang Curtain Rods With Uneven Windows
Some window frames are not perfectly level.
If you align the rod entirely with the frame, the rod may also look crooked.
Instead:
- Use a level for rod.
- Check how it visually relates to window.
- Adjust slightly if required.
The rod itself should generally be level.
How to Hang Curtain Rods With Uneven Ceilings
Do not follow a sloped ceiling line.
Use a level.
The curtain treatment should normally appear horizontal even when the architecture is slightly imperfect.
How to Hang Curtain Rods in an Apartment
Renters should first check:
- Lease
- Landlord requirements
- Rules regarding wall holes
If drilling is allowed, use an installation appropriate for the wall type.
If not, you may need a non-drilling curtain solution.
Do not assume adhesive products can safely support a conventional heavy curtain rod.
Can You Hang Curtain Rods Without Drilling?
Sometimes.
Options include:
- Tension rods
- Specialty no-drill brackets
- Some adhesive systems designed for specific lightweight applications
But load limits matter.
A no-drill system suitable for a lightweight sheer may not support:
- Heavy blackout curtains
- Wide rod
- Double-layer curtains
Follow the manufacturer’s rated application and load limits.
Tension Rod vs Wall-Mounted Curtain Rod
Tension Rod
Advantages:
- No drilling
- Easy removal
Best for:
- Light curtains
- Inside-frame installation
- Rental situations
Wall-Mounted Rod
Advantages:
- More placement flexibility
- Supports wider window treatment
- Better for floor-length curtains
For a primary living-room or bedroom window, wall-mounted rods generally offer more design flexibility.
Can You Install a Curtain Rod by Yourself?
Yes, especially on a small or standard window.
For long rods, a second person can make installation easier.
Help is particularly useful when:
- Rod is very long
- Curtains are heavy
- Ladder work is required
- Rod needs center support
Do not overreach from a ladder.
Move the ladder instead.
How Long Does It Take to Hang a Curtain Rod?
A straightforward installation may take around:
30–60 minutes
once measurements and tools are ready.
More complex situations may take longer, including:
- Masonry
- Plaster
- Wide windows
- Double rods
- Multiple support brackets
Taking additional time to measure properly is better than repairing misplaced holes later.
Common Curtain Rod Installation Mistakes
1. Installing the Rod Too Low
Problem:
Window can appear shorter.
Better approach:
Plan height before drilling.
2. Rod Is Too Narrow
Problem:
Open curtains cover too much glass.
Better approach:
Extend rod beyond window where possible.
3. Measuring From Only One Reference Point
Problem:
Brackets end up uneven.
Better approach:
Mark and level both sides.
4. Skipping the Level
Problem:
Rod looks crooked.
Better approach:
Use a real level.
5. Using the Wrong Wall Anchors
Problem:
Brackets may become loose.
Better approach:
Match fastening method to wall and load.
6. Skipping the Center Bracket
Problem:
Wide rod can sag.
Better approach:
Follow rod manufacturer’s support requirements.
7. Buying Curtains Before Planning Rod Height
Problem:
Curtains end too short or long.
Better approach:
Coordinate dimensions.
8. Ignoring Curtain Fullness
Problem:
Panels look flat after wide rod installation.
Better approach:
Calculate panel width.
9. Installing Rod Before Checking Window Treatments
Problem:
Rod interferes with blinds.
Better approach:
Check wall projection.
10. Tightening Everything Before Checking Level
Problem:
Adjustment becomes harder.
Better approach:
Verify alignment first.
Step-by-Step Curtain Rod Installation Checklist
Before Drilling
- Window width measured
- Rod height decided
- Rod extension decided
- Curtain length checked
- Curtain width checked
- Wall type identified
- Stud positions checked
- Fasteners selected
- Center support requirements checked
During Installation
- First bracket marked
- Second bracket marked
- Level checked
- Screw holes marked
- Pilot holes drilled
- Anchors installed if required
- Brackets tightened
- Center support installed
After Installation
- Rod assembled
- Curtains added
- Rod placed in brackets
- Level checked again
- Set screws tightened
- Finials installed
- Curtain length checked
- Curtain width checked
- Panels tested open and closed
Curtain Rod Placement Example
Suppose you have:
60-inch-wide window
You choose:
5 inches above frame
and
6 inches beyond each side
Then:
Rod span =
60 + 6 + 6
= 72 inches
You would plan brackets according to the rod design around that finished span.
For curtain width:
72 × 1.5 = 108 inches
to
72 × 2 = 144 inches
total curtain fabric.
If the hanging point to floor is:
96 inches
you might choose curtains around:
95–96 inches finished length
depending on whether you want a slight float or exact floor touch.
This is why the best curtain installations coordinate:
height + width + length + hardware
before drilling.
Quick Curtain Rod Installation Box
The simplest method
1. Measure the window
2. Plan the rod several inches above the frame
3. Extend it beyond each side
4. Check curtain length
5. Mark both brackets
6. Level the marks
7. Identify studs/wall type
8. Install suitable fasteners
9. Attach brackets
10. Install rod and curtains
11. Check level again
Never drill the first bracket before you know exactly where the second bracket needs to go.
Curtain Rod Measurement Checklist
Before purchasing or installing your rod, confirm:
- Window width
- Window height
- Ceiling height
- Rod height
- Rod extension
- Total rod span
- Bracket location
- Rod projection
- Curtain panel width
- Curtain panel length
- Curtain heading
- Curtain weight
- Wall construction
- Stud location
- Anchor requirements
- Center support requirement
- Blind/shade clearance
- Furniture clearance
- Finial clearance
How Curtain Rod Installation Fits Into the Complete Curtain Setup
A complete curtain installation has four separate decisions.
1. Where Should the Rod Go?
Read: How High Should You Hang Curtains?
2. How Wide Should the Curtains Be?
Read: How Wide Should Curtains Be?
3. Where Should the Curtain End?
Read: Should Curtains Touch the Floor?
4. How Do You Install the Hardware?
That is the purpose of this guide.
Treating these as separate decisions prevents common mistakes such as mounting a perfectly level rod only to discover that:
- Curtains are too short
- Panels are too narrow
- Rod is too close to window
Final Thoughts
Hanging curtain rods successfully is less about drilling holes and more about getting the measurements right before drilling begins.
The most reliable process is:
- Plan the rod height
- Plan the rod width
- Confirm curtain length
- Confirm curtain fullness
- Mark both brackets
- Level everything
- Choose appropriate fasteners
- Install and test
For many standard windows, starting around 4–6 inches above the frame and 4–8 inches beyond each side can create balanced proportions where the architecture allows.
But these are starting points, not mandatory measurements.
Your final placement should account for:
- Ceiling height
- Curtain length
- Wall space
- Window size
- Furniture
- Hardware design
Most importantly, do not guess at the wall fastening.
Whether you are mounting into:
- Drywall
- Stud
- Plaster
- Masonry
use hardware appropriate for the wall and the weight of the complete curtain system.
Once the rod is securely installed, the remaining details—curtain height, width and floor clearance—work together to create a window treatment that looks intentional rather than improvised.
Frequently Asked Questions
How do you hang a curtain rod correctly?
Measure the window, decide the rod height and extension, mark both bracket positions, check them with a level, choose fasteners appropriate for the wall, install the brackets securely and then place the rod and curtains into position.
How high should curtain rods be hung?
For many standard windows, around 4–6 inches above the window frame is a useful starting point. The exact position should depend on ceiling height, curtain length and available wall space.
How far should curtain rods extend past the window?
Approximately 4–8 inches beyond each side is a practical starting range where space allows. Wider placement gives open curtains more room to stack away from the glass.
Do curtain rods need to be installed into studs?
Not always. If studs are unavailable at the required bracket positions, suitable wall anchors may be used depending on the wall construction and curtain weight. Follow the rod and fastener manufacturer’s instructions.
Do you need wall anchors for curtain rods?
You may need them when mounting into drywall or another hollow wall where the bracket screws do not enter secure framing. The appropriate anchor depends on wall type and load.
How do you make sure a curtain rod is level?
Mark both bracket locations and use a long spirit level or laser level before drilling. Check the rod again after placing it in the brackets.
Do long curtain rods need a center bracket?
Many long rods require a center support to prevent sagging, especially with heavy curtains. Follow the manufacturer’s maximum unsupported-span recommendations.
Can you hang curtain rods without drilling?
Yes, some tension rods and specialty no-drill systems can work for lighter curtains. Always follow the product’s installation and load-limit instructions.
Should I install the curtain rod before buying curtains?
Ideally, plan the rod position first and measure the final hanging point before choosing curtain length. You can buy components together, but the measurements should be coordinated before installation.
Should curtain rods be wider than the window?
Usually, yes. Extending the rod beyond the window allows curtains to stack partly against the wall when open and can expose more of the glass.
How do you hang curtain rods over blinds?
Use brackets with enough wall projection for the curtain to clear the blind, shade or valance. Measure how far the existing window treatment projects before selecting the rod brackets.
Can one person hang a curtain rod?
Yes, most standard curtain rods can be installed by one person. Very long rods, heavy curtains or installations requiring ladder work may be easier and safer with another person assisting.