







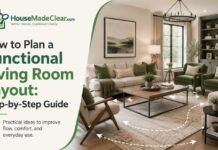




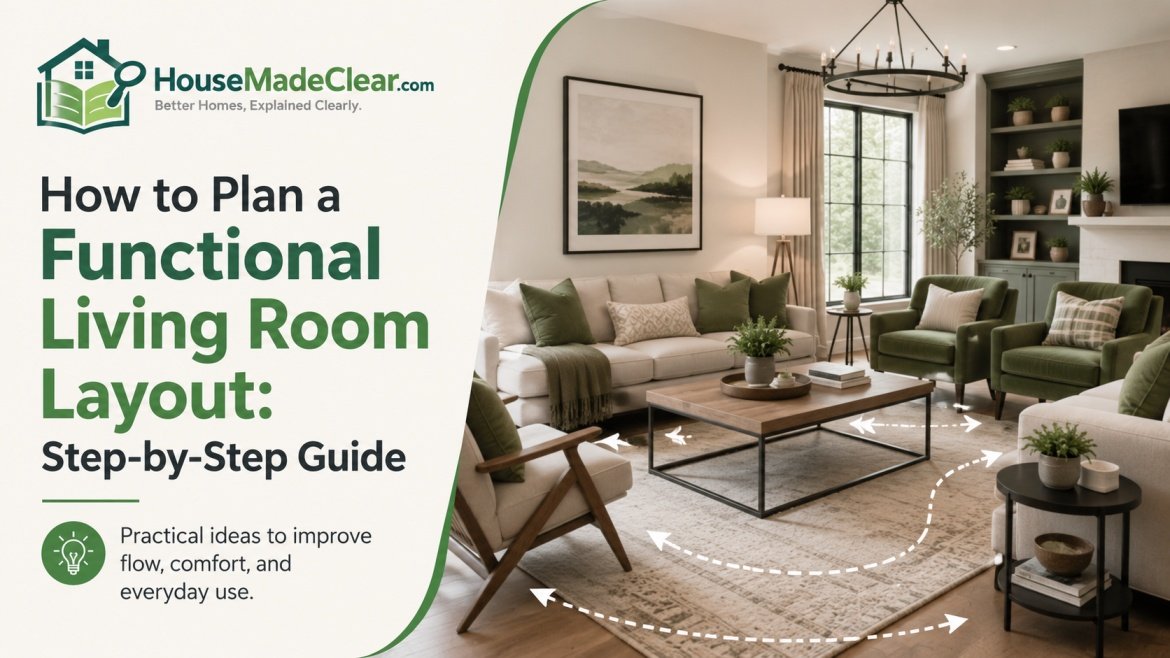
A living room can contain attractive furniture and still feel awkward to use.
The sofa may block the easiest route through the room. A coffee table may sit too close to the seating. A large sectional may overwhelm the available floor space, while an undersized rug can make every piece feel disconnected.
These problems usually begin before decorating. They happen when furniture is selected before the room’s fixed features, movement patterns, measurements and daily functions are understood.
A functional living room layout should support:
- Comfortable movement
- Conversation
- Television viewing where relevant
- Natural and artificial lighting
- Accessible tables and storage
- Children, older adults, guests and pets
- The household’s actual daily activities
Quick Answer
Start by measuring the room, fixed features and delivery route. Decide how the room will be used, identify the main walking paths and choose a focal point. Position the sofa or sectional first, then add chairs, tables, rugs, lighting and storage.
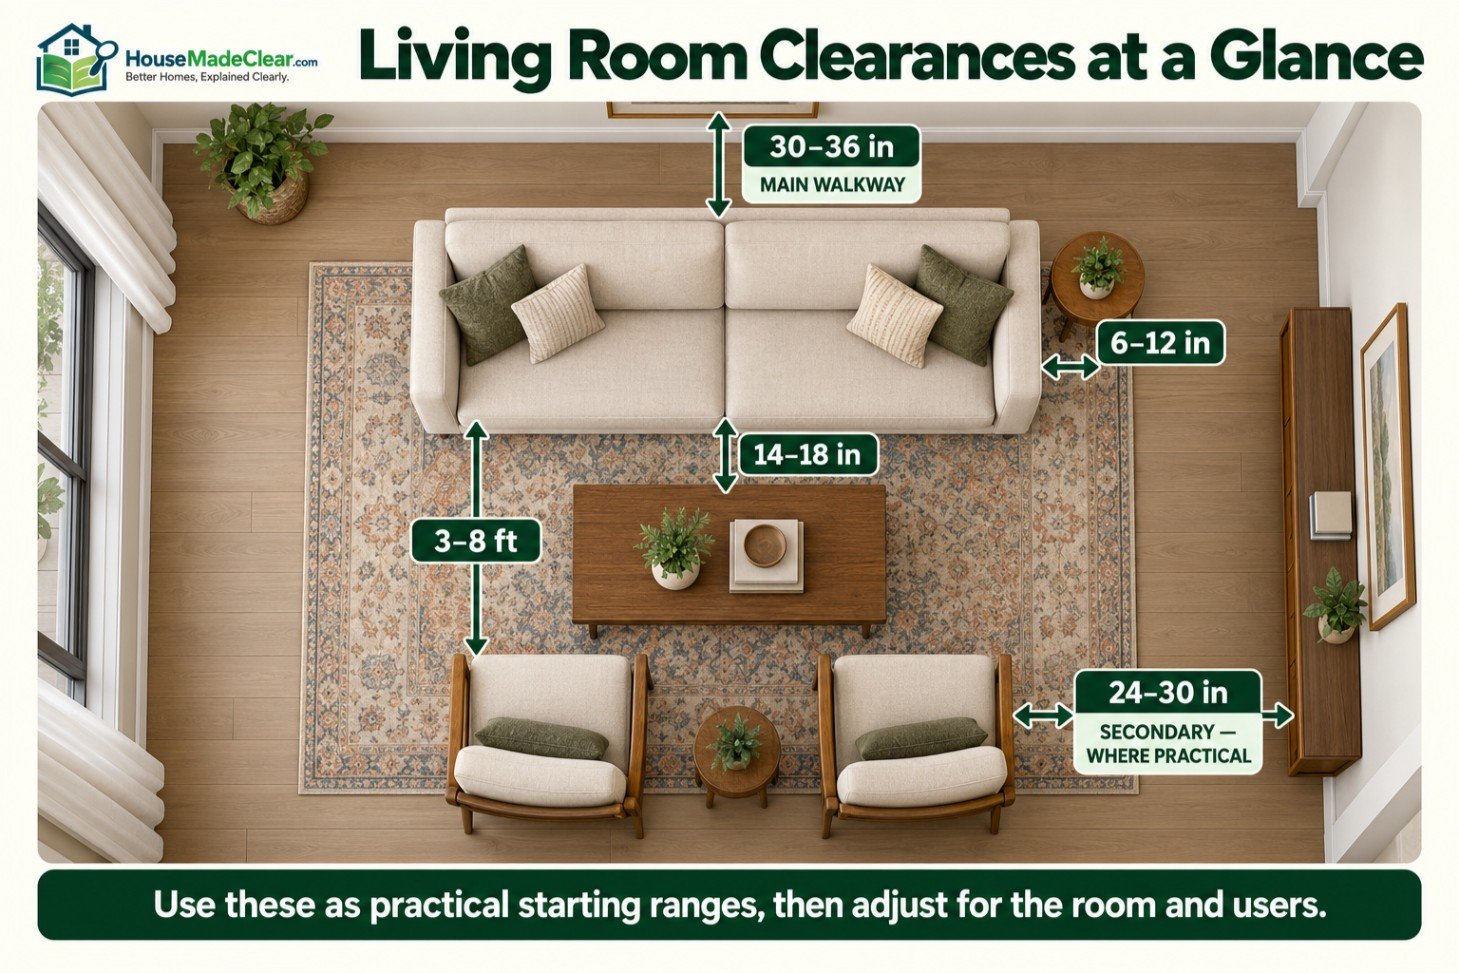
Useful planning dimensions include:
- Main walkway: approximately 30–36 inches
- Secondary passage: approximately 24–30 inches where practical
- Sofa to coffee table: approximately 14–18 inches
- Facing conversation seating: commonly about 3–8 feet apart
- Coffee-table length: approximately one-half to two-thirds of the sofa width
- Coffee-table height: around the sofa-seat height or up to 1–2 inches lower
These are practical residential planning ranges, not universal building-code requirements. Adapt them to the room, furniture and users.
Living Room Planning Guides
This page is the starting point for the complete House Made Clear living-room planning series. Use the supporting guides below when you reach each furniture decision.
| Planning question | Detailed guide |
|---|---|
| How large is a standard sofa? | Couch dimensions and standard sofa sizes |
| How much room depth will the couch use? | Standard couch depth and seat depth |
| What size is a two-person loveseat? | Standard loveseat dimensions |
| How large is an L-shaped, U-shaped or chaise sectional? | Standard sectional sofa dimensions |
| What coffee-table length and width should you choose? | Standard coffee-table sizes |
| How high should a coffee table be? | Standard coffee-table height |
| How much space belongs between the sofa and table? | Sofa-to-coffee-table clearance guide |
| What rug size fits the furniture arrangement? | Standard rug sizes by room and layout |
The hub and supporting guides have different purposes. This article explains the complete room-planning process. The linked guides provide detailed dimensions for individual furniture categories.
Living Room Clearances at a Glance
| Furniture relationship | Practical starting range | Primary purpose |
|---|---|---|
| Sofa to coffee table | 14–18 inches | Seated reach and legroom |
| Main walkway | 30–36 inches | Frequent movement |
| Secondary passage | 24–30 inches where practical | Occasional movement |
| Facing conversation seating | Approximately 3–8 feet | Conversation and central furniture |
| Rug beyond sofa ends | Approximately 6–12 inches | Visual balance |
| Coffee-table length | About one-half to two-thirds of sofa width | Proportion and reach |
| Coffee-table top | Level with sofa seat or 1–2 inches lower | Comfortable use |
| Dining rug beyond table | Approximately 24–30 inches | Pulled-out chair support |
| Sofa behind a walkway | Approximately 30–36 inches | Regular passage behind seating |
Treat these as planning ranges rather than fixed rules. Recliners, mobility aids, children, pets and unusual furniture may require more space.
What Makes a Living Room Layout Functional?
A functional layout is not simply symmetrical or visually attractive. It allows people to enter, sit, talk, watch television, reach tables, use storage and leave without repeatedly moving around obstacles.
Five elements matter most.
Clear Circulation
People should be able to move between doors and connected spaces without squeezing around furniture.
The room may need routes between:
- The entrance and seating
- The living room and kitchen
- The living and dining areas
- The sofa and balcony
- Seating and storage
- Seating and light switches
- The room and an adjoining hallway
A practical starting width for an important household walkway is approximately 30 to 36 inches. More space may be needed where people pass each other or use mobility equipment.
Correct Furniture Scale
A piece of furniture may technically fit inside the room while still being too large for the layout.
Furniture scale includes:
- Width
- Overall depth
- Height
- Seat depth
- Arm thickness
- Visual weight
- Reclining clearance
- Drawer or door movement
- Delivery dimensions
A deep sofa or projecting chaise can consume substantially more usable space than its showroom appearance suggests.
Comfortable Conversation
People should be able to face each other without sitting uncomfortably close or speaking across the full room.
Conversation usually works better when seating forms a defined group instead of lining every wall.
Accessible Tables, Lighting and Storage
A functional room should provide reachable places for:
- Drinks
- Books
- Lamps
- Remote controls
- Charging
- Everyday storage
Adding more furniture is not always the solution. One correctly positioned table may be more useful than several surfaces placed beyond comfortable reach.
A Clear Visual Focus
A living room may focus on:
- Conversation
- Television
- Fireplace
- Window or view
- Artwork
- Bookshelves
- Music
- Multipurpose family use
The focal point should reflect how the room is actually used.
Step 1: Decide How the Living Room Will Be Used
Do not begin with the sofa position. Begin with the room’s purpose.
List every regular activity that takes place there:
- Everyday family seating
- Television and gaming
- Reading
- Hosting guests
- Children’s play
- Working from home
- Music
- Access to a garden or balcony
- Dining in an open-plan layout
- Storage
- Exercise
- Quiet relaxation
The IKEA living-room planning guidance similarly recommends considering how people use the space before choosing furniture.
Rank the Uses
Separate activities into three groups.
| Use | Priority |
|---|---|
| Essential | Must work every day |
| Regular | Used several times a week |
| Occasional | Needed only sometimes |
For example:
| Activity | Priority |
|---|---|
| Family seating | Essential |
| Television | Essential |
| Reading | Regular |
| Children’s play | Regular |
| Guest seating | Occasional |
| Working from home | Occasional |
An occasional activity should not control the entire room.
Define the Main Users
Consider:
- Number of regular occupants
- Typical number of guests
- Children’s ages
- Pets
- Older adults
- Mobility needs
- Preferred sitting positions
- Storage requirements
- Cleaning routine
A household that watches films together has different needs from one that mainly uses the room for reading and conversation.
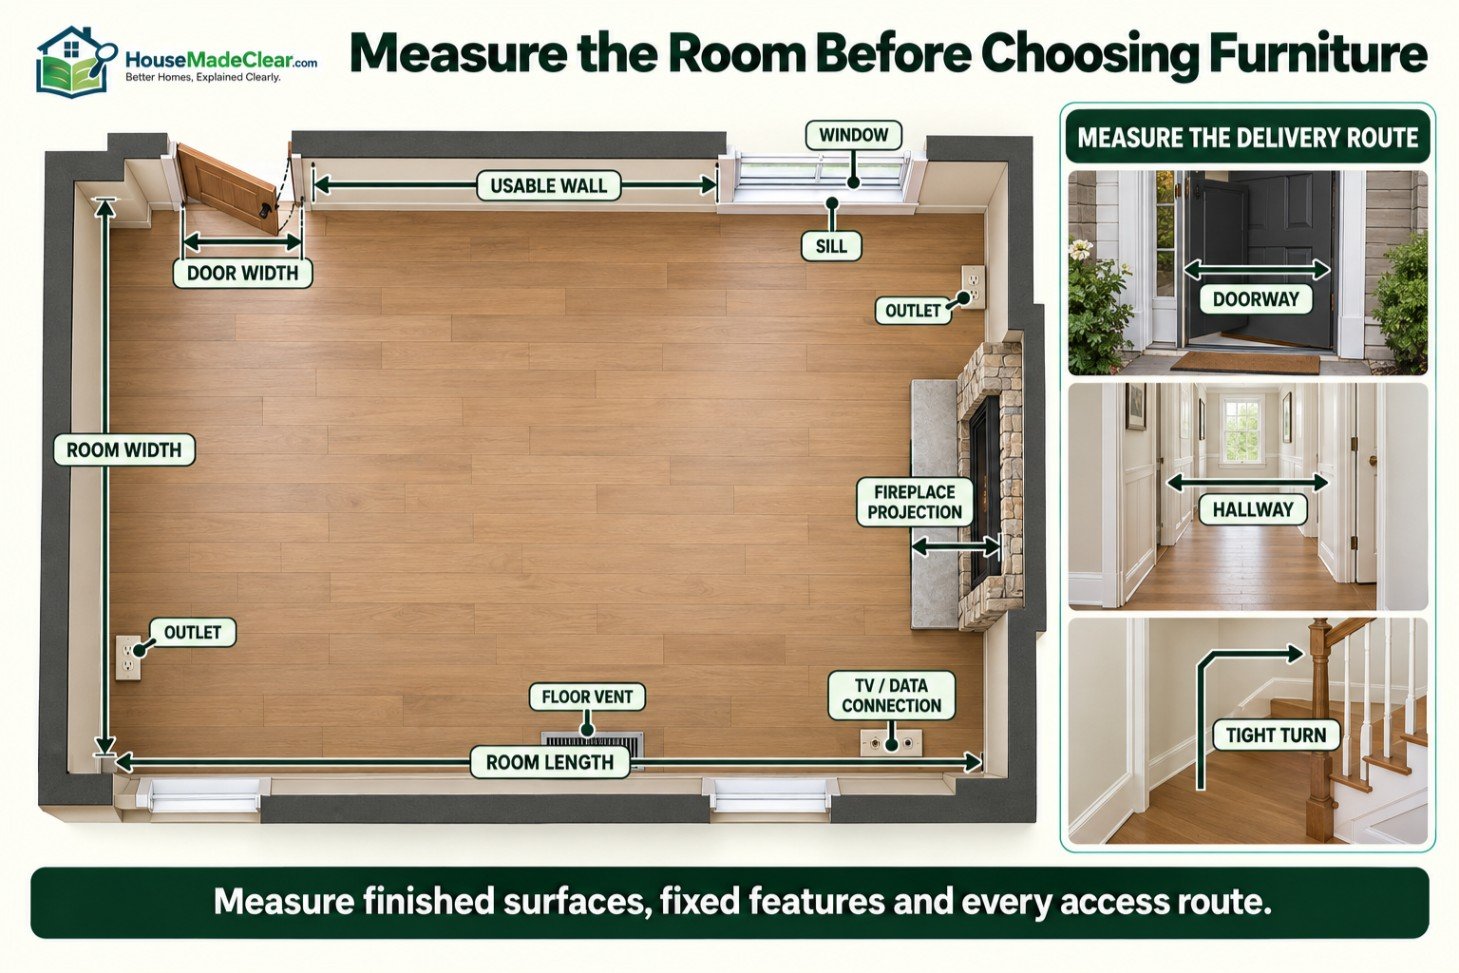
Step 2: Measure the Room Properly
Measure before choosing or moving furniture.
Record:
- Overall room length
- Overall room width
- Ceiling height
- Wall lengths between openings
- Door widths
- Door swings
- Window positions
- Window-sill heights
- Fireplace projection
- Built-in furniture
- Radiators and heaters
- Floor and wall vents
- Electrical outlets
- Television and data connections
- Columns, recesses and sloped ceilings
Measure finished surfaces rather than assuming that the floor plan reflects the completed room exactly.
Measure Access Routes
Furniture must pass through:
- Exterior doors
- Hallways
- Staircases
- Elevators
- Interior doorways
- Tight corners
A sofa that fits the destination room can still fail to reach it. The Pottery Barn furniture-measuring guide recommends checking every passageway as well as the destination.
Record the dimensions of the largest individual piece, including its diagonal depth where provided.
Measure Existing Furniture
Record the complete exterior dimensions of every piece you plan to keep:
- Width
- Depth
- Height
- Seat height
- Arm width
- Open drawer depth
- Reclined depth
- Extended footrest
- Open sleeper dimensions
Do not measure only the usable seat or tabletop.
Draw a Scaled Floor Plan
Use:
- Graph paper
- A digital room planner
- Paper furniture cutouts
- A spreadsheet grid
- Painter’s tape
- Cardboard templates
Choose one scale and use it consistently.
Mark fixed features before adding movable furniture.
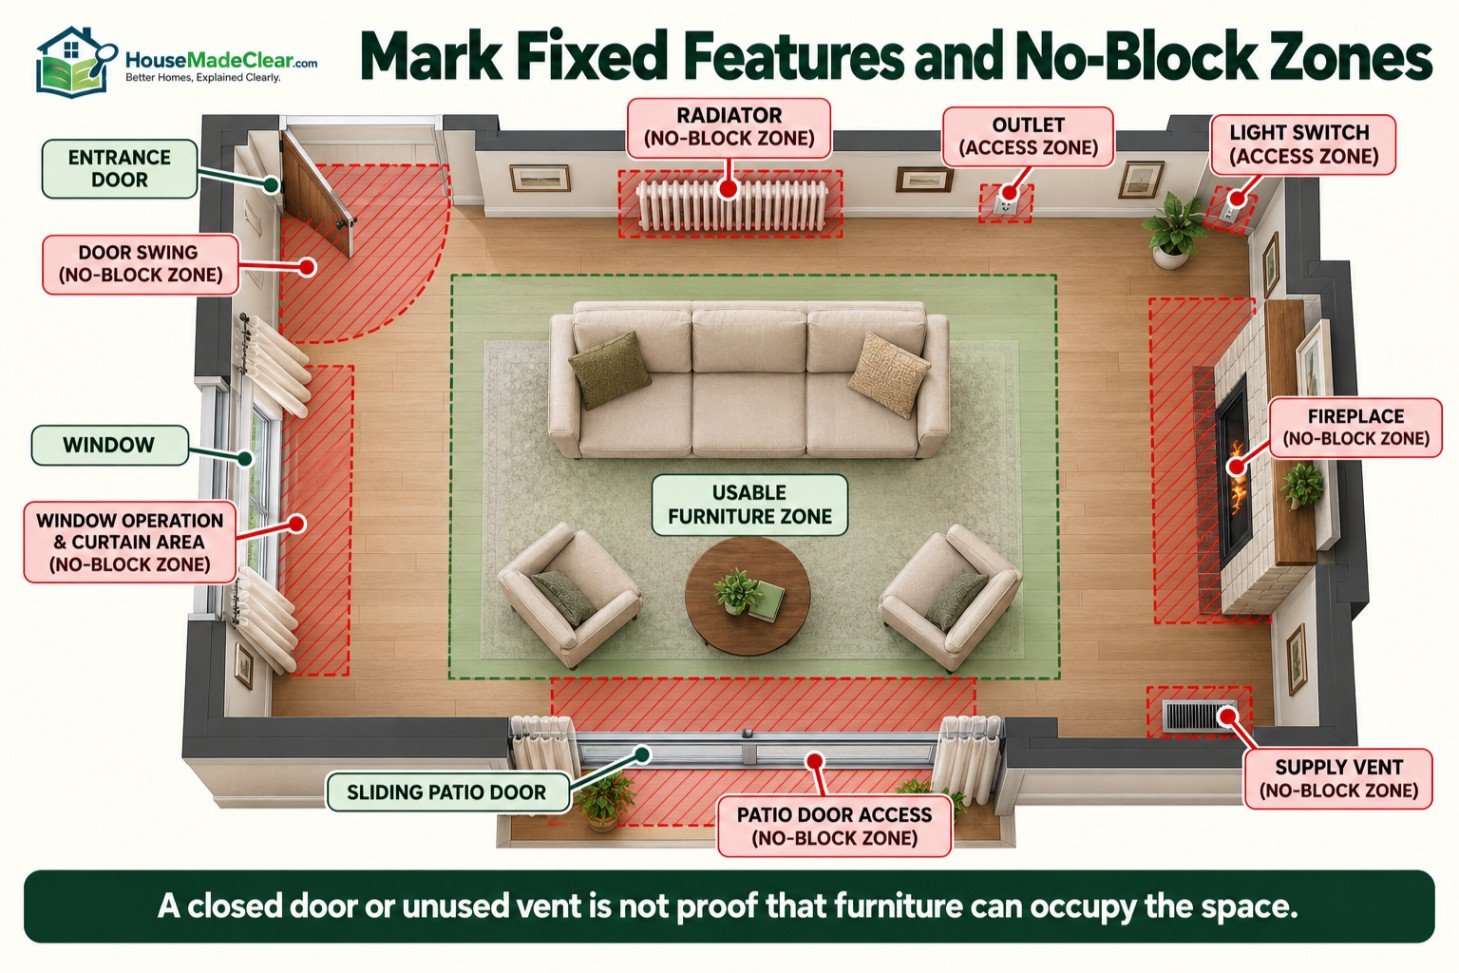
Step 3: Identify Fixed Features and No-Block Zones
Some room features cannot be moved easily.
Mark:
- Doors
- Windows
- Fireplaces
- Radiators
- Vents
- Built-ins
- Columns
- Outlets
- Switches
- Television connections
- Balcony or patio access
Check Every Door Swing
Draw the full movement of each door.
Check whether furniture blocks:
- The entrance
- Closet doors
- Cabinet doors
- Balcony doors
- Media-unit doors
- Storage drawers
A narrow gap beside a closed door does not prove that the door can operate.
Protect Heating and Cooling Equipment
Do not place furniture where it blocks:
- Supply vents
- Return grilles
- Baseboard heaters
- Radiators
- Thermostats
Besides reducing comfort, furniture placed directly against heat sources may create product-specific safety or material problems.
Keep Windows Usable
Consider:
- Curtain movement
- Blind controls
- Window handles
- Natural light
- Ventilation
- Cleaning access
- Required emergency access
If you are also planning window treatments, see our guide to how high to hang curtains.
Step 4: Map the Main Traffic Routes
Draw the paths people naturally take through the room.
Primary routes may connect:
- Entrance to hallway
- Kitchen to seating
- Seating to balcony
- Living room to dining area
- Sofa to storage
- Main seating to bathroom or stairs
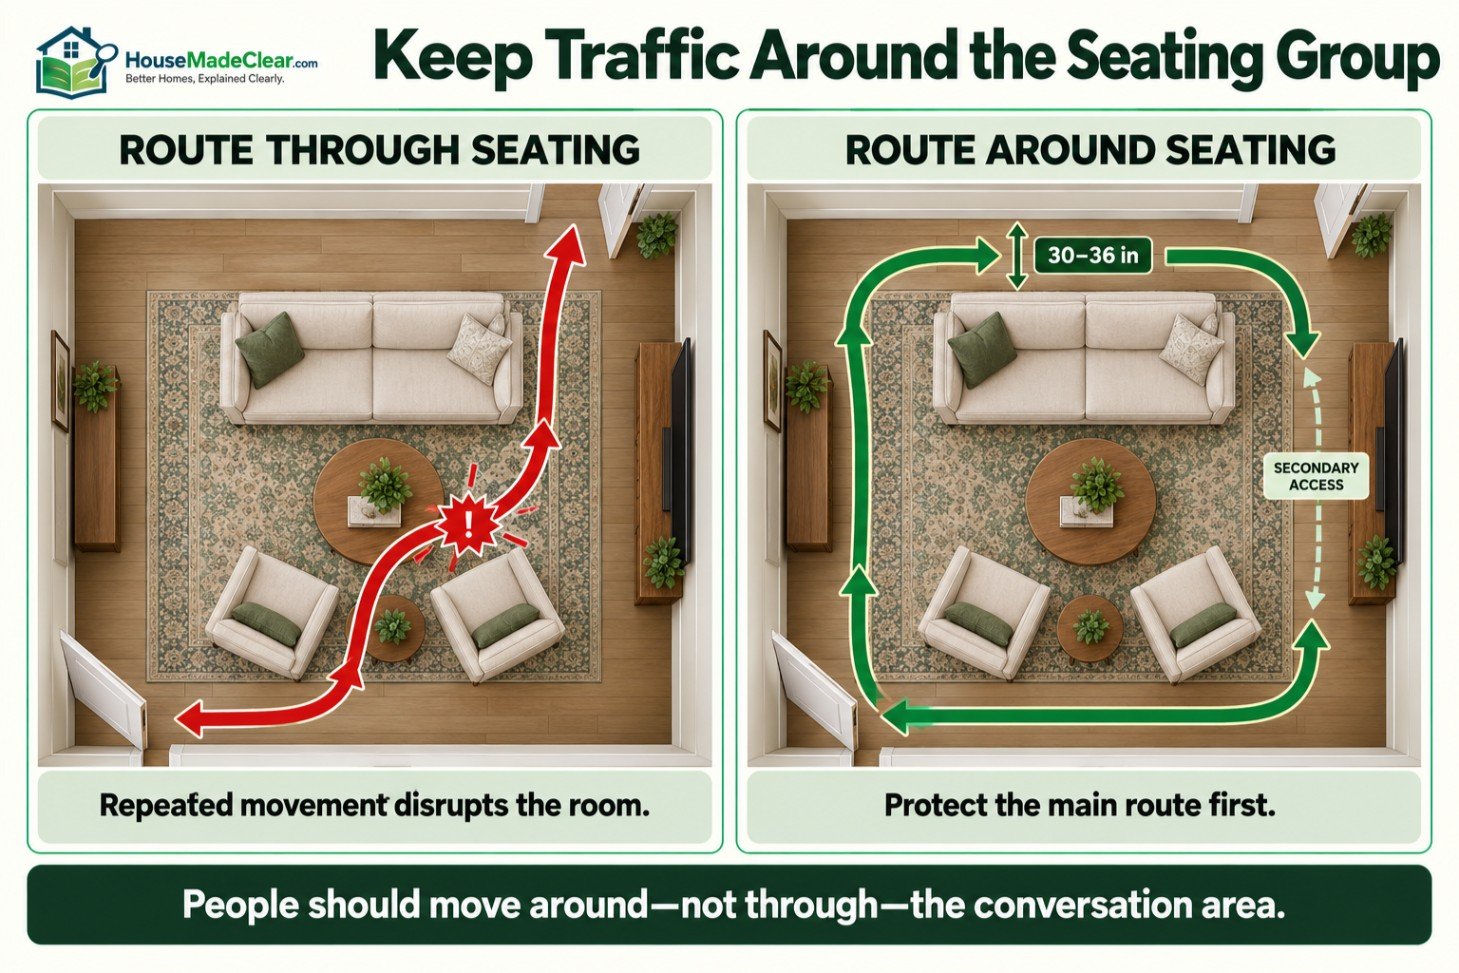
Do not force a major route through the narrow gap between a sofa and coffee table.
Separate Primary and Secondary Routes
A primary route is used repeatedly and should receive the most clearance.
A secondary route may serve:
- An occasional chair
- Storage
- A window
- A floor lamp
- A little-used doorway
Protect the main route first. Adjust secondary access afterward.
Keep Traffic Out of the Conversation Area
Where possible, people should move around rather than through the center of the seating group.
A path through the middle creates repeated interruptions and makes a coffee table difficult to position.
Step 5: Choose the Main Focal Point
A focal point gives the furniture arrangement direction.
Possible focal points include:
- Television
- Fireplace
- View
- Artwork
- Bookcase
- Conversation area
- Architectural feature
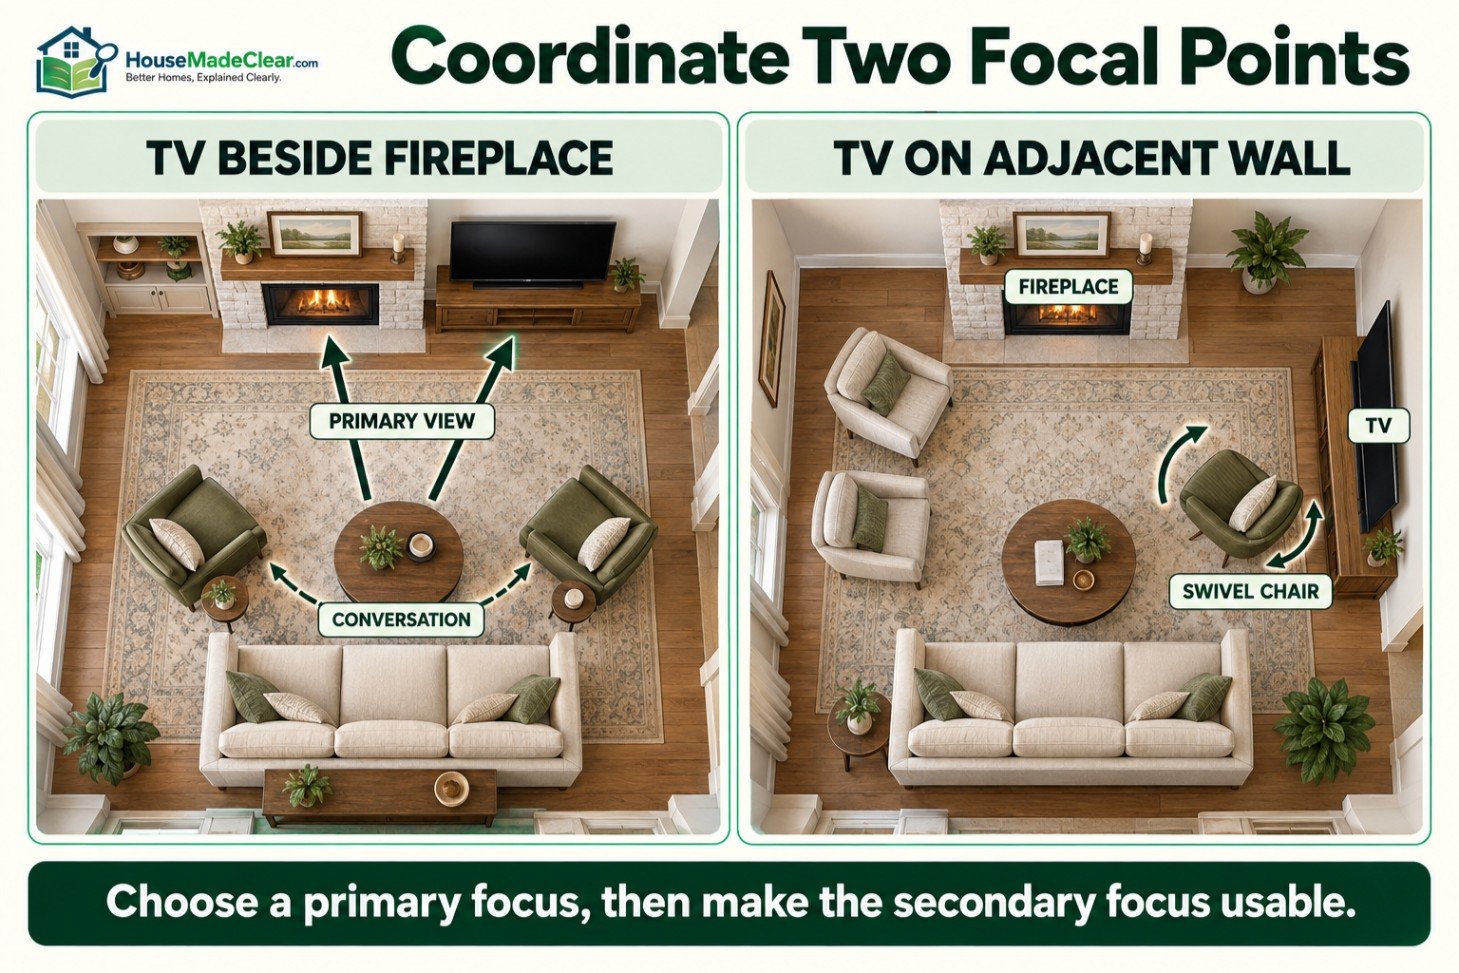
Rooms With Two Focal Points
A room may contain both a fireplace and television.
Possible solutions include:
- Place the television beside the fireplace
- Use an adjacent television wall
- Angle some seating toward both
- Use swivel chairs
- Make conversation the primary focus and television secondary
- Divide a large room into two related zones
Do not automatically mount a television above a fireplace without checking viewing height, heat, wiring and manufacturer requirements.
Television Placement
Consider:
- Viewing direction
- Window glare
- Power and cable access
- Wall structure
- Speaker placement
- Heat sources
- Routes passing in front of the screen
If visible wiring is a problem, our guide to hiding TV cords without cutting the wall covers non-invasive options.
Step 6: Place the Largest Furniture First
The largest and least flexible item normally establishes the layout.
This may be:
- Sofa
- Sectional
- Pair of sofas
- Media unit
- Large storage cabinet
Select the Correct Sofa Size
Do not buy according to seating labels alone. Compare the complete width, depth, height and arm design.
Use the standard couch-dimensions guide to compare conventional sofas, apartment sofas and other seating sizes.
A sofa should leave room for:
- Side access
- Coffee-table clearance
- Main circulation
- Curtains
- Floor lamps
- Storage doors
- Recliner movement
Check Couch Depth
Sofa width is obvious, but depth often causes the layout failure.
A standard couch may be approximately 35 to 40 inches deep, while a deep lounge model can extend 40 to 45 inches or more.
Compare the full footprint using the standard couch-depth guide.
Consider a Loveseat for a Compact Room
A loveseat can provide two seating positions with less width than a conventional sofa.
However, arm thickness can significantly reduce usable seating. Review the exterior and interior measurements in our loveseat-dimensions guide.
Measure Every Side of a Sectional
Sectionals must be measured according to configuration.
Record:
- Long side
- Short return
- Chaise projection
- Maximum depth
- Interior opening
- Left- or right-facing orientation
- Reclined or sleeper footprint
Our sectional sofa size guide provides planning ranges for chaise, L-shaped, U-shaped and modular configurations.
Should the Sofa Sit Against the Wall?
A wall position often works in:
- Small rooms
- Narrow rooms
- Rooms with one dominant walkway
- Layouts needing open central floor space
Floating the sofa can work in:
- Large rooms
- Open-plan spaces
- Rooms needing separate zones
- Conversation-focused arrangements
A floating sofa requires deliberate space behind it. A narrow decorative gap is not the same as a usable walkway.
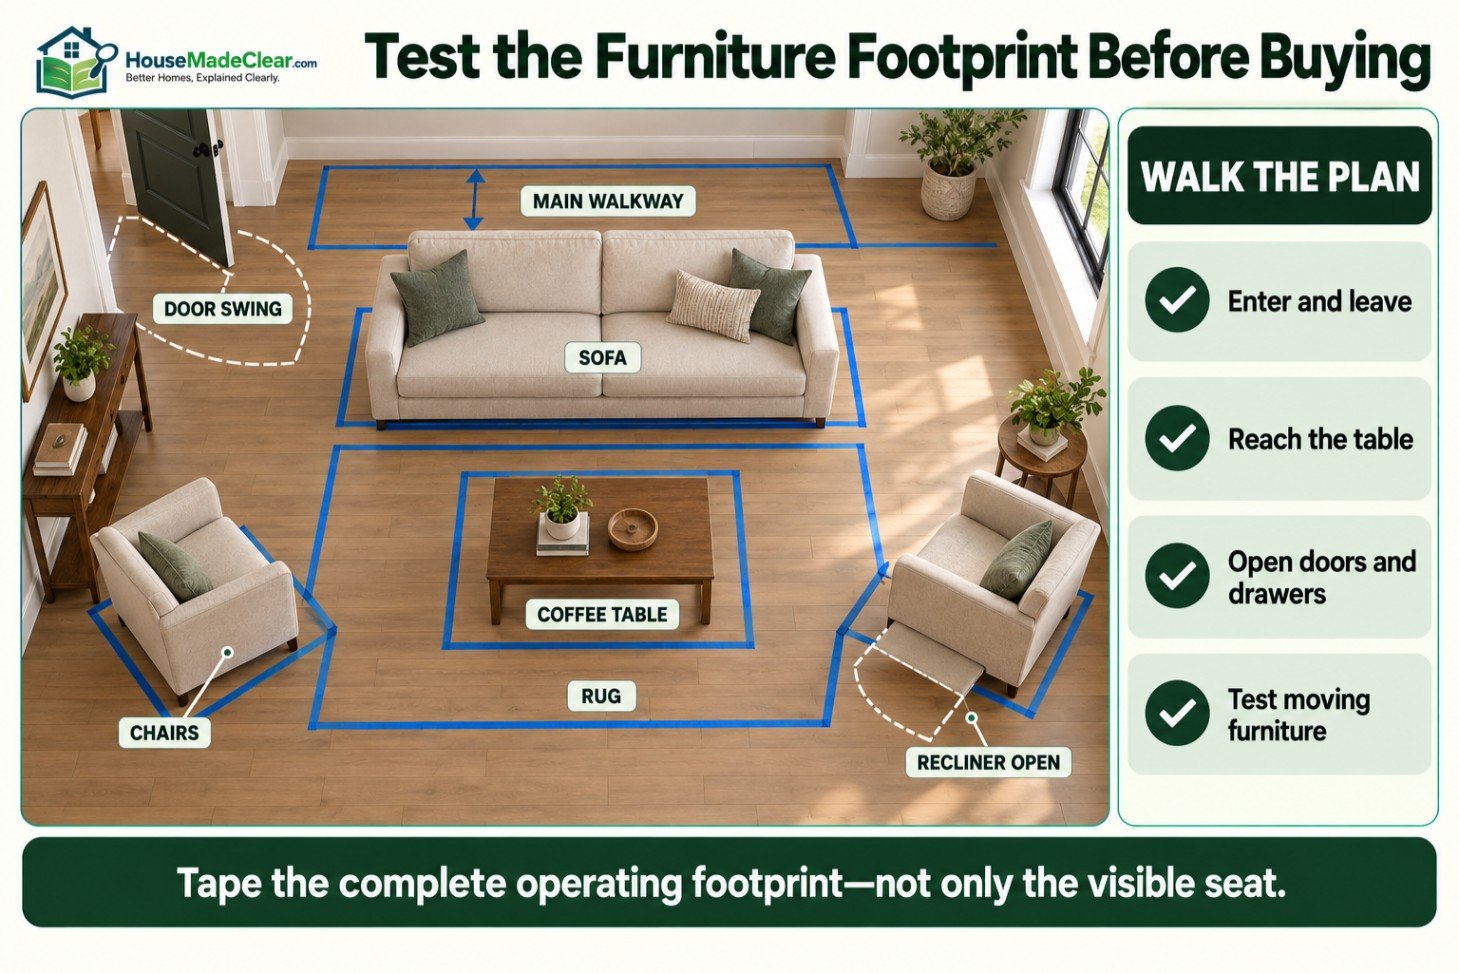
Test the Footprint Before Buying
Mark the complete sofa or sectional footprint with painter’s tape.
Include:
- Arms
- Back
- Chaise
- Recliner extension
- Side-table positions
- Coffee-table gap
- Walkway behind or beside the seating
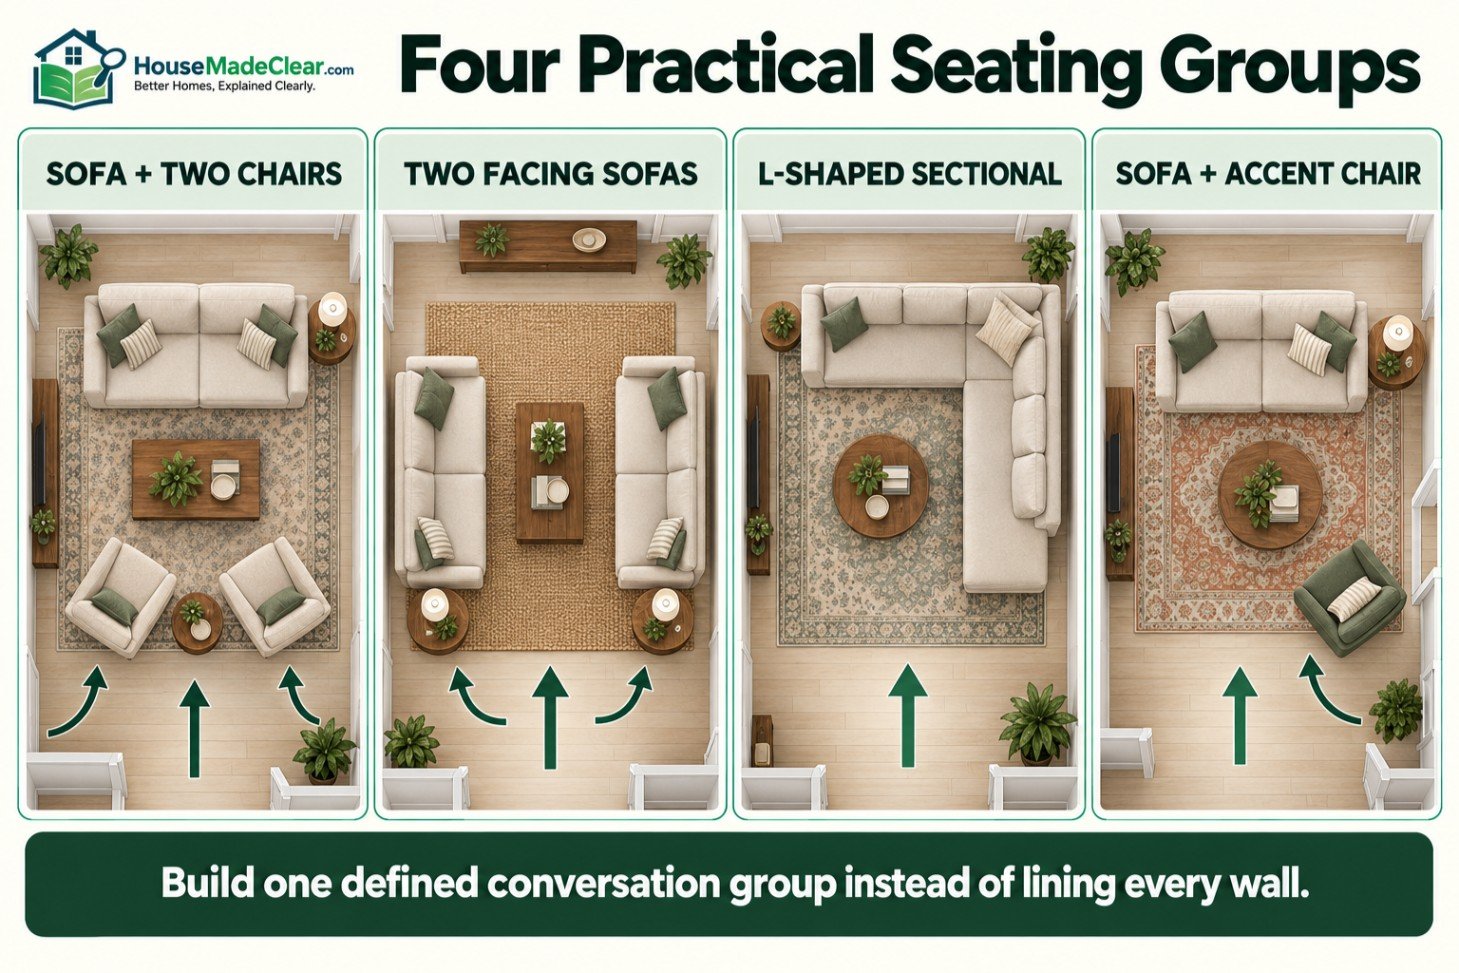
Step 7: Build the Seating Group
Once the main seating is placed, add chairs or secondary seating.
Sofa and Two Chairs
This flexible arrangement can support:
- Conversation
- Television viewing
- Guests
- A central coffee table
Angle the chairs slightly when a rigid face-to-face arrangement feels too formal.
Two Facing Sofas
Facing sofas create a strong conversation area.
The room must be wide enough for:
- Both sofa depths
- Space between them
- Coffee table
- Access around the group
Do not force two deep sofas into a room that can support only one sofa and chairs.
L-Shaped Sectional
An L-shaped sectional can:
- Use a corner efficiently
- Define an open-plan zone
- Provide lounging space
- Increase seating capacity
The return or chaise should not cut across the main route.
Sofa and One Accent Chair
This arrangement works in small rooms and rooms with several doorways.
A swivel chair can adapt between conversation, television and adjoining spaces.
U-Shaped Seating
A sofa with chairs or a U-shaped sectional creates an enclosed conversation zone.
Leave a clear entry into the center and measure the interior opening before selecting a coffee table.
Step 8: Apply Practical Furniture Spacing
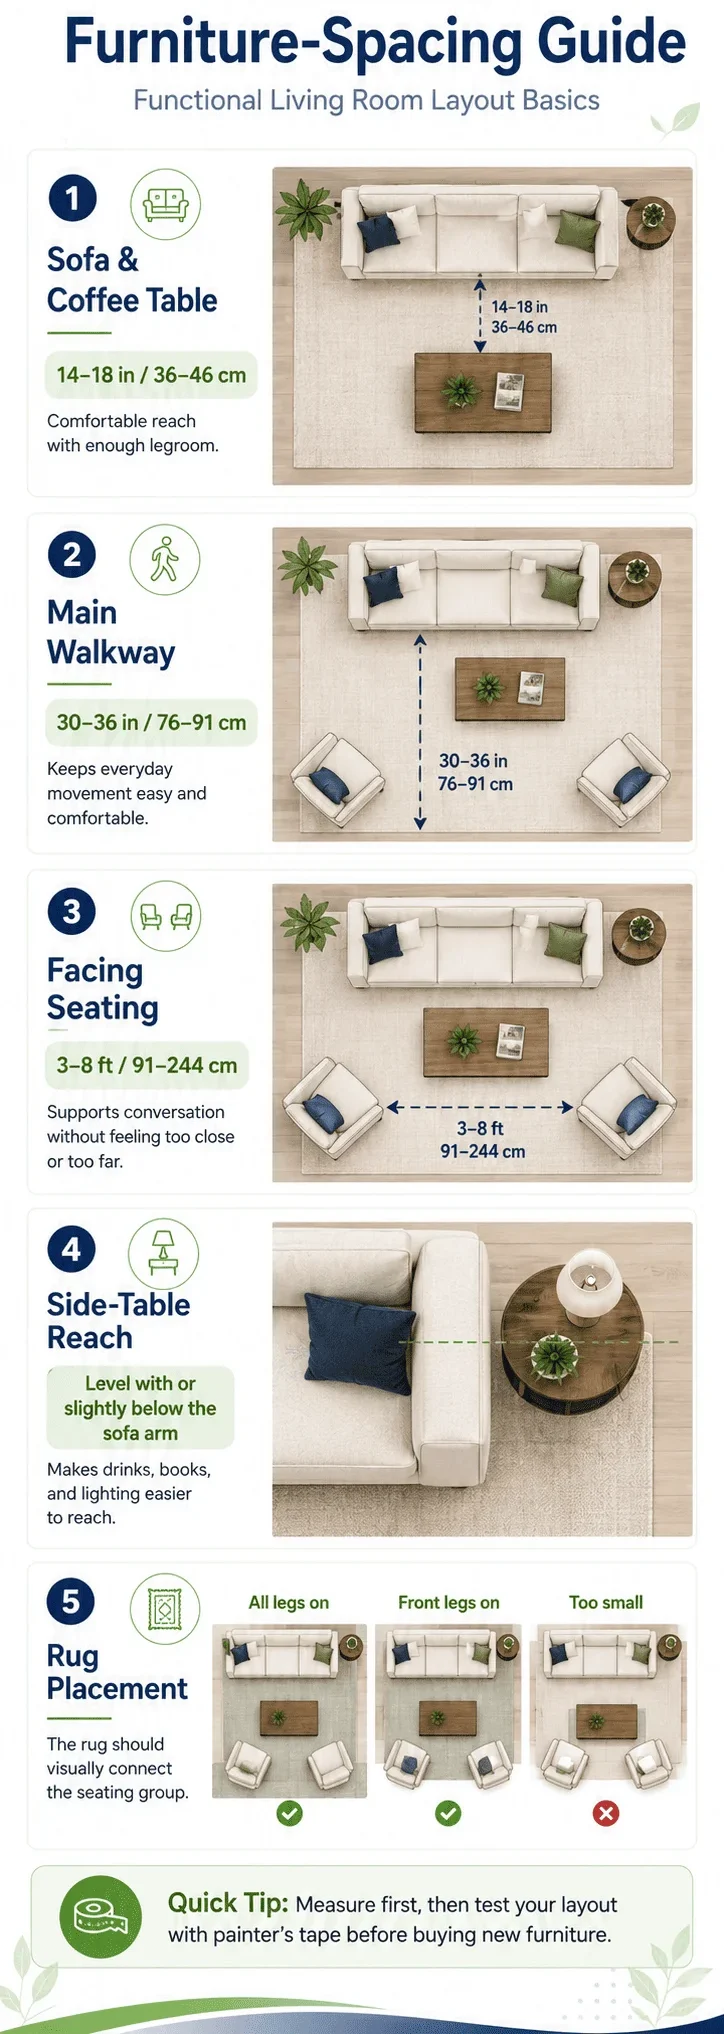
Start with these relationships:
| Furniture relationship | Planning range |
|---|---|
| Sofa to coffee table | 14–18 inches |
| Main walkway | 30–36 inches |
| Secondary passage | Approximately 24–30 inches where practical |
| Facing conversation seating | Approximately 3–8 feet |
| Walkway behind floating sofa | Approximately 30–36 inches |
| Rug beyond sofa ends | Approximately 6–12 inches |
The Crate & Barrel living-room layout guide similarly recommends measuring the room, selecting a focal point and preserving circulation around tables and storage.
These ranges must be adjusted for the users and furniture involved.
Step 9: Choose the Coffee Table
A coffee table should serve the seating group without obstructing movement.
Consider:
- Length
- Width
- Height
- Shape
- Base footprint
- Corner safety
- Storage
- Legroom
- Drawer movement
- Lift-top movement
Coffee-Table Length and Width
A table approximately one-half to two-thirds of the sofa width is a useful proportional starting point.
Typical rectangular coffee tables measure approximately:
- 36–48 inches long
- 18–24 inches wide
- 16–18 inches high
Use our standard coffee-table size guide to compare rectangular, round, square and oval models.
Coffee-Table Height
Compare the tabletop with the actual sofa-seat height.
A table approximately level with the seat or up to 1 or 2 inches lower works for many arrangements. The coffee-table height guide provides examples for different seat heights.
Sofa-to-Table Clearance
Measure from the sofa’s nearest fixed front edge to the table.
Approximately 14 to 18 inches works for many layouts, but recliners, children and mobility needs can require more.
See the full sofa-to-coffee-table clearance guide before finalizing the table position.
Alternatives for Small Living Rooms
A full coffee table is not mandatory.
Consider:
- Nesting tables
- Small round table
- Movable ottoman
- C-shaped table
- Side tables
- Storage bench
- Two small movable tables
Flexible pieces often work better than one large central table in a compact room.
Step 10: Position the Rug
The rug should visually connect the furniture rather than float independently beneath the coffee table.
All Furniture Legs on the Rug
This arrangement works well in:
- Large rooms
- Open plans
- Formal seating groups
- Floating furniture layouts
The rug should extend beyond the furniture instead of ending directly at the legs.
Front Legs on the Rug
This is practical for many medium rooms.
Place the front legs of the sofa and chairs securely on the rug to connect the pieces visually.
Furniture Around a Smaller Rug
A smaller rug may work in a compact room, but it must still relate clearly to the seating.
A rug barely larger than the coffee table often makes the entire furniture group look undersized and disconnected.
Select the Correct Rug Size
Common living-room starting points include:
| Seating arrangement | Common rug starting size |
|---|---|
| Loveseat and small table | 5 × 8 or 6 × 9 ft. |
| Small sofa and chair | 6 × 9 or 8 × 10 ft. |
| Standard sofa and two chairs | 8 × 10 or 9 × 12 ft. |
| Compact sectional | 8 × 10 or 9 × 12 ft. |
| Medium sectional | 9 × 12 or 10 × 14 ft. |
| Large sectional | 10 × 14 or 12 × 15 ft. |
Use our complete standard rug-size guide to compare living-room, sectional, bedroom, dining-room and runner sizes.
Step 11: Plan Lighting Around Activities
A functional living room rarely works well with one ceiling light.
Use three lighting layers.
Ambient Lighting
Provides general illumination through:
- Ceiling fixtures
- Recessed lights
- Wall lights
- Large floor lamps
Task Lighting
Supports specific activities:
- Reading
- Working
- Games
- Crafts
- Music
Task lighting may include an adjustable floor lamp, table lamp or directional wall light.
Accent Lighting
Highlights:
- Artwork
- Bookshelves
- Plants
- Architectural details
- Textured walls
Keep Lamps Out of Walkways
Check:
- Floor-lamp bases
- Cords
- Outlet locations
- Shade projections
- Side-table stability
- Switch access
Do not run loose cords through a walking path.
Step 12: Add Storage Without Filling Every Wall
Storage should support the room’s activities without making it feel crowded.
Open Storage
Open shelving works for:
- Books
- Decorative objects
- Baskets
- Plants
- Frequently used items
It requires visual organization and regular dusting.
Closed Storage
Closed cabinets can hide:
- Electronics
- Toys
- Games
- Paperwork
- Charging equipment
- Everyday clutter
Measure the full door and drawer movements before positioning nearby furniture.
Leave Visual Rest Areas
Not every wall needs:
- Artwork
- Cabinetry
- Shelving
- Plants
- A console
Empty space helps the important furniture and focal point read clearly.
Layout Ideas for Different Room Shapes
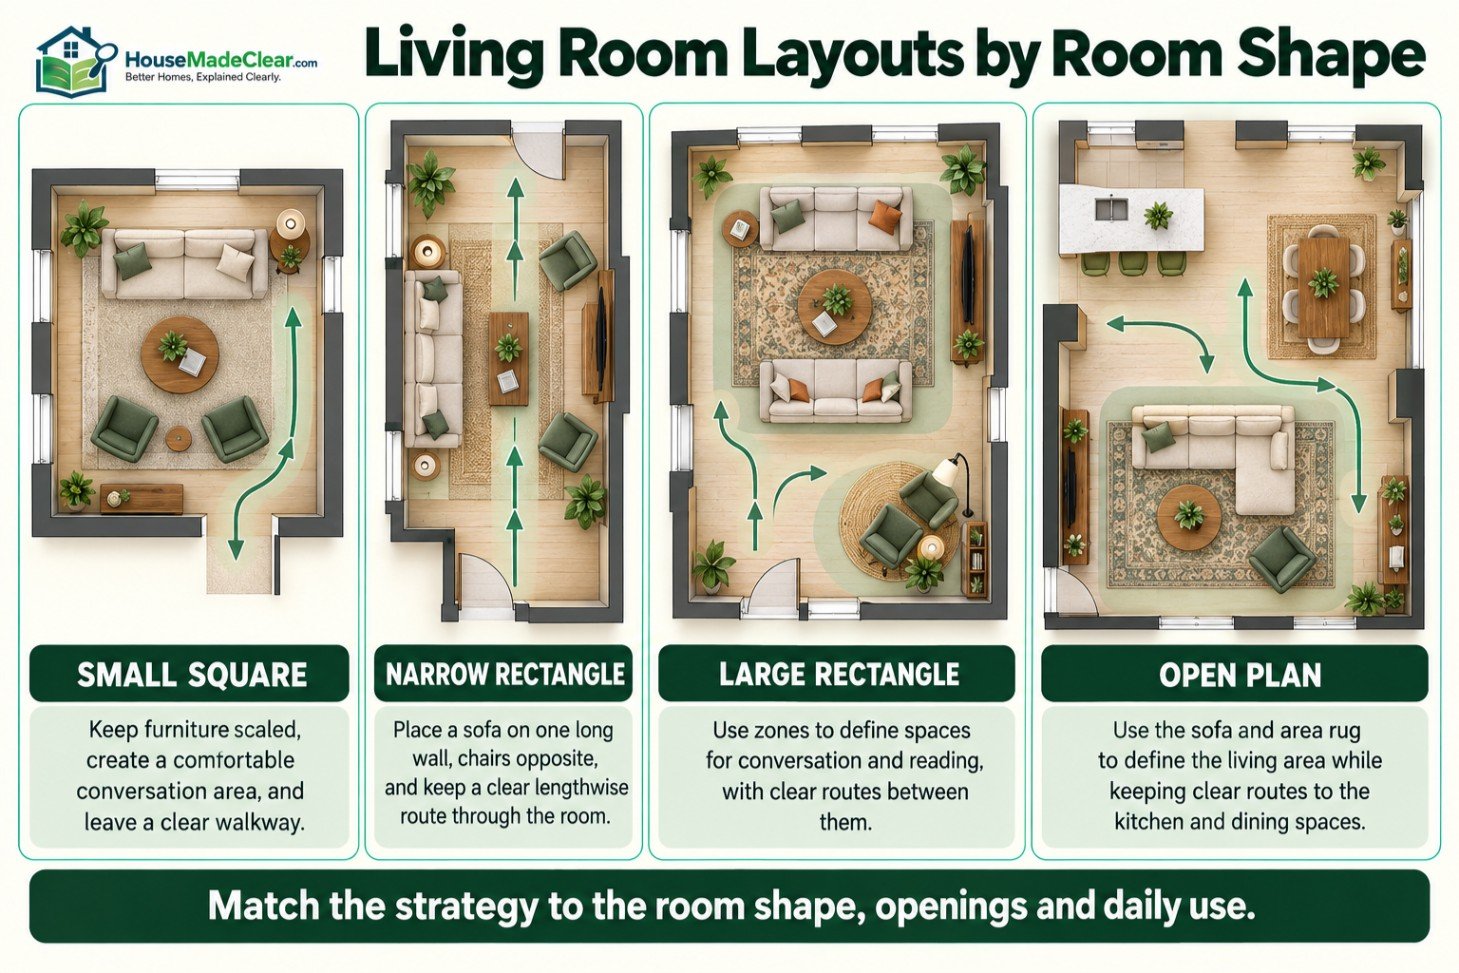
Small Square Living Room
A compact square room may work with:
- Two- or three-seat sofa
- One or two movable chairs
- Round coffee table
- 6 × 9 or 8 × 10 rug
- Low storage
- One protected walkway
Avoid assuming a sectional is automatically space-efficient. Its chaise may block the only practical route.
Narrow Rectangular Living Room
Common problems include:
- Furniture lining both long walls
- Oversized sofa depth
- Empty central strip
- Television too far from seating
- Restricted walkways
Possible solutions include:
- Use shallower seating
- Place the sofa along one long wall
- Use compact chairs opposite
- Create two connected zones
- Use nesting tables
- Position selected furniture perpendicular to the wall
Large Rectangular Living Room
A large room often needs more than one zone.
Possible zones include:
- Main conversation area
- Reading corner
- Game table
- Desk
- Secondary seating
- Music area
Avoid pushing every item to the perimeter and leaving an unusable center.
L-Shaped Living Room
Use the natural change in direction to separate functions.
For example:
- Main seating in the larger area
- Reading or working in the smaller area
- Dining near the kitchen connection
Maintain a clear visual and walking link between the two sections.
Open-Plan Living Room
Furniture can define space without adding walls.
Use:
- Sofa back
- Area rug
- Console
- Lighting
- Storage
- Coordinated but distinct furniture groups
Protect the routes between the kitchen, dining area and living room.
Living Room With Several Doorways
Avoid filling every remaining wall with furniture.
Consider:
- Floating seating
- Compact chairs
- Round tables
- Low-back furniture
- One clearly protected cross-room path
- Movable pieces
The correct solution may involve fewer pieces rather than smaller gaps.
Planning for Different Households
Families With Children
Consider:
- Rounded table edges
- Stable storage
- Play space
- Washable surfaces
- Toy storage
- Clear movement
- Secure cords
- Furniture anchoring where required
Do not create hidden play areas that cannot be seen from the main seating.
Older Adults
Consider:
- Firm supportive seating
- Appropriate seat height
- Wider walkways
- Stable armrests
- Reduced trip edges
- Reachable switches and tables
- Even lighting
A low, deep sofa may be difficult to use even when it fits the room perfectly.
Homes With Pets
Consider:
- Pet movement routes
- Bed and crate placement
- Washable covers
- Rug stability
- Access to windows
- Tail clearance around tables
- Storage for supplies
Do not position fragile objects in a route the pet uses regularly.
Rental Homes
Prioritize:
- Movable furniture
- Freestanding storage
- Rugs
- Floor lamps
- Modular seating
- Non-permanent cable management
- Reversible arrangements
The room should be easy to adapt or restore when moving.
Common Living Room Layout Mistakes
Buying Furniture Before Measuring
The furniture may fit the floor area but block a doorway, drawer or walkway.
Blocking the Main Route
A direct path through the seating group creates repeated interruptions.
Choosing Furniture That Is Too Large
An oversized sofa or sectional leaves no room for tables, chairs or circulation.
Ignoring Furniture Depth
A deep sofa can consume six or more additional inches of room depth compared with a compact model.
Pushing Everything Against the Walls
This can make conversation difficult and leave an unused space in the center.
Treating the Television as the Only Focal Point
The room may also need to support conversation, reading and natural light.
Using an Undersized Rug
A rug that does not connect with the furniture makes the group feel fragmented.
Selecting the Coffee Table in Isolation
The table must work with the sofa width, seat height, rug and surrounding clearance.
Ignoring Lighting and Outlets
A layout fails when lamps have nowhere safe to plug in.
Filling Every Corner
Empty space is functional when it improves circulation and visual clarity.
Forgetting Door and Drawer Movement
Test every moving component at full extension.
Designing a Showroom Instead of a Home
A successful layout must support daily routines, not only look balanced in a photograph.
Step-by-Step Example: Rectangular Living Room
Consider a room with:
- One main doorway
- One large window
- One television wall
- One three-seat sofa
- Two chairs
- One coffee table
- One storage unit
This is an illustrative process rather than a universal layout.
Step 1: Measure
Record the room, door, window and furniture dimensions.
Step 2: Mark Fixed Features
Draw the doorway, window, outlets and television connection.
Step 3: Protect the Main Route
Reserve a direct 30- to 36-inch path between the entrance and adjoining room.
Step 4: Place the Sofa
Position the sofa where it faces the focal point without blocking the window or path.
Step 5: Add the Chairs
Place the chairs at an angle or perpendicular to the sofa to support conversation.
Step 6: Test the Seating Group
Check whether users can reach the seats without crossing the center.
Step 7: Position the Coffee Table
Leave approximately 14 to 18 inches from the sofa and chairs where possible.
Step 8: Size the Rug
Choose a rug wide enough to reach the front legs of the sofa and chairs.
Step 9: Add Storage
Place the unit where its doors or drawers can open fully.
Step 10: Add Lighting
Provide ambient light plus a task lamp for reading or other activities.
Test the Layout Before Buying
Use painter’s tape or cardboard to mark:
- Sofa
- Sectional
- Chairs
- Coffee table
- Rug
- Storage
- Walkways
- Recliner extension
- Door movement
Walk through the layout and test:
- Entering and leaving
- Sitting down
- Reaching tables
- Opening doors and drawers
- Watching television
- Using lamps
- Cleaning
- Moving around pets or children
For an existing room, use the proposed arrangement for at least one normal day before making permanent decisions.
Functional Living Room Layout Checklist
Before finalizing the layout, confirm:
- Room dimensions recorded
- Existing furniture measured
- Delivery route measured
- Doors and windows marked
- Door swings shown
- Fixed features identified
- Primary use defined
- Regular users considered
- Focal point selected
- Main walkway protected
- Sofa or sectional positioned first
- Furniture depth checked
- Conversation arrangement tested
- Sofa-to-table clearance checked
- Coffee-table size and height verified
- Rug linked to the seating
- Lighting planned by activity
- Natural light protected
- Storage included
- Outlets accessible
- Doors and drawers open fully
- Television glare tested
- Recliners and sleepers tested when open
- Layout marked before purchasing
Frequently Asked Questions
How do I start planning a living room layout?
Start by listing how the room will be used. Measure the room, doors, windows, fixed features, delivery route and existing furniture. Mark the primary walking routes before placing the sofa or sectional.
Should a sofa always go against a wall?
No. A wall position often works in small or narrow rooms. Floating the sofa can define zones in a large or open-plan room. The correct position depends on circulation, room size and use.
How much walking space should a living room have?
Approximately 30 to 36 inches is a useful starting point for an important walkway. Secondary passages may be around 24 to 30 inches where practical. These are planning guidelines rather than universal code requirements.
How do I arrange furniture in a small living room?
Use correctly scaled seating, protect one clear walkway and avoid filling every wall. A compact sofa or loveseat, movable chair, nesting tables and low storage may work better than a large sectional.
Where should the television go in a living room?
Place it where the main seats have a comfortable view and windows do not create severe glare. Also consider power, cable access, wall structure and heat from fireplaces or radiators.
How do I arrange a long, narrow living room?
Avoid lining oversized furniture along both long walls. Use shallower seating, create one or two smaller zones and position selected pieces perpendicular to the walls where possible.
Which furniture should I place first?
Place the largest and least flexible piece first, usually the sofa, sectional, media unit or large storage cabinet. Add chairs, tables, rugs, lighting and accessories afterward.
How can I test a living room layout before buying furniture?
Use painter’s tape or cardboard to mark the furniture dimensions on the floor. Walk through the room, open doors and drawers, test chair movement and compare likely seating positions before ordering.
Final Thoughts
A functional living room begins with behavior, movement and measurement—not decoration.
Decide what the room must support. Measure its fixed features and delivery routes. Protect the main walkways, position the largest furniture and build the remaining seating, tables, rug, lighting and storage around that foundation.
Use the supporting House Made Clear measurement guides whenever you need exact help with:
- Sofa dimensions
- Couch depth
- Loveseat dimensions
- Sectional dimensions
- Coffee-table size
- Coffee-table height
- Sofa-to-table spacing
- Area rug sizes
The best layout is not the one that follows the most design rules. It is the arrangement that lets the household move comfortably, sit naturally, reach what it needs and adapt the space as routines change.





[…] How to Plan a Functional Living Room Layout: Step-by-Step Guide […]