














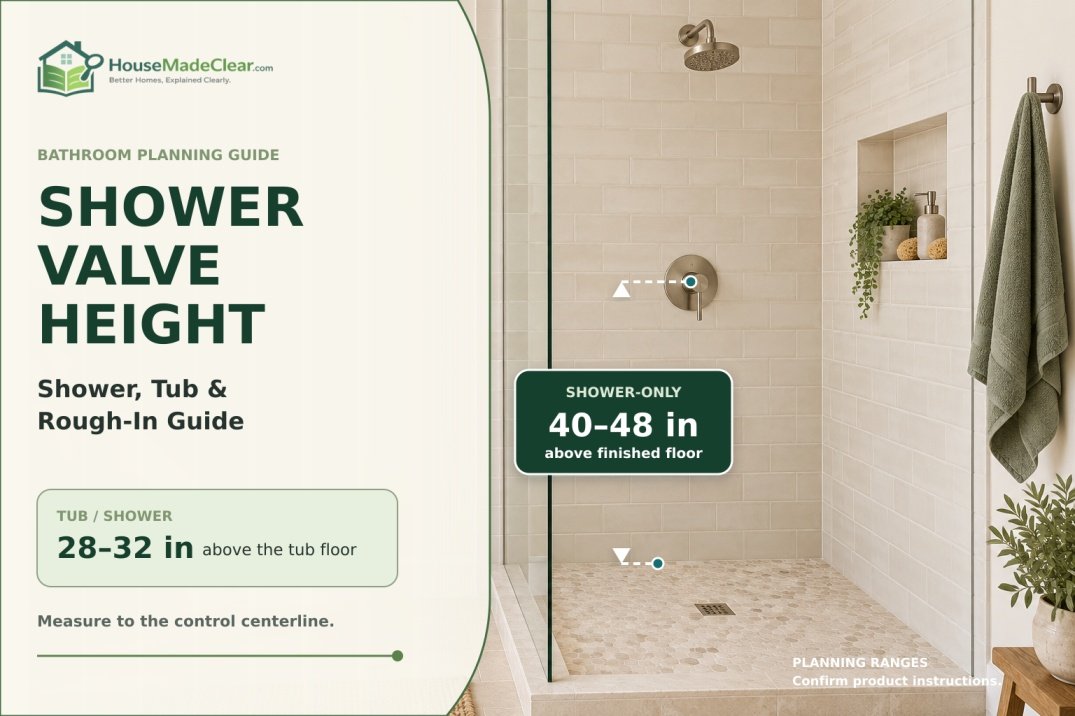
For a conventional shower-only installation, a practical shower valve height is approximately 40 to 48 inches above the finished shower floor, measured to the center of the valve or control.
Many households find 42 to 48 inches comfortable. However, there is no single mounting height that works for every shower, valve or user.
Tub/shower controls are usually installed lower because they must be reachable while a person is bathing. A common planning range is approximately 28 to 32 inches above the tub floor, subject to the selected tub, spout, valve and manufacturer’s instructions.
Quick Answer
Use these measurements as initial planning ranges:
- Shower-only valve: approximately 40–48 inches above the finished shower floor
- Common comfortable target: approximately 42–48 inches
- Walk-in shower valve: approximately 40–48 inches, with entry-side placement considered
- Tub/shower valve: approximately 28–32 inches above the tub floor
- Accessible transfer-shower controls: 38–48 inches above the shower floor, with specific horizontal placement requirements
- Valve rough-in depth: determined by the selected valve and finished-wall thickness
Measure to the centerline of the valve or main control unless the manufacturer specifies another reference. Always measure from the finished standing surface—not an unfinished subfloor—and follow the selected product’s installation instructions and locally adopted code.
Shower Valve Height at a Glance
| Installation | Practical planning height | Measurement reference |
|---|---|---|
| Standard shower-only valve | 40–48 inches | Finished shower floor to valve centerline |
| Comfortable shower-only target | 42–48 inches | Finished shower floor to valve centerline |
| Walk-in shower valve | 40–48 inches | Finished shower floor to valve centerline |
| Tub/shower combination | 28–32 inches | Tub floor to valve centerline |
| Separate shower diverter | Near and above the main control | Follow the system’s spacing requirements |
| ADA transfer shower controls | 38–48 inches | Shower floor to operable control area |
| ADA roll-in shower controls | No higher than 48 inches | Shower floor to operable control area |
These are not interchangeable measurements. A shower-only valve, tub/shower control and accessible shower control serve different users and layouts.
What Is the Standard Shower Valve Height?
The most useful residential answer is:
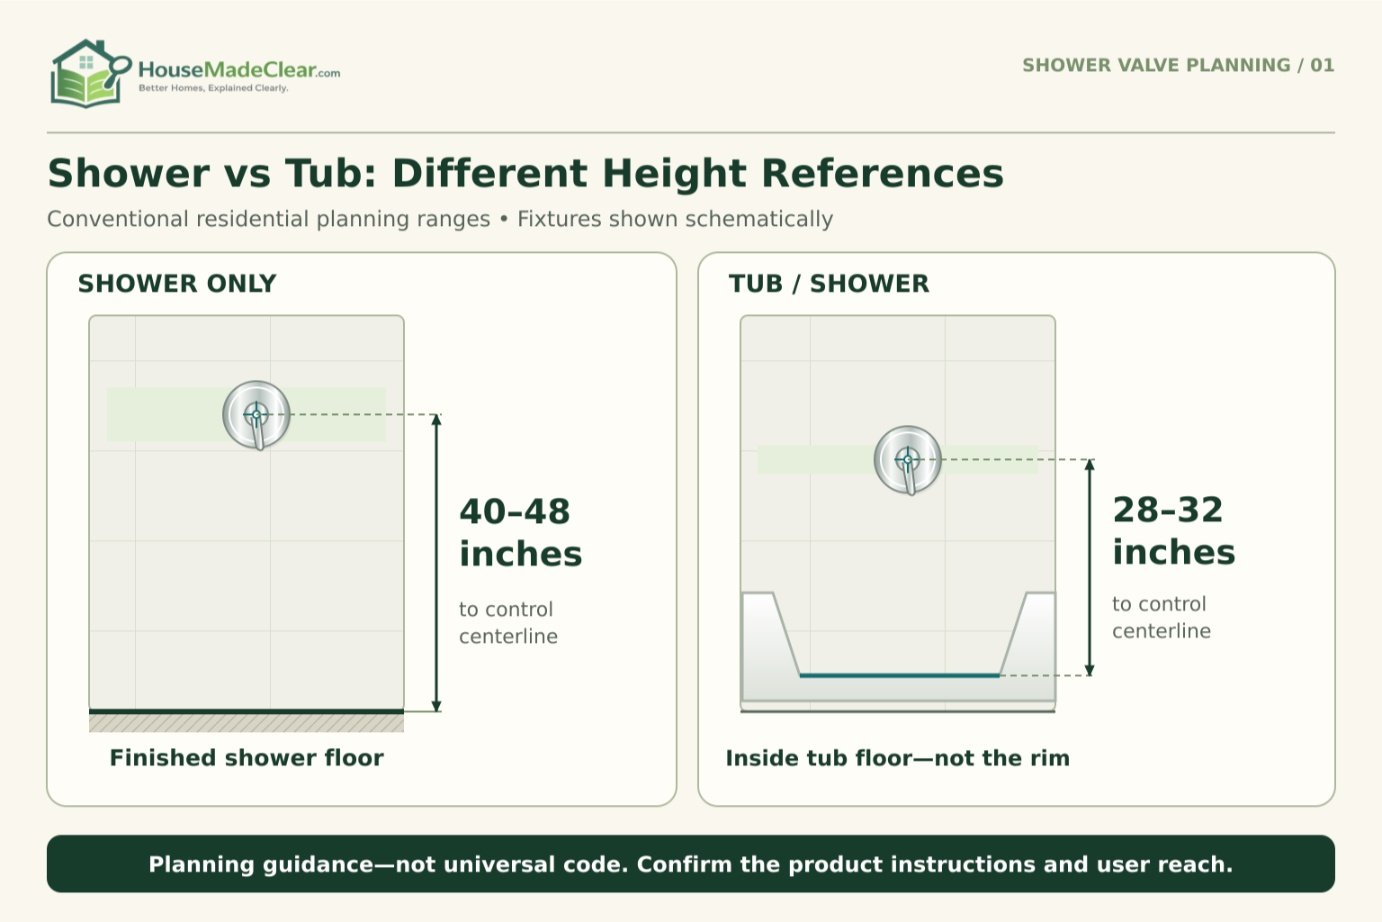
Approximately 40 to 48 inches above the finished shower floor for a shower-only valve.
This range generally places the handle between waist and lower-chest level for adults, where it can be operated without bending or reaching overhead.
Within that range:
- 40–42 inches can suit shorter users or a lower control preference.
- 44–46 inches is a balanced starting point for many households.
- 48 inches can be comfortable for taller adults and aligns with the maximum operable height used in many accessible configurations, although accessibility involves more than height alone.
The number is a planning convention, not a universal residential code dimension. For example, SharkBite’s official shower-valve installation guide demonstrates a 40-inch valve height. Other manufacturers and installers may use a different position based on the product and layout.
The correct height is the one that satisfies all of the following:
- Comfortable reach for regular users
- Compatibility with the valve and trim
- Correct relationship with a tub, bench or grab bars
- Adequate spacing for a diverter or volume control
- Correct rough-in depth in the finished wall
- Applicable code and accessibility requirements
How Is Shower Valve Height Measured?
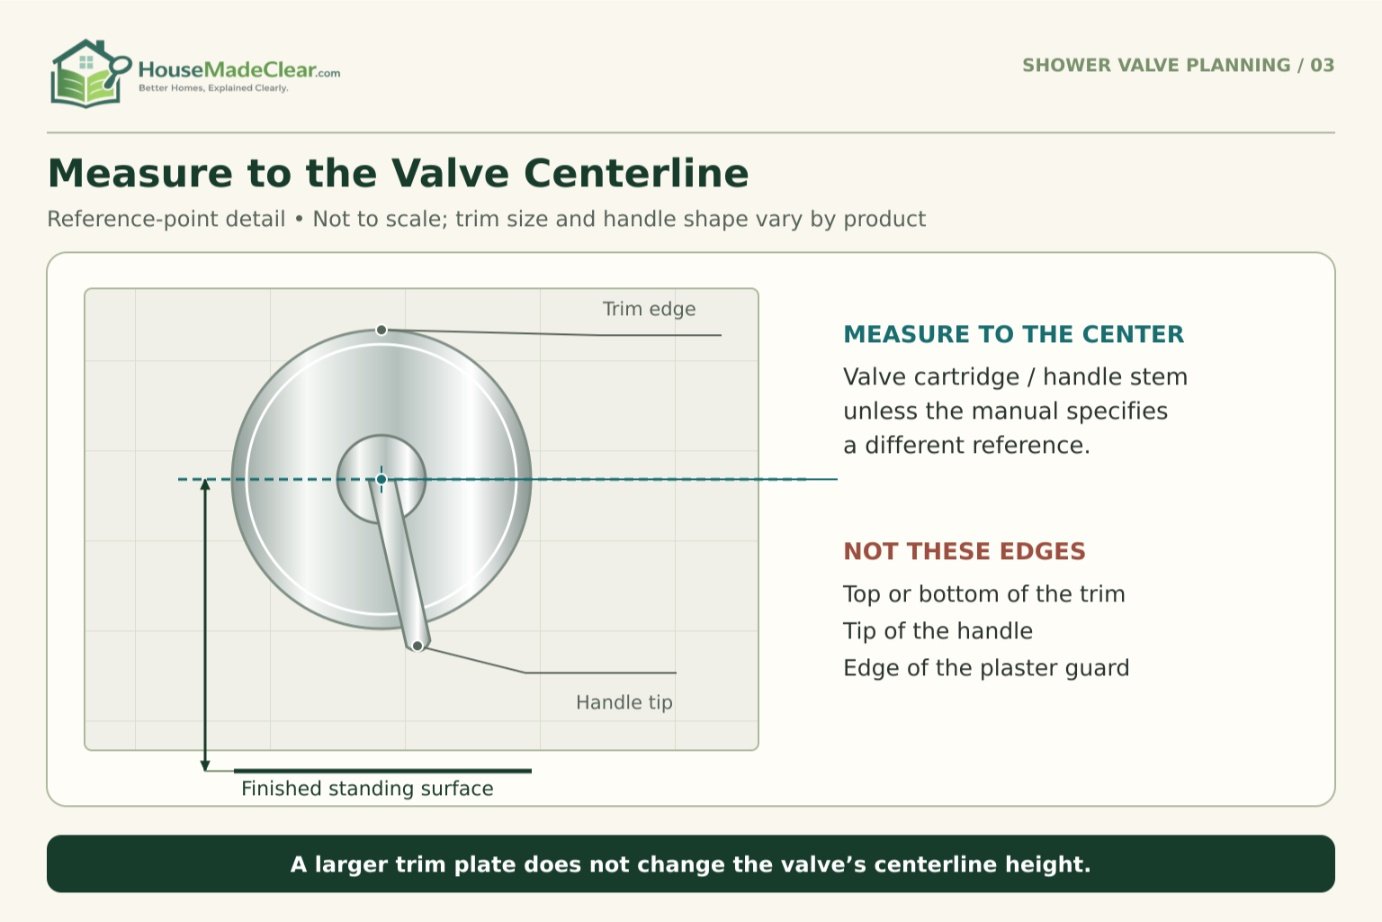
Measure vertically from the finished shower floor to the centerline of the valve body or visible control, unless the manufacturer’s drawing identifies a different reference.
For a tub/shower combination, the reference is commonly the finished surface inside the tub where the user stands. Confirm the reference used in the tub and valve specifications before rough-in.
Measure From the Finished Standing Surface
The finished standing surface is the completed:
- Tile floor
- Shower pan
- Stone floor
- Prefabricated shower base
- Tub floor in a tub/shower combination
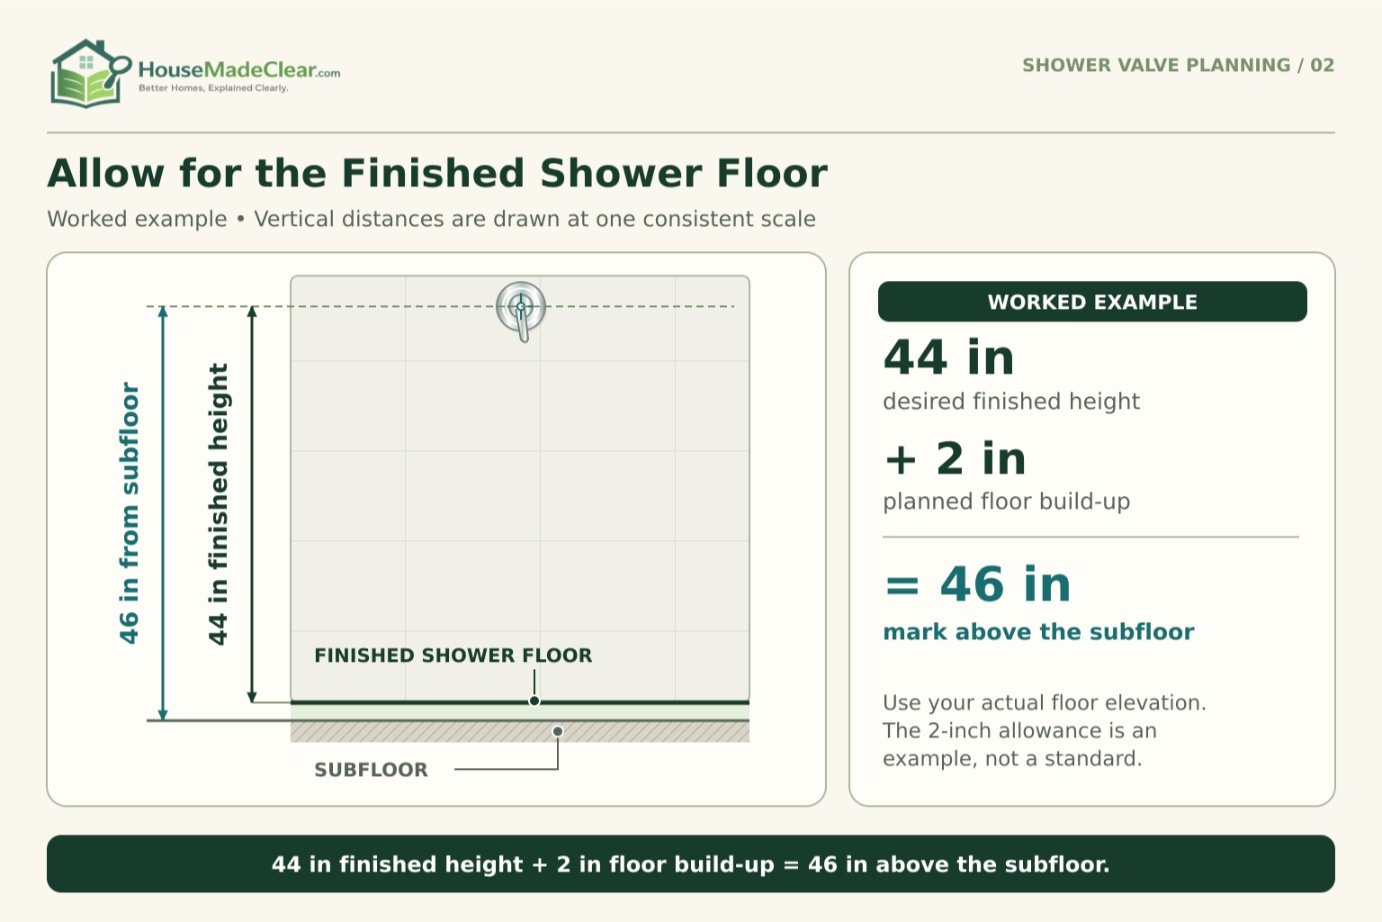
Do not measure only from the structural subfloor. Mortar, waterproofing, tile and the shower base can raise the final surface and reduce the finished valve height.
If the intended finished height is 44 inches and the completed shower floor will sit 2 inches above the current subfloor, the valve centerline must be marked approximately 46 inches above the subfloor:
44-inch finished height + 2-inch floor build-up = 46-inch rough framing mark
The exact calculation depends on how the shower base and floor assembly relate to the surrounding subfloor. Confirm that elevation with the shower-pan and tile plans.
If the base has not been selected, compare common standard shower pan sizes before fixing the plumbing position.
Measure to the Valve Centerline
For most single-handle valves, the useful height reference is the center of the valve cartridge or handle stem.
Do not measure to the:
- Top of the trim plate
- Bottom of the trim plate
- End of the handle
- Temporary plaster guard edge
unless the product instructions specifically use that point.
Large thermostatic trims can extend several inches above and below the valve center. Two controls with identical centerline heights may therefore occupy different amounts of wall space.
Mark the Finished Wall, Not Just the Framing
Valve height is vertical, but the installation can still fail if its horizontal depth is wrong.
Before fixing the valve to blocking, account for:
- Backer board
- Waterproofing membrane
- Mortar
- Tile or stone
- Decorative wall panels
- Manufacturer-required plaster-guard position
The visible trim must be able to connect after all wall finishes are installed.
Standard Shower-Only Valve Height
For a shower without a bathtub, approximately 40 to 48 inches above the finished shower floor is a practical range.
A target around 44 to 46 inches works for many average-height adults because the control remains easy to see and operate without being unusually high.
Do not choose the number solely because it looks centered on an elevation drawing. Test how the control feels when someone is standing in the actual shower.
Factors That Can Change the Height
Adjust the position when necessary for:
- Tall or short household members
- Children
- A shower bench
- A handheld shower
- Grab bars
- Multiple controls
- A large trim plate
- An entry-side control location
- A sloped or raised shower base
- Accessibility needs
More height is not automatically better. A control at 52 or 54 inches may be comfortable for a tall adult but inconvenient for children, shorter users or someone seated on a bench.
Walk-In Shower Valve Height
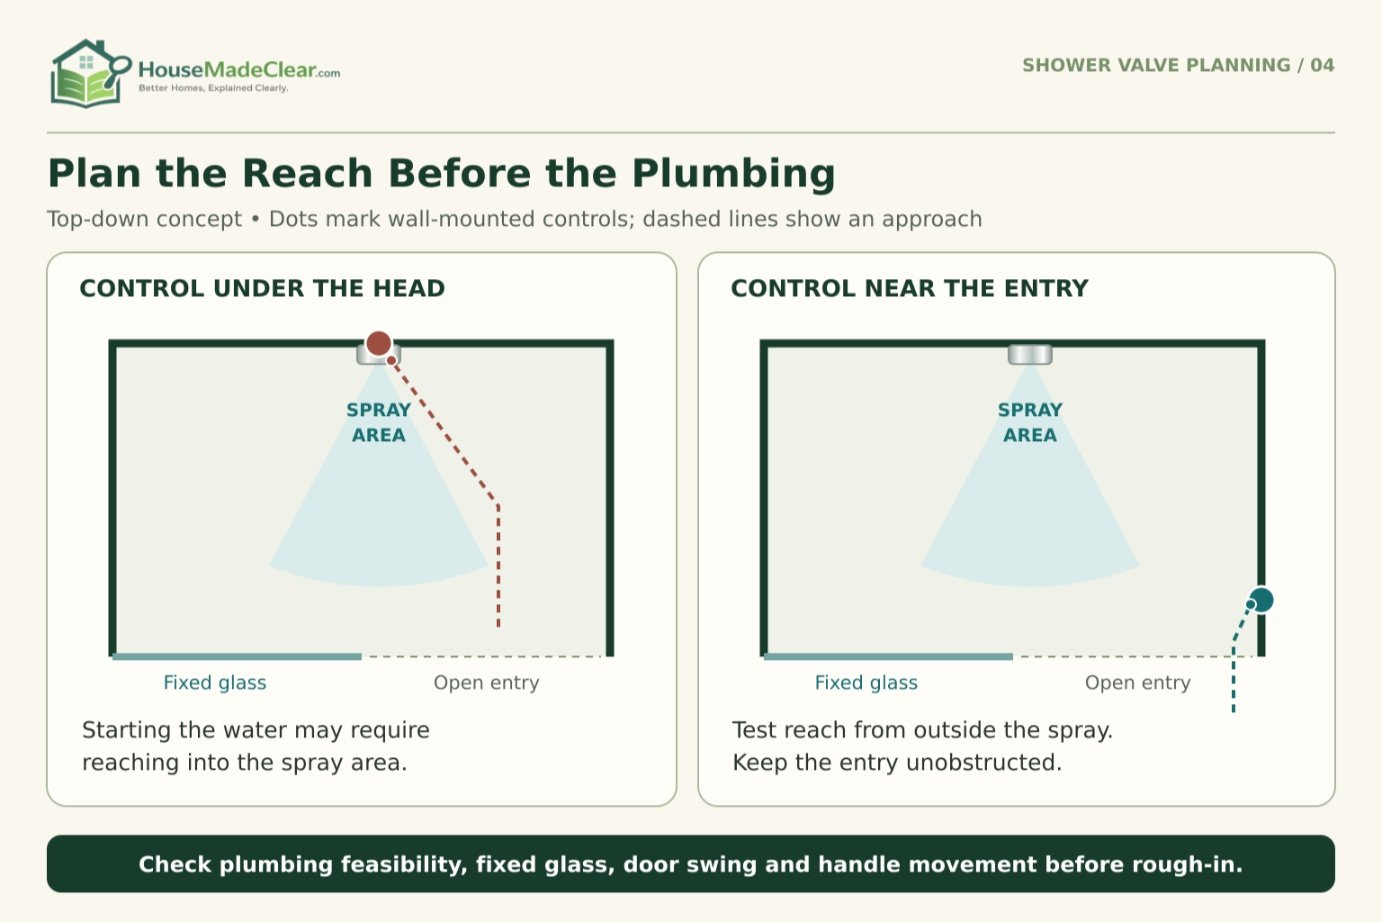
A walk-in shower valve commonly uses the same 40-to-48-inch planning range as another shower-only installation. The larger opportunity is often horizontal placement.
Instead of automatically placing the valve directly beneath the shower head, consider positioning the control near the entrance. An entry-side valve can let the user:
- Reach into the shower.
- Turn on the water.
- Set the temperature.
- Enter after the water is comfortable.
This avoids standing beneath cold water during startup.
The layout must still provide an appropriate plumbing route and keep the control within the valve manufacturer’s limitations. It must not conflict with the door, glass panel, bench or grab bars.
For larger enclosures, compare the control location with the complete walk-in shower dimensions rather than treating the fixture wall in isolation.
Valve Placement in a Small Shower
In a compact enclosure, a valve can project into the standing area or become difficult to reach behind a door.
Check that:
- The handle has room to rotate.
- The user can operate it without pressing against a wall.
- The trim does not overlap a corner or door channel.
- The control is not directly behind the user.
- The user can reach it without stepping into the main spray.
Our guide to small shower dimensions can help determine whether the planned fixture wall has enough usable space.
Tub/Shower Valve Height
A tub/shower valve is usually lower than a shower-only valve because the control must serve both bathing and standing shower use.
A practical starting range is approximately:
28 to 32 inches above the tub floor
The correct position depends on:
- Tub-floor elevation
- Tub-rim height
- Tub-spout position
- Valve trim diameter
- User reach while seated
- Shower use while standing
- Manufacturer requirements
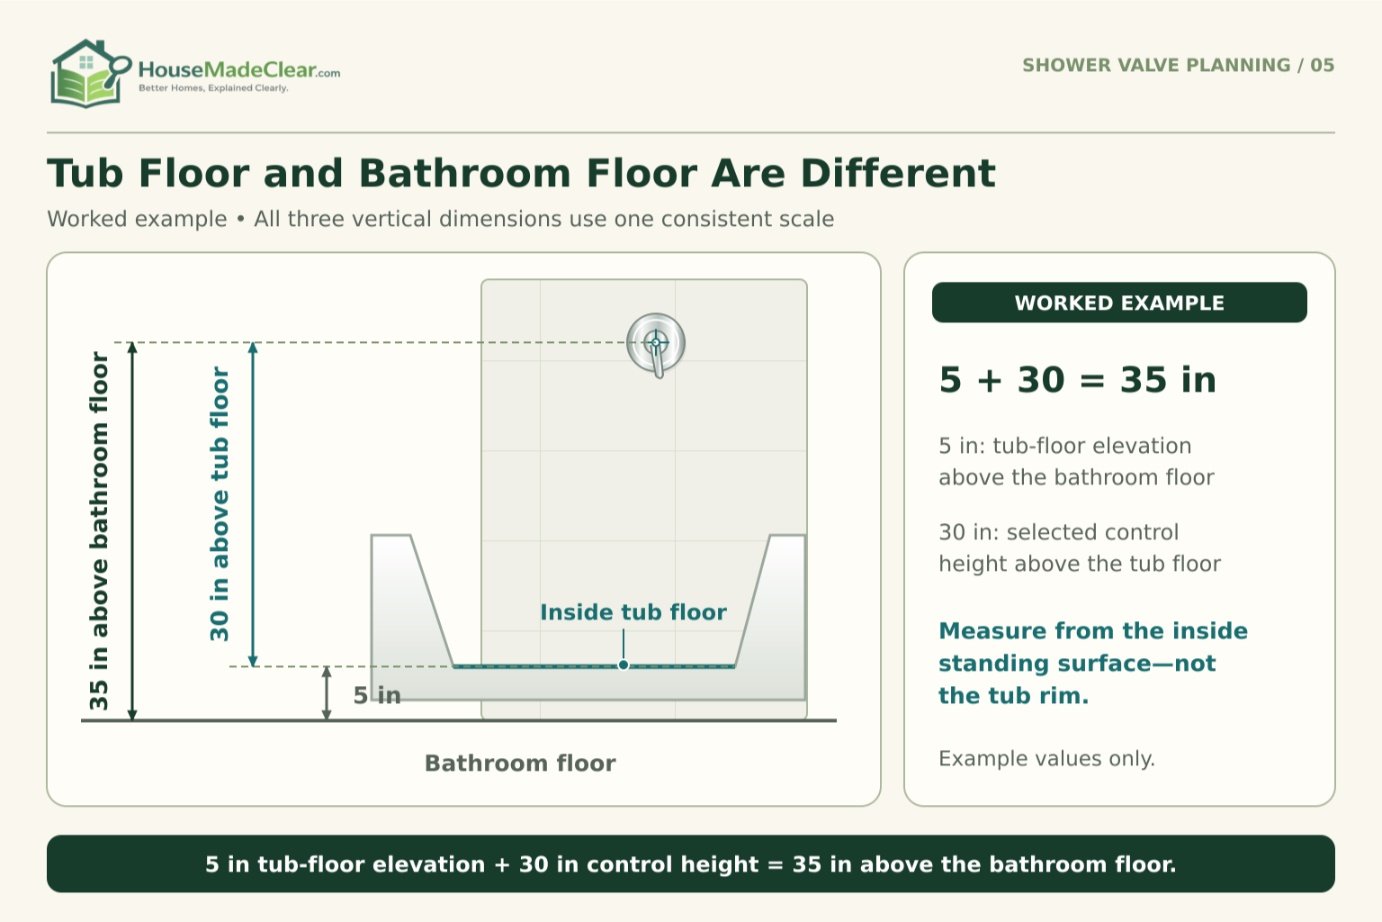
Do not measure from the bathroom floor without converting that dimension to the tub’s internal standing surface.
Tub/Shower Height Calculation Example
Suppose:
- The tub floor is 5 inches above the bathroom floor.
- The desired valve height is 30 inches above the tub floor.
The valve centerline would be:
5 + 30 = 35 inches above the bathroom floor
This is why a tub/shower valve often appears lower than a valve in a walk-in shower.
Select the tub before finalizing the valve. Different tubs have different exterior heights, interior wells and floor elevations. Our standard bathtub dimensions guide explains which measurements need to be checked.
Coordinate the Valve With the Tub Spout
The valve, tub spout and shower riser form one plumbing system. Their dimensions cannot be selected independently.
Confirm:
- Required pipe length between the valve and spout
- Tub-spout clearance above the rim
- Whether the manufacturer permits PEX on the tub-spout drop
- Trim-plate clearance above the spout
- Access for cartridge service
- Shower-riser connection above the valve
Some valve manufacturers restrict the pipe type or length used between the valve and tub spout because excessive restriction can cause water to rise toward the shower head while the tub spout is running.
Follow the selected valve’s piping diagram rather than copying measurements from another brand.
Shower Control, Handle, Faucet and Mixer Height
Searches for shower control height, shower handle height, shower faucet height and shower mixer height usually describe the same main rough-in decision.
For a single-handle concealed valve:
- The valve body sits inside the wall.
- The cartridge stem establishes the control center.
- The trim plate covers the wall opening.
- The handle attaches to the cartridge or adapter.
The valve centerline therefore controls the visible handle height.
For a shower-only installation, the same 40-to-48-inch planning range generally applies whether the product is described as a:
- Shower valve
- Shower mixer
- Shower faucet control
- Pressure-balance control
- Thermostatic control
- Shower handle
The terms are not technically identical, but they often represent the same height question for layout purposes.
Multiple-Control Systems
A thermostatic system may have separate controls for:
- Temperature
- Water volume
- Shower head selection
- Hand shower
- Body sprays
Do not stack these controls at arbitrary equal intervals. Obtain the rough-in template for the complete system and check:
- Minimum center-to-center spacing
- Trim overlap
- Shared mounting frames
- Required valve orientation
- Service access
- Comfortable reach
Mark the full trim outlines on the wall, not only their center points.
Shower Valve Rough-In Height vs. Rough-In Depth
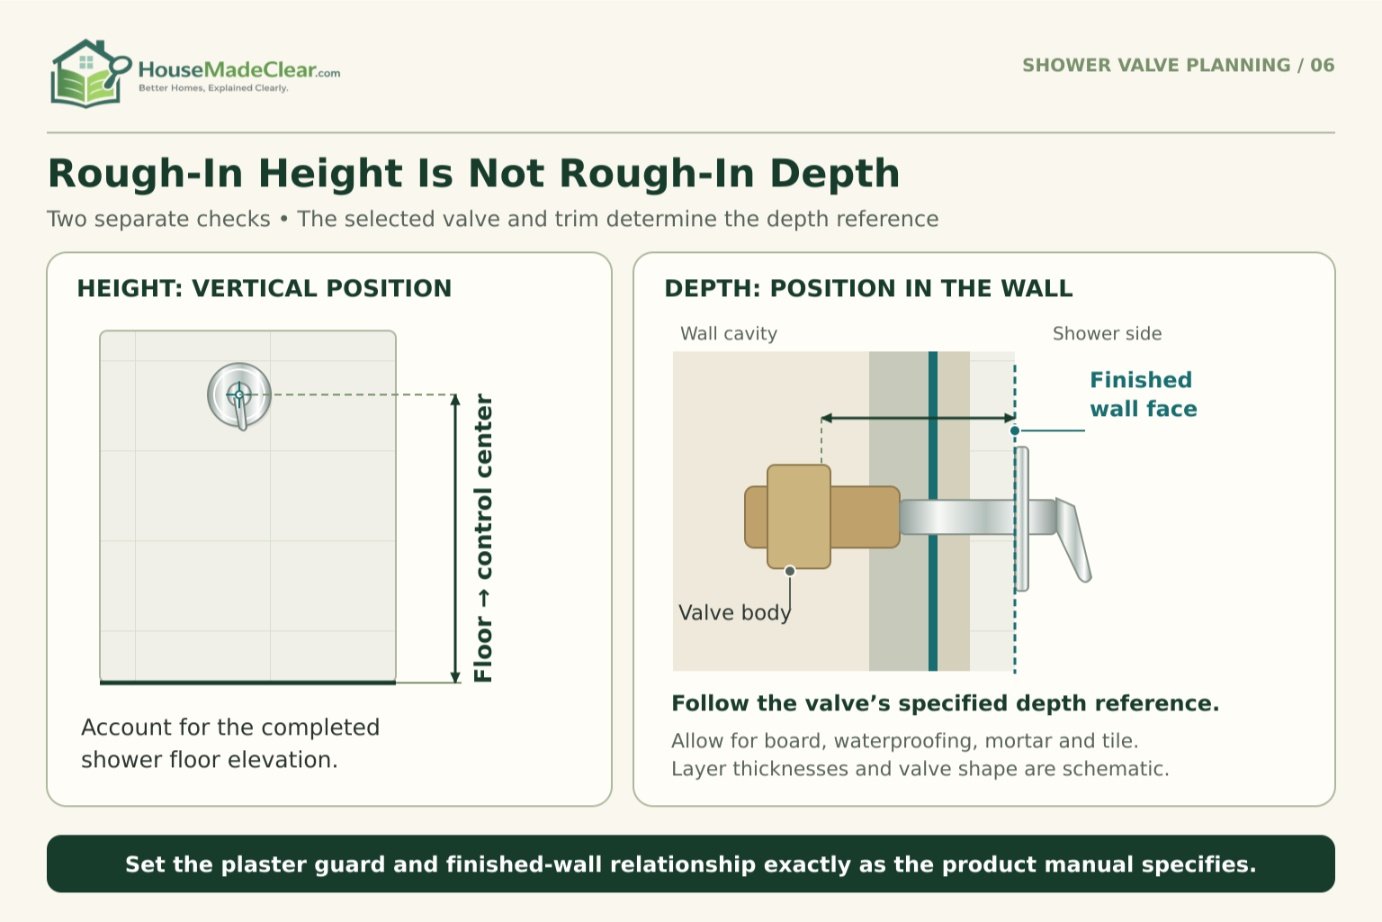
Rough-in height controls where the valve sits vertically. Rough-in depth controls where the valve sits within the wall.
Both must be correct.
Rough-In Height
For a conventional shower-only valve, rough-in height commonly begins within the 40-to-48-inch finished-height range.
The framing mark may need to be higher or lower than the desired finished measurement when the shower floor has not yet been installed.
Rough-In Depth
Rough-in depth depends on the specific valve and trim. Many concealed valves use a plaster guard to show the acceptable relationship between the valve and finished wall.
For example, Moen’s official Posi-Temp installation instructions direct installers to position the plaster ground in relation to the finished wall. Other valve systems use their own guards, depth ranges and finished-wall references.
Do not assume that every valve uses the same depth. A valve set too deep may leave the handle or trim unable to connect. A valve set too far forward may prevent the trim plate from sealing against the wall.
Before fixing the blocking, record:
- Finished wall thickness
- Minimum and maximum depth shown in the manual
- Plaster-guard reference
- Tile and mortar thickness
- Available extension kit, if any
- Required wall-opening size
Correcting a depth error after tile installation can require opening the wall or purchasing an extension kit that may not exist for that model.
Shower Diverter Height
A diverter directs water between outlets such as a fixed shower head, handheld shower and rain head.
There is no universal shower-diverter height. Its position depends on whether the diverter is:
- Integrated into the main valve trim
- Installed as a separate transfer valve
- Combined with a volume control
- Part of a manufacturer-specific mounting frame
When it is separate, place it within comfortable reach and usually near the main control. A common layout positions the diverter above the main valve, but the required distance is product-specific.
The diverter should not be so high that shorter users cannot operate it or so close to the main control that the trim plates overlap.
Valve and Diverter Layout Example
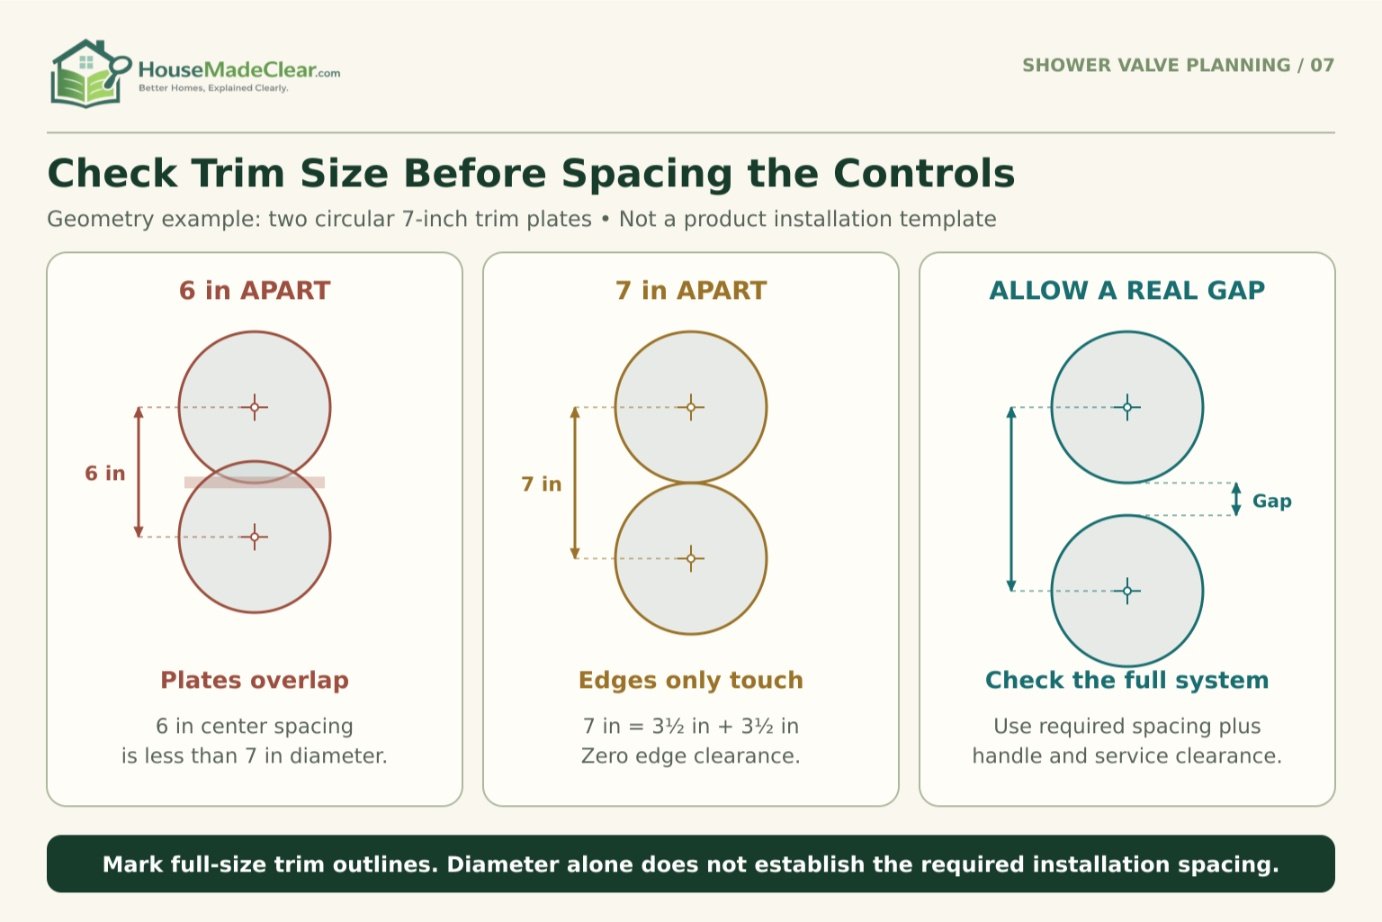
Suppose the main valve center is planned at 44 inches and both trim plates have a 7-inch diameter.
If the diverter center is placed only 6 inches above the main valve, the trim plates would overlap because each extends approximately 3½ inches from its center.
The minimum non-overlapping center-to-center distance would be slightly more than:
3½ + 3½ = 7 inches
Additional space may be needed for installation tolerances, handle movement and the manufacturer’s required spacing.
Shower Valve Height and Shower Head Height
The valve and shower head should be planned together, but they are different measurements.
A common residential starting arrangement is:
| Component | Practical starting point |
|---|---|
| Shower valve | 40–48 inches above finished shower floor |
| Fixed shower head | About 80 inches above finished shower floor |
The valve is selected for comfortable reach. The shower head is selected for user clearance and spray performance.
Do not raise the valve simply because the shower head is being raised for a tall user. The tallest person may benefit from a higher head while other household members still need to reach the control.
For complete head placement guidance, see our article on standard shower head height.
Is There a Shower Valve Height Code?
For a conventional residential shower, model plumbing-code provisions generally focus on valve performance, temperature limitation and safe installation rather than prescribing one universal mounting height.
The 2024 International Plumbing Code provisions for individual showers address shower and tub/shower control-valve performance and require the maximum setting to be limited to 120°F. The water-heater thermostat alone is not treated as the required temperature-limiting control.
This does not mean valve placement is unregulated everywhere. The enforceable requirements depend on:
- The code adopted by the state or local jurisdiction
- Local amendments
- Residential or commercial occupancy
- Accessibility requirements
- The valve’s listing and installation instructions
- Project-specific specifications
Confirm the locally adopted code before rough-in. Code editions and amendments vary across the United States.
Anti-Scald Protection Matters More Than an Arbitrary Height
A convenient control is still unsafe if the wrong valve is installed or its temperature limit is not set correctly.
Depending on the project and adopted code, the installation may require a:
- Pressure-balancing valve
- Thermostatic valve
- Combination pressure-balancing and thermostatic valve
- Listed temperature-limiting device
The installer should set and test the high-limit stop according to the valve instructions and applicable code. Do not rely only on the water-heater setting to control shower temperature.
Accessible Shower Valve Height
Accessibility rules are more specific than conventional residential planning guidance.
The U.S. Access Board’s bathing-room guidance explains that, under the ADA Standards:
- Transfer-shower controls, faucets and the shower spray unit are located 38–48 inches above the shower floor within a specified area on the control wall.
- Standard and alternate roll-in shower controls must be located above the grab bar and no higher than 48 inches.
- Horizontal placement changes according to the shower type and whether a seat is provided.
- Controls and fittings must not obstruct the usable gripping surface of grab bars.
An accessible shower is not created by placing an ordinary valve at 48 inches. The complete design must coordinate:
- Compartment dimensions
- Seat position
- Grab bars
- Control wall
- Handheld shower
- Hose length
- Clear floor space
- Door or enclosure
- Reach ranges
Does the ADA Apply to a Private Home?
A conventional owner-occupied private home is not automatically subject to the ADA Standards. Other federal, state, local, housing or project-specific accessibility rules may apply.
Even when formal compliance is not required, keeping the control within comfortable reach and planning space for future support features can improve aging-in-place usability.
Choosing Valve Height for Household Members
A generic dimension cannot account for every user.
Taller Users
Taller adults may prefer a valve near the upper end of the conventional range, such as 46–48 inches. Going higher should be tested against the reach of shorter household members.
Shorter Users and Children
A control around 40–44 inches may be easier to use. Children should be supervised around shower-temperature controls, regardless of height.
Seated Users
A person using a shower bench needs the control within safe seated reach. Avoid requiring the user to stand, twist or move beneath the spray to adjust temperature.
If the shower is intended to comply with an accessibility standard, use the standard’s exact control area rather than a general residential recommendation.
Multigenerational Households
For users of different heights, approximately 42–46 inches can be a practical compromise in a conventional shower. An entry-side location may improve usability more than moving the control a few inches vertically.
Practical Shower Valve Height Examples
Example 1: Standard Shower-Only Installation
The household selects a valve-center height of 44 inches above the finished shower floor.
The planned floor assembly will be 1½ inches above the current subfloor.
The framing measurement becomes:
44 + 1½ = 45½ inches above the subfloor
The installer must still set the valve’s depth according to the finished wall and plaster guard.
Example 2: Walk-In Shower With Entry-Side Controls
The valve center is placed at 46 inches above the finished floor and close enough to the entrance to operate without entering the spray.
The door swing, fixed glass panel and handle rotation are checked at full scale. The shower head remains on the opposite wall.
This layout can be more convenient than placing the valve directly under the head.
Example 3: Tub/Shower Combination
The tub floor is 5 inches above the bathroom floor. The selected control height is 30 inches above the tub floor.
The valve centerline is therefore:
5 + 30 = 35 inches above the bathroom floor
The tub spout and trim dimensions are then checked against the manufacturer’s piping diagram.
Example 4: Valve With a Separate Diverter
The main valve is centered at 44 inches. The diverter is placed above it only after checking both trim diameters and the manufacturer’s required spacing.
Full-size paper templates confirm that the plates do not overlap and both handles can move freely.
Common Shower Valve Height Mistakes
Measuring From the Subfloor
Problem: The finished control ends up lower than planned.
Better approach: Add the expected floor build-up to the rough framing measurement.
Treating 48 Inches as a Universal Requirement
Problem: The household or product may need a different position.
Better approach: Treat 40–48 inches as a conventional planning range and verify the final choice.
Using a Shower-Only Height for a Bathtub
Problem: The control becomes difficult to reach while bathing.
Better approach: Measure from the tub floor and coordinate the valve with the tub and spout.
Ignoring Rough-In Depth
Problem: The trim cannot be installed after the wall is finished.
Better approach: Position the plaster guard exactly as the product instructions require.
Selecting the Trim After Rough-In
Problem: The preferred trim may not fit the installed valve body.
Better approach: Select a compatible valve and trim system before plumbing begins.
Forgetting Diverter-Trim Size
Problem: Adjacent trim plates overlap.
Better approach: Mark the complete trim outlines and required spacing.
Placing Controls Directly Under the Spray by Default
Problem: The user gets wet while starting or adjusting the shower.
Better approach: Evaluate entry-side control placement where the plumbing and layout allow it.
Ignoring the Door or Glass Panel
Problem: The control becomes difficult to reach or the handle hits the enclosure.
Better approach: Test the complete door swing and fixed-panel location.
Calling a Shower Accessible Based on Height Alone
Problem: The control may be at 48 inches but outside the required horizontal reach area.
Better approach: Follow the complete applicable accessibility standard.
Failing to Pressure-Test Before Closing the Wall
Problem: A hidden leak is discovered after waterproofing or tile installation.
Better approach: Have the plumbing tested and inspected as required before closing the wall.
Shower Valve Rough-In Checklist
Before closing the wall, verify:
- Finished shower- or tub-floor elevation
- Valve centerline height
- Finished wall thickness
- Plaster-guard position
- Compatible trim model
- Valve orientation
- Hot and cold inlet positions
- Shower and tub outlet positions
- Tub-spout drop requirements
- Diverter spacing
- Handle movement
- Bench and grab-bar locations
- Entry-side reach
- Door or glass-panel conflicts
- Cartridge service access
- Required blocking and support
- Pressure test
- Temperature-limit adjustment
- Local code and inspection requirements
- Manufacturer’s installation instructions
Mark the complete trim outlines at full scale. A center-point mark alone will not reveal overlap or clearance problems.
Final Answer: How High Should a Shower Valve Be?
For a conventional shower-only installation, place the valve approximately:
40 to 48 inches above the finished shower floor
For many households, 42 to 48 inches provides comfortable standing access.
For a tub/shower combination, begin around:
28 to 32 inches above the tub floor
Then adjust for the selected tub, spout, valve, trim and user reach.
Measure to the valve or control centerline unless the product instructions specify otherwise. Confirm both vertical height and rough-in depth before waterproofing or tile installation.
Frequently Asked Questions
What is the standard shower valve height?
A practical residential shower-valve height is approximately 40–48 inches above the finished shower floor. Many households find 42–48 inches comfortable, but the final position should follow user needs and the valve manufacturer’s instructions.
How high should a shower valve be from the floor?
For a shower-only enclosure, measure approximately 40–48 inches from the finished shower floor to the valve centerline. Do not measure from the unfinished subfloor without accounting for the shower pan, mortar and tile.
What is the typical shower valve height?
Approximately 44–48 inches is typical in many shower-only residential layouts, while some installations use 40–42 inches. There is no single height required for every conventional shower.
What is the standard tub/shower valve height?
A tub/shower valve commonly starts around 28–32 inches above the tub floor. The exact height depends on the tub, spout, trim, user reach and manufacturer’s piping requirements.
Is tub/shower valve height measured from the bathroom floor?
It is better to establish the measurement from the tub’s internal standing surface and then convert it to the bathroom-floor or framing measurement. Tub-floor elevation varies by model.
What is shower valve rough-in height?
Rough-in height is the planned vertical position of the valve before the shower wall is finished. It must account for the future finished-floor elevation so the completed control reaches the intended height.
What is the difference between rough-in height and rough-in depth?
Rough-in height determines how far the valve is above the floor. Rough-in depth determines how far the valve sits within the wall relative to the finished tile or wall surface. Both measurements must match the selected valve and trim.
How high should a shower diverter be?
There is no universal diverter height. A separate diverter is often installed above and near the main control, but its center-to-center spacing and rough-in position must follow the shower-system manufacturer’s instructions.
What is the standard shower handle height?
For a single-handle shower-only valve, the handle commonly follows the valve centerline at approximately 40–48 inches above the finished shower floor.
What is the standard shower control height?
A conventional residential shower control is commonly planned around 40–48 inches above the finished floor. Accessible showers have additional height and horizontal-placement requirements.
Is there a shower valve height code?
Model plumbing codes generally focus on valve performance, anti-scald protection and maximum temperature rather than one universal conventional mounting height. Local amendments and accessibility requirements may specify additional conditions.
What is the ADA shower valve height?
In an ADA transfer shower, controls are located 38–48 inches above the shower floor within a specified horizontal control area. Roll-in shower controls are located above the grab bar and no higher than 48 inches, with placement depending on the compartment and seat.
Can a shower valve be higher than 48 inches?
A conventional private shower may use a higher control if permitted by the product and local requirements, but it can be difficult for shorter or seated users to reach. A higher control will not satisfy configurations that require a 48-inch maximum accessible reach.
Should a shower valve be directly below the shower head?
Not necessarily. In a walk-in shower, positioning the control near the entrance may allow the user to start and adjust the water without standing beneath the spray. Plumbing feasibility and manufacturer requirements still apply.







[…] Standard Shower Valve Height: Shower, Tub & Rough-In Guide […]
[…] Standard Shower Valve Height: Shower, Tub & Rough-In Guide […]
[…] Standard Shower Valve Height: Shower, Tub & Rough-In Guide […]
[…] Standard Shower Valve Height: Shower, Tub & Rough-In Guide […]