












A security camera can be switched on, connected and recording while still providing poor protection.
It may show only the top of a visitor’s head. A wall, parked vehicle or overgrown shrub may conceal an important approach route. At night, a porch light or infrared reflection may wash out the image. A camera mounted too high may capture a large area but too little facial detail to be useful.
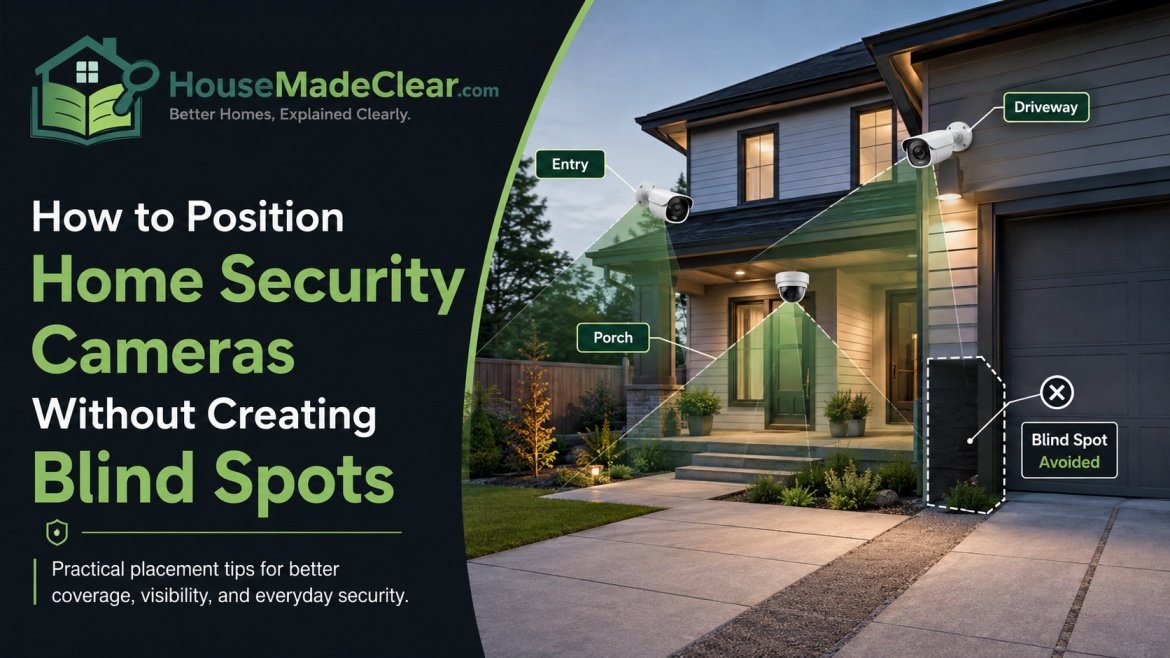
Good home security camera placement is not about recording the widest possible view. It is about capturing useful activity along relevant approach routes while controlling blind spots, glare, obstructions and unnecessary intrusion into neighbouring or public areas.
The best position depends on:
- The purpose of the camera
- The area being protected
- The camera’s field of view
- The distance from likely activity
- Lighting during the day and night
- Mounting height and angle
- Wi-Fi, power or cable access
- Privacy and rental restrictions
- The level of detail you expect the camera to capture
Quick answer:
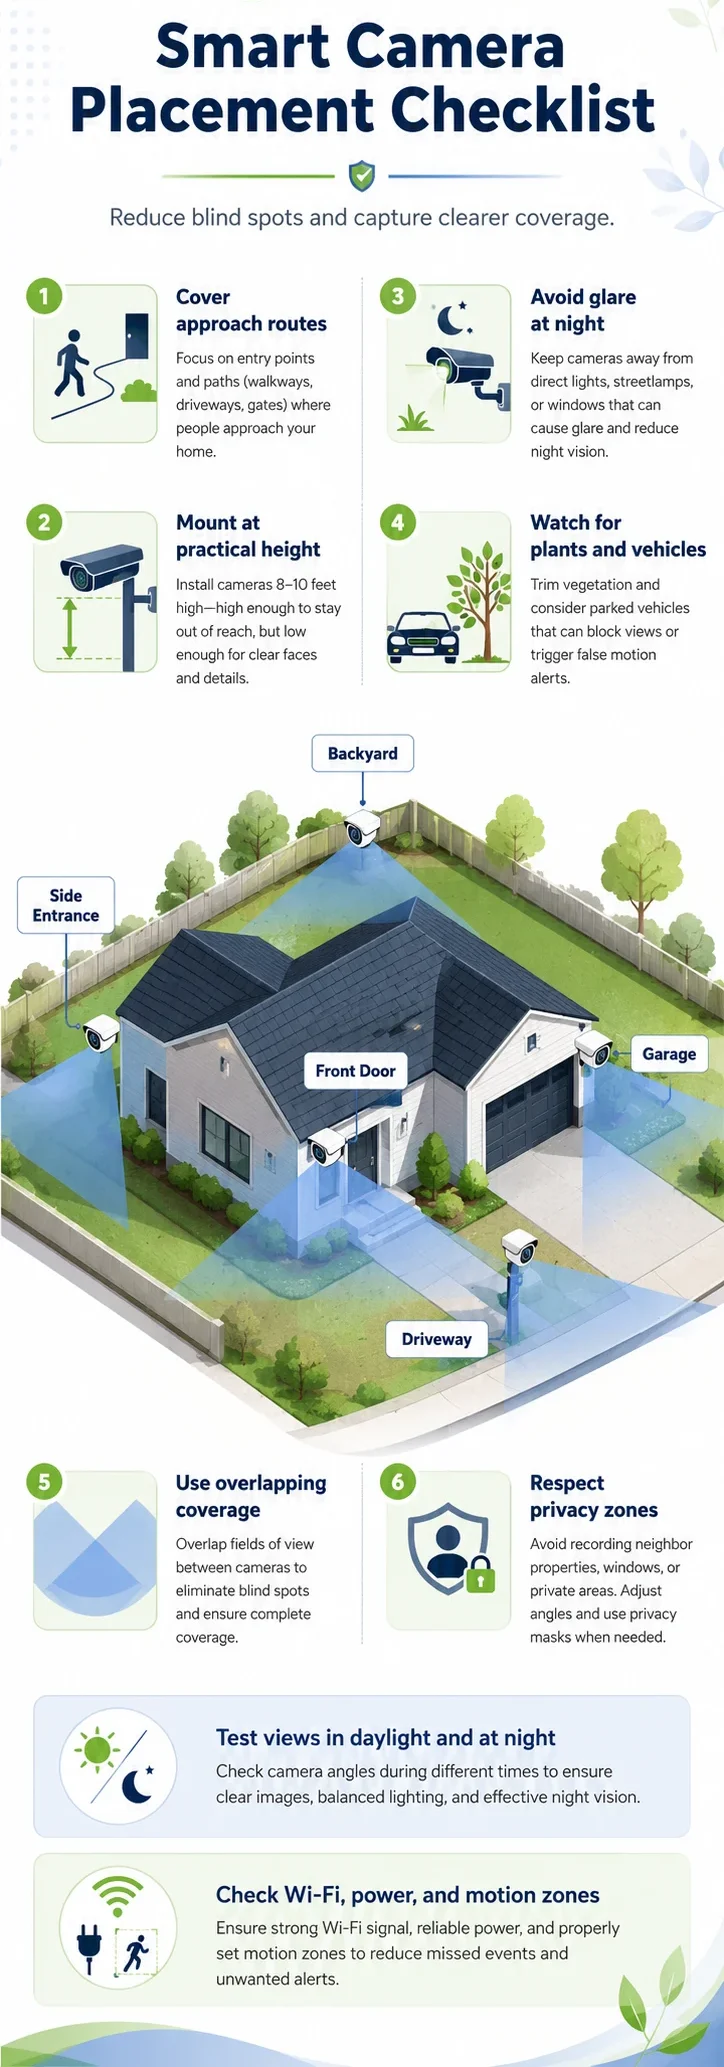
Position cameras so they cover the route a person uses to approach an entrance—not only the door itself. Mount them high enough to reduce easy tampering but low enough to capture useful facial detail. Test every view during daylight and darkness, account for plants and parked vehicles, and limit recording of neighbouring or public areas wherever possible.
Camera placement should support physical security, not replace it. Before adding more cameras, address the weak locks, defective doors and overlooked entrances covered in HouseMadeClear’s guide to common home security mistakes.
What Is a Security Camera Blind Spot?
A blind spot is any relevant area that a camera cannot record clearly enough for its intended purpose.
It may be:
- Completely outside the camera’s field of view
- Hidden behind a wall, column or gate
- Blocked by plants, furniture or vehicles
- Too dark for useful recording
- Washed out by glare or backlighting
- Too far away for meaningful detail
- Distorted near the edge of a wide-angle image
- Visible during the day but unusable at night
- Temporarily blocked when a door opens
- Outside the configured motion-detection zone
A blind spot is not always a completely invisible area. A driveway may appear in the image, for example, but a person at the gate may be too small to recognise.
That is still a coverage failure when identification was the camera’s purpose.
Physical Blind Spots
These are created by solid objects or property features, including:
- Walls
- Recessed entrances
- Porch columns
- Roof overhangs
- Fences
- Gates
- Vehicles
- Trees
- Shrubs
- Outdoor storage
- Bins
- Furniture
Technical Blind Spots
These occur when the camera sees the area but cannot capture useful information because of:
- Poor resolution at the required distance
- Excessively wide field of view
- Weak wireless signal
- Failed night vision
- Incorrect exposure
- Dirty lenses
- Motion zones that exclude the area
- Recording delays
- Inadequate lighting
- A disconnected camera
Operational Blind Spots
These are caused by the way the household uses the system.
Examples include:
- Notifications being disabled
- Batteries being allowed to fail
- Cloud storage expiring
- Local storage becoming full
- Nobody checking recorded events
- Users assuming one camera covers more than it does
- Landscaping changing after installation
A placement plan must consider all three types.
Start With a Property Camera Audit
Do not begin by mounting cameras where installation looks easiest.
Begin with a simple map of the property.
Mark:
- Property boundaries
- Front, rear and side entrances
- Accessible ground-floor windows
- Gates
- Driveways
- Garages
- Side passages
- Patios
- Balconies
- Basement entrances
- Garden rooms
- Sheds and outbuildings
- Package-delivery areas
- Existing lights
- Likely vehicle positions
- Trees and large plants
- Available power
- Wi-Fi or cable routes
- Neighbouring homes
- Shared or public areas
Then identify the routes people actually use.
A person approaching the front door may enter through a gate, cross the driveway, follow a path and step onto a recessed porch. A camera showing only the final two feet beside the door misses most of that movement.
Give Each Camera One Primary Purpose
Write down the intended purpose before choosing a position.
For example:
- Identify visitors at the front entrance
- Observe movement through a side passage
- Record vehicles entering the driveway
- Monitor access to a detached garage
- Verify package deliveries
- Alert residents when the rear gate opens
- Observe the inside of a garage door
A camera expected to identify visitors should be positioned differently from one intended only to detect movement across a wide garden.
Trying to make one camera do everything usually produces a wide but weak image.
Prioritise Approach Routes, Not Only Door Surfaces
A common placement mistake is aiming a camera directly at the door.
That may capture someone only after they have reached the entrance. It may fail to show:
- Where they came from
- Whether they approached another window first
- Whether they left an object
- Whether another person remained outside the frame
- Which direction they left
A better setup may use:
- One camera covering the approach route
- A video doorbell or closer camera capturing the visitor at the entrance
The two views answer different questions.
Front-Door Approach
Look for a position that captures:
- The main path
- Porch steps
- Gate or driveway approach
- Package area
- Visitor’s face before they reach the door
Avoid framing mostly:
- Sky
- Roof
- Blank wall
- Door surface
- The ground directly beneath the camera
Side Passage
A side passage is often narrow, creating several challenges:
- Walls can cause infrared reflection
- Bins may block the view
- Gates can divide the area
- Plants may grow into the image
- A wide lens may distort people near the edges
Position the camera so movement crosses the view rather than travelling directly toward it where the motion-detection technology works better with lateral movement.
Rear Approach
Cover:
- Rear gate
- Patio entrance
- Garden path
- Access from an alley or shared boundary
- Ground-floor rear windows where relevant
Do not assume the rear garden is private enough to leave unmonitored. Assess how it can actually be accessed.
Where to Place Cameras Around a House
No property needs a camera in every location. Prioritise areas that combine accessibility, limited natural visibility and meaningful household risk.
Front Door and Porch
A front-door camera should capture the person approaching and standing at the entrance.
Check whether it can see:
- The visitor’s face
- Packages
- The route from the gate or driveway
- The door handle or immediate threshold where relevant
- Anyone standing slightly to the side
Common problems include:
- The door opening into the camera’s view
- A porch column hiding the approach
- Strong backlighting behind the visitor
- A porch light creating glare
- The visitor standing outside the motion zone
- A doorbell camera being installed too far to one side
A wedge or angle mount may be needed when the door faces sideways relative to the path.
Side and Secondary Entrances
Secondary entrances may receive less daily attention than the front door.
Positioning should account for:
- Side gates
- Utility doors
- Basement access
- Garage-to-home doors
- Narrow pathways
- Exterior stairs
A camera should not be installed so close to a wall that the wall occupies a large part of the night image.
Rear Door and Patio
Rear cameras may need to cover both the door and approach through the garden.
Potential obstructions include:
- Patio umbrellas
- Pergolas
- Outdoor furniture
- Barbecues
- Seasonal plants
- Washing lines
- Open doors
- Garden structures
Review the position with the garden arranged as it normally is, not only when the area is empty.
Driveway
Decide what you need from the driveway camera.
Possible purposes include:
- General movement detection
- Seeing vehicles arrive
- Monitoring parked vehicles
- Observing people approaching the house
- Capturing activity near a garage
A wide camera mounted high may show the complete driveway but provide limited facial or licence-plate detail.
Licence-plate capture normally requires appropriate positioning, distance, shutter performance, lighting and a suitable camera. Do not assume a general wide-angle home camera will capture readable plates at night.
Garage
Consider two separate views:
- Outside the garage, covering the approach
- Inside the garage, covering the main door and internal entrance
An internal garage camera may remain useful when the exterior view is blocked by the garage door or a parked vehicle.
Avoid positions where:
- The opening door blocks the lens
- Vehicle headlights face the camera directly
- Shelving or stored items obstruct the view
- Wi-Fi drops when the garage door closes
Side Passage
A camera at one end can leave the near corner beneath it unobserved.
Possible solutions include:
- Positioning farther back
- Angling across the passage
- Using a second camera at the opposite end
- Covering the gate separately
Do not place two cameras in the same passage without checking whether their night-vision lights interfere with each other.
Backyard or Garden
A backyard camera does not need to record the entire garden.
Prioritise:
- External gates
- Rear doors
- Accessible windows
- Outbuildings
- Routes from neighbouring or public access
- Areas where tools or ladders are stored
Aim to detect approach and access rather than recording normal private garden activity unnecessarily.
Ground-Floor Windows
Placing a separate camera above every window is rarely necessary.
Instead, identify:
- Windows hidden from the street
- Windows accessible from a flat roof
- Basement windows
- Windows beside climbable structures
- Windows near side passages
One carefully positioned camera may cover several related approach points.
Outbuildings
For garages, sheds and garden offices, consider:
- Distance from the router
- Available electricity
- Cellular or wireless range
- Independent alarm sensors
- Whether the building contains tools that could assist entry into the main house
- Whether the view remains usable when the main property lights are off
A visually perfect camera position is useless if the connection fails repeatedly.
How High Should a Home Security Camera Be Mounted?
There is no universal mounting height.
Ring’s current positioning guidance says its outdoor security cameras are generally designed to be installed approximately 8–10 feet, or 2.5–3 metres, above ground with a moderate downward tilt. Arlo recommends installing some of its cameras at least 7 feet above the floor and aiming them slightly downward. These figures are manufacturer guidance for their products—not a rule for every camera or property.
Use the exact installation instructions for the camera model.
Problems With Mounting Too High
A camera mounted excessively high may:
- Record the top of a person’s head
- Make faces appear small
- Lose detail beneath hats or hoods
- Capture too much ground
- Reduce useful motion detection
- Make maintenance difficult
- Require unsafe ladder access
- Make battery charging inconvenient
Height does not automatically equal security.
Problems With Mounting Too Low
A camera mounted too low may:
- Be easy to reach
- Be easier to cover, rotate or damage
- Have its view blocked by people or furniture
- Record a narrow area
- Create a more intrusive view of neighbours or visitors
- Be vulnerable to accidental impact
A Better Height Test
Before drilling:
- Temporarily hold or mount the camera at the proposed position.
- Ask someone to walk the approach route.
- Review facial detail at several distances.
- Test the motion alerts.
- Check the view with the door open and closed.
- Repeat after dark.
- Confirm the camera can be maintained safely.
The best height is the one that meets the camera’s purpose while balancing usable detail, coverage, tamper resistance and maintenance.
Camera Angle Matters as Much as Height
A camera can be installed at a reasonable height but aimed poorly.
Avoid Excessive Downward Tilt
A steep downward view may capture:
- Hair
- Hats
- Shoulders
- Packages
- Ground
while missing the face.
A smaller downward angle may produce better identification when a person approaches the camera.
Avoid Excessive Sky
A large bright area of sky can affect exposure, making the entrance or visitor appear dark.
Tilt the camera so the important activity area occupies most of the frame.
Check Image Edges
Wide-angle lenses may distort people and objects near the edges.
Do not rely on the outermost portion of the image for important identification.
Avoid Pointing Through Glass
A camera aimed through a window may suffer from:
- Reflections
- Interior light glare
- Infrared bounce
- Reduced night visibility
- Dirty glass
- Window coverings
- A narrower useful angle
Turn off infrared lighting only where the camera supports it and another suitable light source is available. An exterior camera is usually more dependable for outdoor monitoring.
Field of View Is Not the Same as Useful Coverage
A camera advertised with a wide field of view may capture more area, but each person or object can occupy fewer pixels in the image.
Think about four different tasks:
Detection
Can you tell that someone or something is present?
Observation
Can you see what the person is generally doing?
Recognition
Can you determine whether the person appears familiar?
Identification
Is there enough detail to support a confident identification?
A camera can perform well for detection but poorly for identification.
This is why one wide camera covering an entire front garden may not replace a closer entrance camera.
Do Not Rely Only on Resolution Claims
Image usefulness also depends on:
- Distance
- Lens
- Compression
- Lighting
- Motion blur
- Recording frame rate
- Camera angle
- Weather
- Digital zoom
- Storage quality
A high-resolution label does not guarantee useful evidence at every point in the image.
Use Camera Overlap Carefully
Small areas of overlap can help track movement between camera views.
For example:
- Camera A covers the driveway and path.
- Camera B covers the porch and front door.
- Their fields of view overlap near the porch steps.
This makes it easier to follow movement from one area to another.
Too Little Overlap
Movement may disappear between cameras.
Too Much Overlap
Two cameras may record nearly identical views while another entrance remains uncovered.
Useful Overlap
A useful overlap zone:
- Covers a transition point
- Provides another angle
- Helps confirm direction of travel
- Does not waste most of either camera’s field of view
Create a simple top-down sketch showing each camera’s approximate coverage before installation.
Common Causes of Camera Blind Spots
Recessed Entrances
A camera mounted outside the recess may not see the door. One mounted inside may not see the approach.
A two-angle solution may be needed.
Corners
A wall corner creates an immediate area beside and beneath the camera that may not be visible.
Avoid assuming that a wide lens sees around physical structures.
Porch Columns
Columns may block visitors as they approach from one direction.
Test the complete walking route rather than looking only at the static live view.
Trees and Shrubs
Plants change during the year.
A clear winter view may become obstructed in summer. Wind-driven branches may also cause repeated motion alerts.
Vehicles
A camera view may be excellent when the driveway is empty but unusable when a vehicle is parked normally.
Test with all household vehicles in their usual positions.
Gates and Fences
An open gate may block the camera, while a closed gate may hide activity behind it.
Check both states.
Outdoor Furniture
Umbrellas, swings, storage boxes and seasonal furniture can create temporary blind spots.
Decorations
Lights, wreaths, hanging baskets and seasonal decorations can block video doorbells and entrance cameras.
Open Doors
A door may swing directly in front of a wall-mounted camera.
Test from fully closed to fully open.
Lighting and Night Vision
A camera position should be tested during:
- Bright daylight
- Dawn
- Dusk
- Full darkness
- Porch lighting
- Motion lighting
- Vehicle headlights
- Rain where practical
A daytime image can conceal serious nighttime problems.
Backlighting
A visitor standing in front of bright daylight, a road light or vehicle headlight may appear as a silhouette.
Possible improvements include:
- Changing the angle
- Adding balanced entrance lighting
- Enabling supported exposure or HDR settings
- Positioning the camera so the strongest light is not directly behind the subject
Infrared Reflection
Infrared night vision can reflect from:
- White walls
- Roof soffits
- Gutters
- Glass
- Spider webs
- Nearby branches
- Rain
- Protective covers
The reflected light may wash out part of the image.
Move the camera farther from the reflective surface or adjust its angle.
Porch and Motion Lights
Lighting should help the camera without shining directly into the lens.
A motion light that activates after the camera’s recording delay may not improve the first seconds of footage.
Test the complete sequence.
Spider Webs and Insects
Infrared lighting can attract insects, and webs close to the lens can dominate nighttime recordings.
Clean and inspect outdoor cameras regularly.
Wi-Fi, Cabling and Power Can Limit Placement
A camera’s best visual location may be its worst technical location.
Before permanent installation, test:
- Live-view loading time
- Recorded-video quality
- Motion alerts
- Signal strength
- Battery drain
- Upload stability
- Hub connection
- Local storage
- Cellular or internet backup
Wi-Fi Problems
Wireless performance may be reduced by:
- Brick
- Concrete
- Metal doors
- Foil-backed insulation
- Long distance
- Multiple floors
- Garages
- Exterior walls
- Competing networks
Do not assume strong phone Wi-Fi guarantees reliable camera performance.
Battery Cameras
Consider:
- How often charging is required
- Whether the camera can be reached safely
- Cold-weather battery performance
- How long the area remains unmonitored during charging
- Whether solar charging is effective at that position
Wired Cameras
Protect cables from:
- Weather
- Accidental damage
- Easy disconnection
- Sharp bends
- Unsafe routing
- Unauthorised modification
Electrical and structural work should be completed by an appropriately qualified professional where necessary.
HouseMadeClear’s DIY vs professional home security installation guide explains when specialist installation is more defensible also read about Where Are Smart Plugs Actually Useful.
Avoid Easily Defeated Camera Positions
Do not place a camera where it can be disabled simply by:
- Opening a door
- Moving a bin
- Rotating the bracket
- Pulling an exposed cable
- Covering it from a hidden position
- Parking normally
- Closing a gate
- Moving outdoor furniture
Consider whether someone can approach the camera without entering its useful field of view.
Visible or Concealed?
A visible camera may discourage some behaviour and show visitors that recording is taking place.
A less obvious camera may be harder to avoid but may raise greater privacy and disclosure concerns.
For most residential use, cameras should not be deliberately disguised in private or sensitive areas.
Indoor Camera Placement
Indoor cameras require greater privacy restraint.
Potential locations include:
- Main entrance hall
- Shared ground-floor hallway
- Internal garage entrance
- Stair landing
- Room containing an external entrance
- Common living space where every regular occupant understands the arrangement
Avoid placing cameras in:
- Bathrooms
- Changing areas
- Guest sleeping areas without clear notice
- Bedrooms without informed agreement
- Areas where people reasonably expect substantial privacy
The FTC advises buyers to choose cameras with security protections such as encryption, strong account controls and appropriate software support. It also recommends changing default credentials and securing remote access.
Household Consent
Every regular occupant should understand:
- Which areas are recorded
- Whether audio is active
- Who can view live footage
- Who receives alerts
- How long recordings are stored
- Whether cloud processing is used
Do not give unrestricted camera access to more users than necessary.
Camera Placement for Apartments and Renters
Renters must consider both installation rights and shared-area privacy.
Potential renter-friendly options include:
- Freestanding indoor cameras
- Removable mounts
- Approved video doorbells
- Cameras facing only the inside of the private entrance
- Battery devices that do not alter wiring
Before installation, check:
- Lease terms
- Landlord permission
- Building-management rules
- Fire-door restrictions
- Shared-corridor rules
- Damage caused by adhesive or drilling
- Audio-recording settings
- Neighbouring doors within the frame
A hallway outside an apartment is not the same as a private front garden. It may record neighbours whenever they enter or leave their homes.
Use privacy zones and limited motion areas where supported.
US Privacy Considerations
US privacy and recording rules vary by state and circumstance.
Video recording is generally treated differently from audio recording. Audio can create additional consent issues.
Homeowners should avoid recording areas where people have a strong expectation of privacy, including:
- Neighbouring home interiors
- Bathrooms
- Bedrooms
- Enclosed private gardens belonging to others
- Changing areas
Also check:
- State audio-consent rules
- Homeowners’ association restrictions
- Lease requirements
- Local nuisance rules
- Workplace laws where domestic employees are recorded
This article provides general information, not state-specific legal advice.
UK Privacy Considerations
The UK ICO advises householders to point cameras away from neighbours’ property, public areas and communal spaces where possible. It also recommends using privacy filters or blockers when a system captures more than is necessary.
Current UK government guidance covers domestic CCTV, including video doorbells, and was updated in May 2026. It explains that a domestic system includes the camera, recording, storage and associated equipment.
When cameras capture beyond the property boundary, the householder may have additional data-protection responsibilities.
These can include:
- Having a clear reason for recording
- Limiting coverage to what is necessary
- Informing people that recording takes place
- Protecting stored footage
- Restricting access
- Retaining footage only as long as needed
- Responding appropriately to requests
- Avoiding unnecessary audio recording
The ICO specifically advises trying to reposition cameras and using privacy masking to reduce intrusion.
Be particularly careful when recording:
- Footpaths
- Streets
- Shared drives
- Communal corridors
- Neighbouring gardens
- Neighbouring entrances
- Shared parking
The fact that a camera can capture an area does not mean it should.
European Privacy Considerations
EU countries apply data-protection principles through the GDPR, but domestic-surveillance interpretation and additional national rules can vary.
In general, minimise unnecessary recording by:
- Aiming cameras at your own property
- Avoiding neighbouring windows and private gardens
- Limiting audio
- Using privacy masking
- Restricting access to footage
- Using short, justified retention periods
- Securing accounts and storage
- Checking country-specific guidance
Germany and France may have country-specific requirements and enforcement practices. Consult the relevant national data-protection authority where a camera captures public or neighbouring areas.
Secure the Camera System Itself
A physically well-positioned camera can still create a security risk if the account is weak.
The FTC advises choosing cameras that protect account information, live streams and archived video through encryption and other security measures.
Use these minimum controls:
- Create a unique password.
- Enable multifactor authentication.
- Change default credentials.
- Keep camera firmware updated.
- Keep the mobile application updated.
- Remove former users.
- Review access logs where available.
- Disable unused sharing links.
- Limit administrator access.
- Secure the router.
- Review cloud-storage settings.
- Factory-reset cameras before disposal or transfer.
The FTC also recommends checking IP-camera access logs for unfamiliar addresses or unusual access times.
Home Security Camera Placement Checklist
Before finalising a position, ask:
- Does the camera cover a relevant approach route?
- Can it capture useful facial detail?
- Is the subject large enough in the image?
- Does the door block the view when open?
- Is the image clear during full darkness?
- Does a porch light create glare?
- Do headlights wash out the image?
- Can plants grow into the frame?
- Will a parked vehicle block the view?
- Is the camera reasonably protected from tampering?
- Can it be maintained safely?
- Is the Wi-Fi or cable connection reliable?
- Is power dependable?
- Are motion zones aligned with real approach routes?
- Does the recording include unnecessary neighbouring space?
- Is audio recording needed?
- Are privacy zones configured?
- Does another camera cover important transition points?
- Does recording continue without a subscription?
- Does the household know how to respond to alerts?
A Seven-Day Camera Placement Test
Do not consider installation complete after checking one live image.
Day 1: Daylight Test
Review:
- Facial detail
- Approach routes
- Image edges
- Door movement
- Vehicle positions
Walk every likely path.
Day 2: Night Test
Check:
- Infrared reflection
- Dark corners
- Glare
- Motion-light timing
- Face exposure
- Spider webs or nearby objects
Day 3: Visitor and Delivery Test
Ask someone to:
- Approach normally
- Stand at the door
- Place a package
- Step to either side
- Leave by another route
Confirm whether notifications arrive early enough.
Day 4: Vehicle Test
Park vehicles normally and check whether they block:
- Paths
- Gates
- Garage access
- Camera-to-camera transitions
Test headlights after dark.
Day 5: Changing-Light Test
Review the image at:
- Sunrise
- Midday
- Sunset
- Dusk
Look for strong backlighting and deep shadows.
Day 6: Motion and Recording Test
Confirm:
- Motion zones
- Recording duration
- Notification delay
- Event history
- Storage
- Battery status
- Wi-Fi reliability
Day 7: Privacy and Blind-Spot Review
Stand at:
- Every entrance
- The edge of each field of view
- Behind columns
- Near gates
- Beneath cameras
- Common obstruction points
Then review:
- Neighbouring areas
- Public spaces
- Audio settings
- Privacy zones
- User access
- Footage retention
Adjust the system before treating it as complete.
Final Verdict
The best camera position is not necessarily the highest point or the widest view.
It is the position that:
- Covers a meaningful approach route
- Captures useful detail
- Works during the day and night
- Remains connected
- Can be maintained safely
- Resists simple obstruction
- Complements other cameras without excessive duplication
- Records no more neighbouring or public space than necessary
Start with the purpose of each camera. Map the property. Test likely movement. Review lighting and obstructions. Then test the system for a full week under normal household conditions.
A camera should provide information the household can use—not simply footage showing that something happened too far away, outside the frame or behind an avoidable blind spot.
For broader system planning, read Do You Really Need a Smart Home Security System? and the HouseMadeClear guide to DIY vs professional installation.
This article follows the practical design-and-security approach behind HouseMadeClear. Learn more about Charu’s professional contribution on the Meet Charu page and review the HouseMadeClear Disclaimer before making significant installation, electrical, privacy or security decisions.
Frequently Asked Questions
Where is the best place to put outdoor security cameras?
Prioritise routes leading to accessible entrances, including the front path, side gate, rear entrance, driveway and garage. Position each camera according to a defined purpose rather than attempting to record the entire property with one device.
How high should a home security camera be mounted?
There is no universal height. Some manufacturers recommend roughly 7–10 feet for selected outdoor products, but the correct position depends on the camera model, desired detail, angle, tamper risk and property layout. Follow the model’s instructions and test facial detail before drilling.
Should a security camera point directly at the front door?
Not always. A camera pointed only at the door may miss most of the visitor’s approach. A better arrangement may combine one view of the route to the entrance with a closer video doorbell or porch camera.
How can I find camera blind spots?
Walk every approach route while watching the live view and recording. Test corners, areas beneath the camera, open doors, parked vehicles, gates, columns and landscaping. Repeat the process after dark.
Is it better to mount security cameras high or low?
A higher camera may resist tampering and cover more area, but it may lose facial detail. A lower camera may capture faces better but be easier to block or damage. The correct position balances coverage, identification, maintenance and tamper resistance.
Can outdoor security cameras see clearly at night?
They can provide useful night footage when the placement, lighting and infrared operation are suitable. White walls, glass, soffits, spider webs, rain, headlights and badly positioned lights can reduce image quality.
Can home security cameras record a neighbour’s property?
Camera owners should avoid recording neighbouring property where possible. In the UK, recording beyond the property boundary can trigger data-protection responsibilities. US and European rules vary, so cameras should be limited to what is reasonably necessary and local requirements should be checked.
How many security cameras does a house need?
There is no fixed number. The appropriate quantity depends on entrances, approach routes, property layout, existing visibility and the purpose of each camera. Several carefully positioned cameras may be more useful than many devices with overlapping or poorly tested views.