

















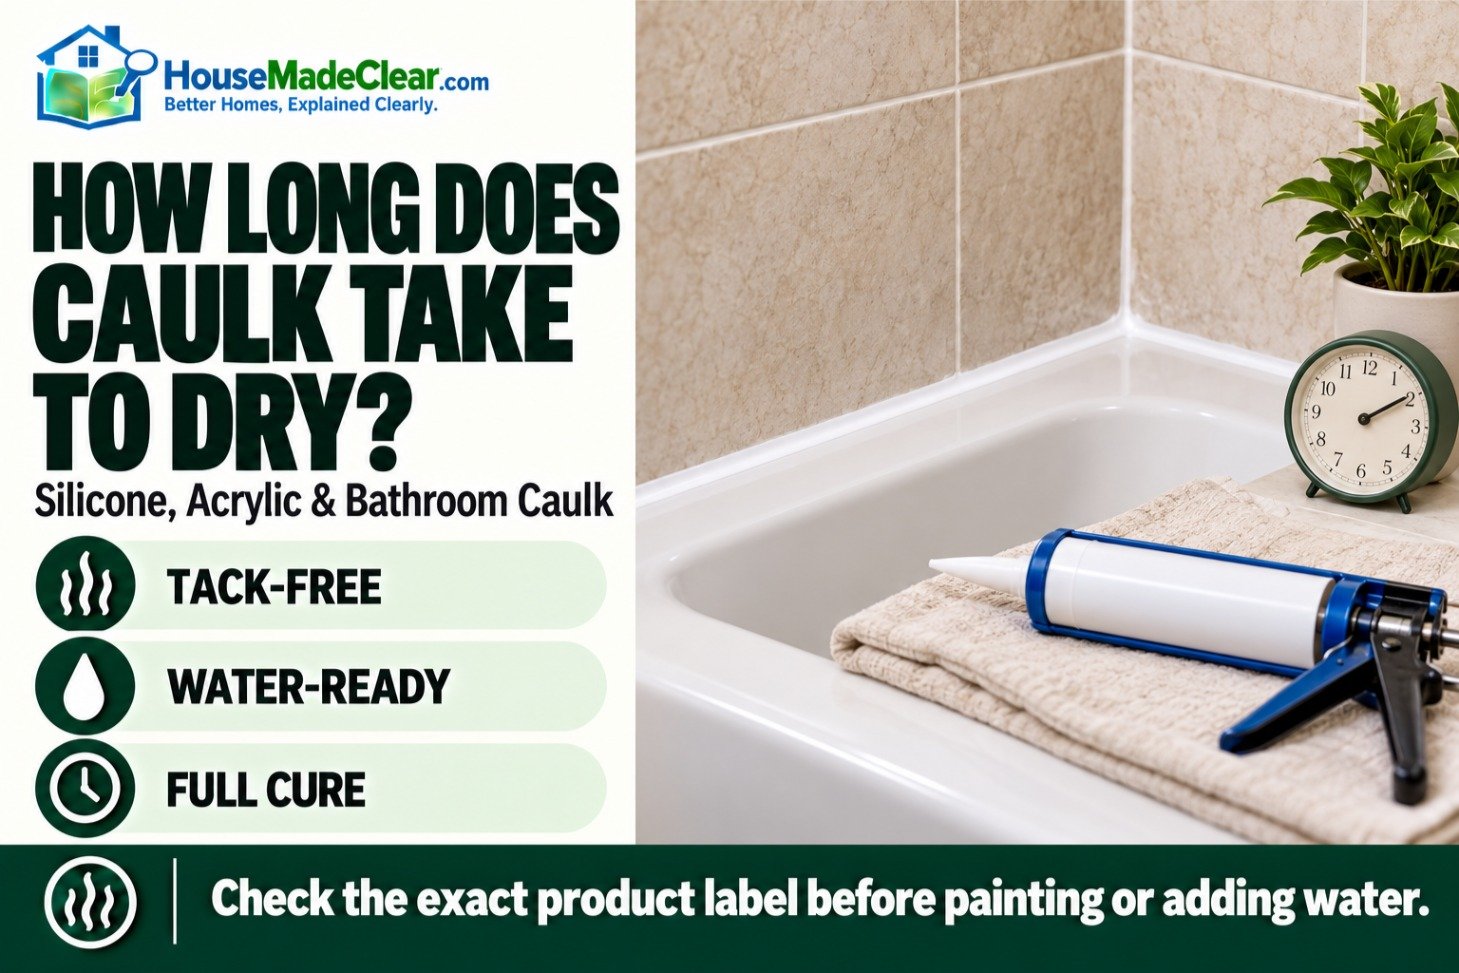
You’ve just applied fresh caulk around your bathtub, shower, sink, or window. The bead looks smooth, the gap is sealed, and the project seems finished. But one important question remains: How long does caulk take to dry before you can safely touch it, paint over it, or expose it to water?
The answer depends on the type of caulk, its formulation, the thickness of the bead, and the temperature and humidity where it was applied.
Some fast-drying acrylic caulks become tack-free in less than an hour. Many silicone sealants require approximately 24 hours to cure, while certain fast-water-ready bathroom silicones can tolerate water exposure in as little as 30 minutes under specified conditions.
However, drying, curing, paint readiness, and water readiness are not the same thing.
A bead that feels dry on the outside may still be soft underneath. Using a shower or painting too early can interfere with curing, damage the fresh seal, or cause adhesion problems.
This guide explains typical caulk drying and curing times, differences between silicone and acrylic caulk, when you can use a newly caulked shower, and how to avoid common mistakes that delay the process.
Quick Answer
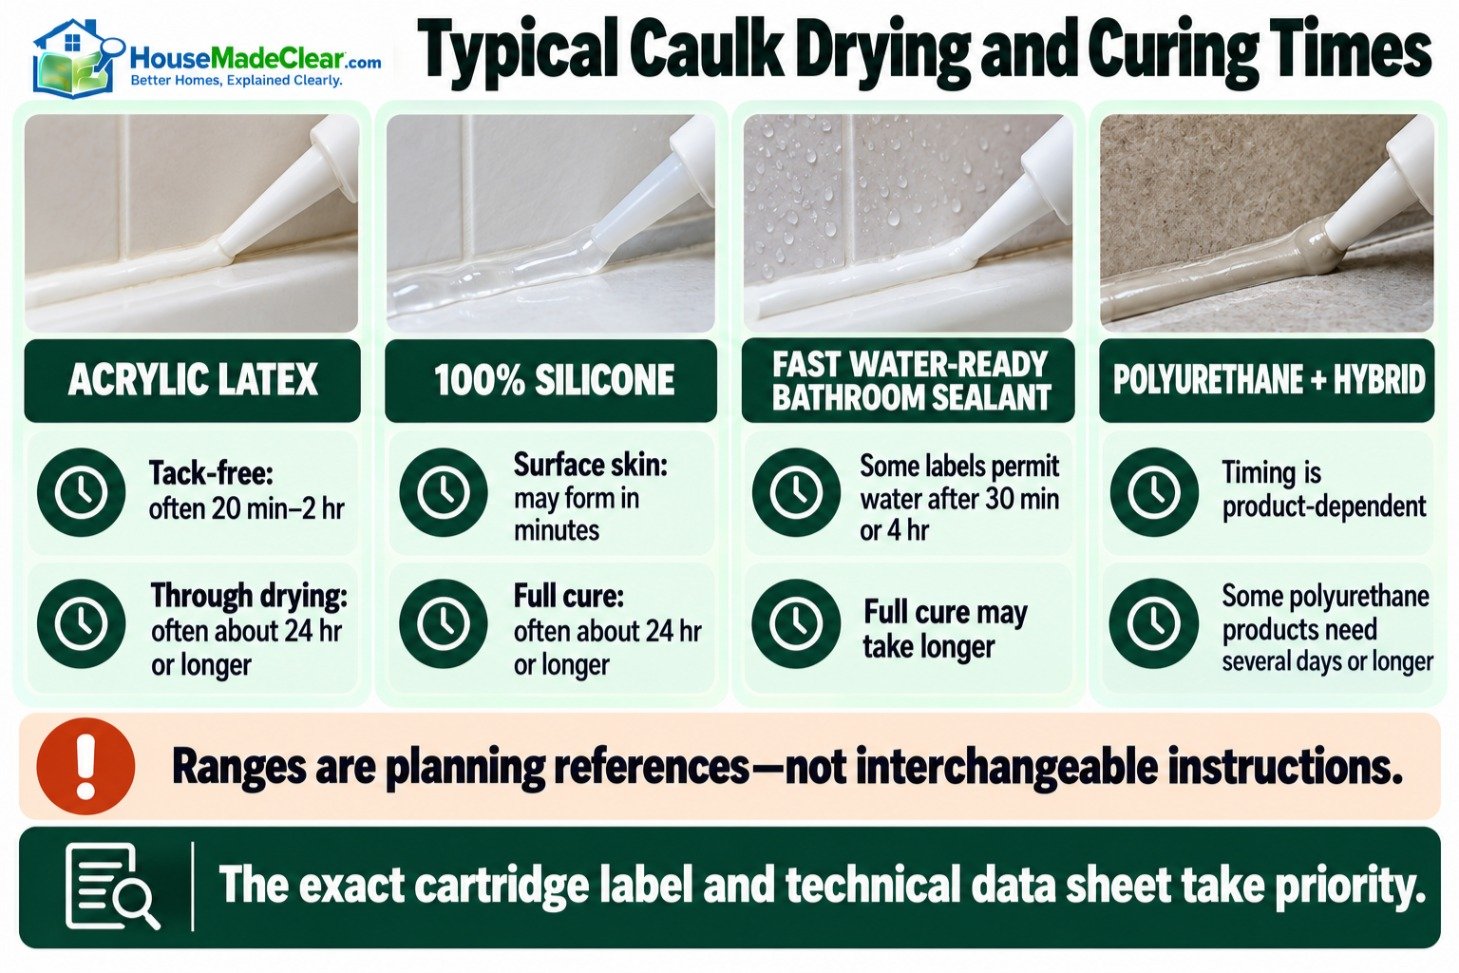
How long does caulk take to dry? Many acrylic latex caulks become tack-free within approximately 20 minutes to 2 hours, but drying through the bead may take around 24 hours or longer. Standard silicone sealants commonly require about 24 hours to cure, depending on the product and application conditions.
Typical planning guidance:
- Acrylic latex caulk: May become tack-free in 20 minutes to 2 hours; full drying is often around 24 hours or more.
- 100% silicone caulk: Commonly requires approximately 24 hours to cure, sometimes longer for thick beads.
- Fast-drying paintable caulk: Some products allow painting after approximately 20–30 minutes.
- Fast-water-ready bathroom caulk: Certain labeled products permit water exposure after 30 minutes or 4 hours.
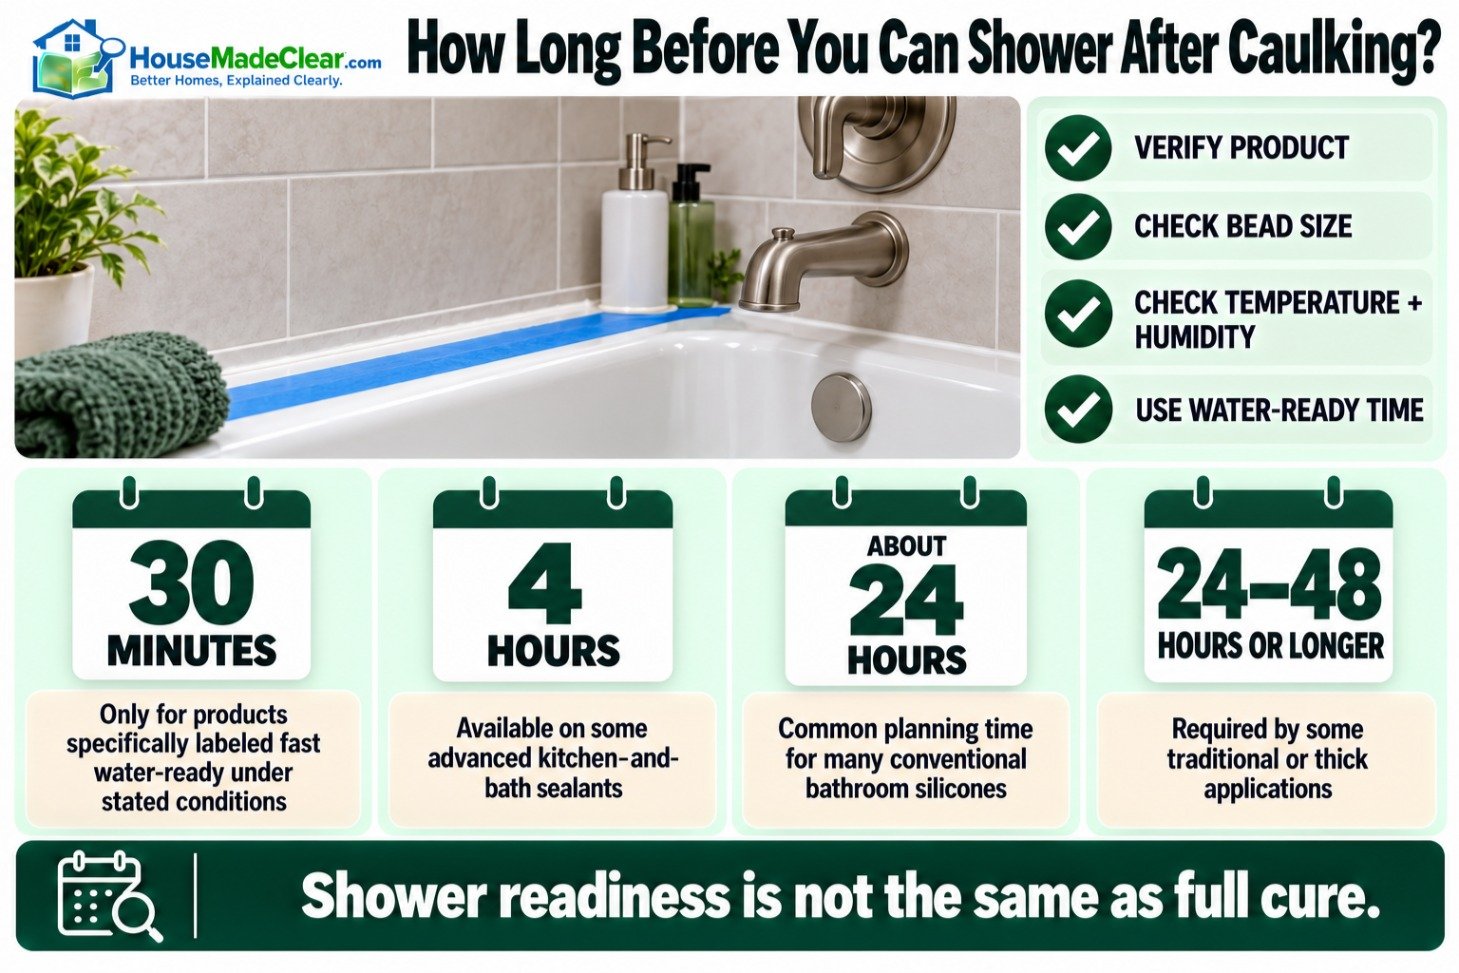
- Standard shower caulk: Plan for roughly 24 hours or the specific manufacturer’s required waiting period before showering.
Most important: Always follow the instructions on your exact caulk product. A water-ready label does not necessarily mean the sealant is fully cured.
Caulk Drying Time Chart by Type
Different caulks use different chemistries, so there is no single drying time that applies to every product.
| Caulk or Sealant Type | Typical Early Surface Stage | Full Drying or Curing | Important Consideration |
|---|---|---|---|
| Acrylic latex | Often 20 minutes–2 hours to become tack-free | Frequently around 24 hours or longer | Painting time varies by formula |
| Siliconized acrylic latex | Often minutes to a few hours | Commonly around 24 hours or longer | Still primarily a water-based formulation |
| Standard 100% silicone | Surface skin may form in minutes | Often around 24 hours; longer for thicker sections | Water exposure depends on the label |
| Fast-water-ready silicone | May skin over quickly | Often around 24 hours or more | Some allow water exposure after 30 minutes |
| Hybrid or advanced polymer sealant | Product dependent | Product dependent | Some can be exposed to water before full cure |
| Polyurethane sealant | Product dependent | May require several days or longer | Often used for construction and exterior applications |
| Specialty tub-and-tile caulk | Product dependent | Can range from about a day to substantially longer | Check exact formulation and joint dimensions |
These ranges are general planning references, not interchangeable instructions.
For example, DAP’s caulk and sealant guidance distinguishes between quick paint-ready times for some acrylic products and longer curing periods for silicone sealants.
Similarly, certain fast-water-ready silicone products are designed to tolerate water exposure before they have reached their final cured properties.
When timing matters, the individual product’s technical data sheet takes priority.
Caulk Drying vs. Curing: What’s the Difference?
One of the most common caulking mistakes is assuming that a dry surface means the sealant is ready for normal use.
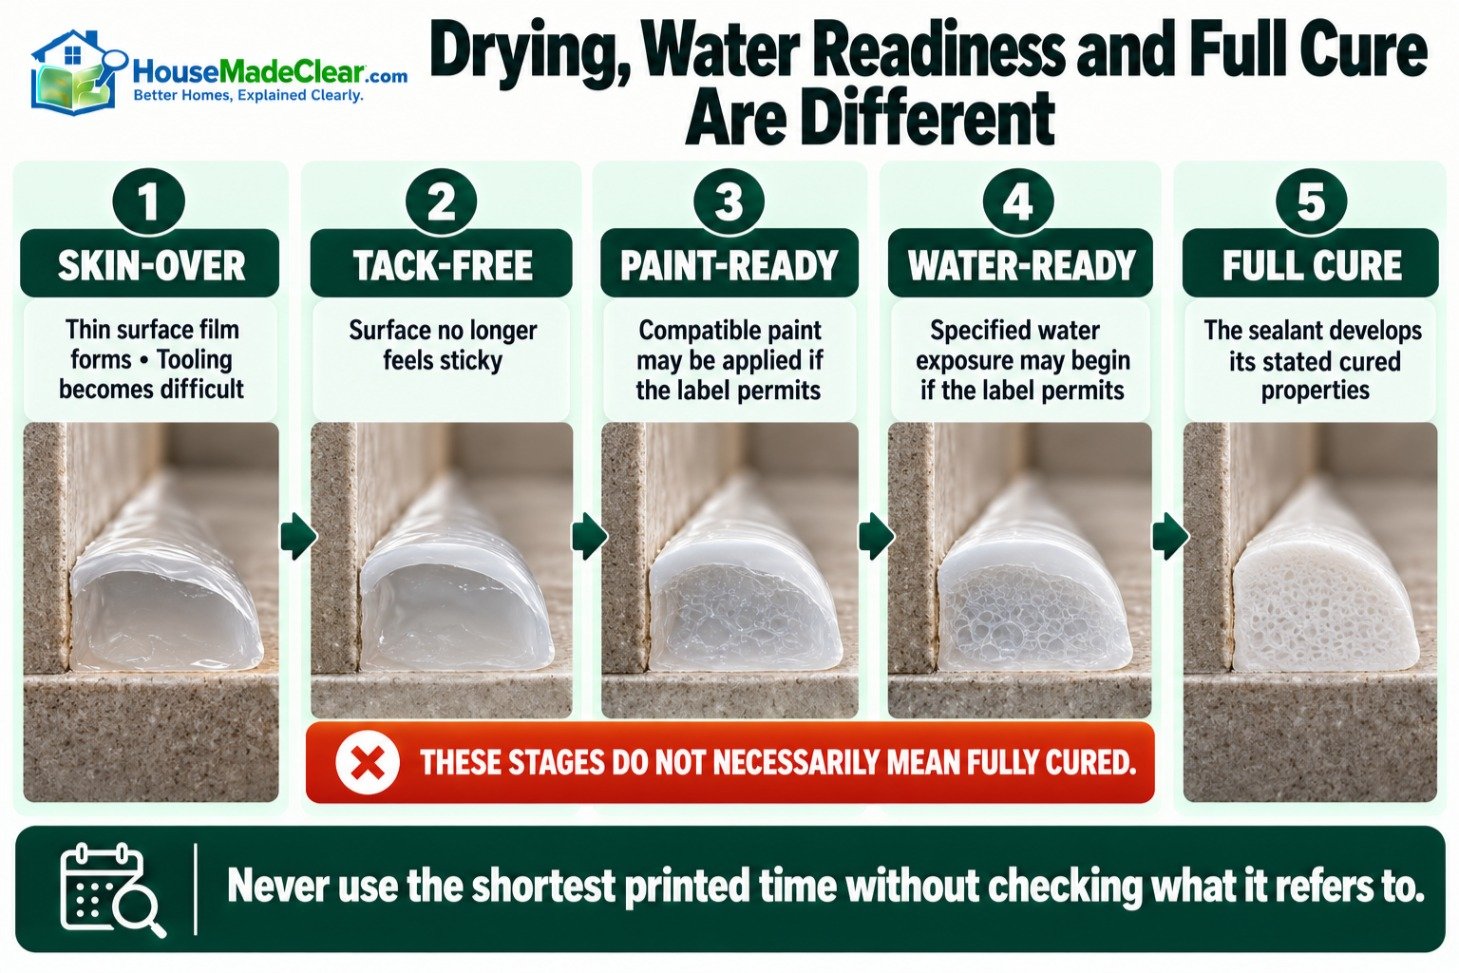
In reality, several different stages occur after application.
1. Skin-Over Time
Skin-over time refers to the period needed for a thin film to develop on the exposed surface.
With certain silicone sealants, skin formation can begin fairly quickly.
Once a skin forms, smoothing or reshaping the bead may become difficult.
This is why manufacturers usually recommend tooling silicone immediately after application.
2. Tack-Free Time
Tack-free time is when the surface no longer feels sticky under the specified test conditions.
A caulk can be tack-free while the material beneath the surface remains soft.
Therefore, tack-free does not mean fully cured.
3. Paint-Ready Time
Paint-ready time is the waiting period before a compatible paint may be applied.
Some fast-drying acrylic products can be painted relatively soon after application.
Other products need a longer drying period.
Most conventional 100% silicone sealants are not paintable.
4. Water-Ready Time
Water-ready time is when a sealant can tolerate the water exposure described by its manufacturer.
This is especially important for showers, bathtubs, sinks, and exterior repairs.
Some products are water-ready well before they are fully cured.
5. Full Cure Time
Full cure is the stage when the material has developed the cured properties specified by the manufacturer.
Depending on its chemistry, the sealant may need to release water or undergo a chemical curing reaction.
A bead can appear dry long before this process is finished.
Quick Comparison
| Term | What It Means | Does It Mean Fully Cured? |
|---|---|---|
| Skin-over | A film has formed on the surface | No |
| Tack-free | Surface is no longer sticky | No |
| Paint-ready | Suitable for specified painting conditions | Not necessarily |
| Water-ready | May tolerate permitted water exposure | Not necessarily |
| Full cure | Specified curing process is complete | Yes, under stated conditions |
Key takeaway: Never use the shortest time printed on the cartridge without checking what that time actually refers to.
 How Long Before You Can Shower After Caulking?
How Long Does Silicone Caulk Take to Dry?
Silicone caulk is widely used in bathrooms, kitchens, and other areas that need a flexible, water-resistant seal.
Many conventional silicone products require approximately 24 hours to cure under normal conditions.
However, the time can increase depending on temperature, humidity, and bead thickness.
How Does Silicone Caulk Cure?
Many one-component silicone sealants cure by reacting with moisture in the surrounding air.
This differs from water-based acrylic caulk, which primarily dries as water leaves the material and the polymer film develops.
Because the chemistry is different, drying conditions affect the two materials differently.
Does Silicone Caulk Dry in 30 Minutes?
Some silicone sealants are labeled water-ready in as little as 30 minutes.
For example, Gorilla 100% Silicone Kitchen & Bath advertises 30-minute water readiness under stated conditions involving a 3/16-inch bead, approximately 70°F temperature, and 50% relative humidity.
That is a product-specific claim.
It does not mean every silicone caulk can safely be exposed to water after 30 minutes.
It also does not mean full curing is complete.
How Long Does Thick Silicone Caulk Take to Cure?
Thick beads generally need more time because the curing process must progress through a greater amount of material.
A deep, oversized joint may cure significantly more slowly than the standard test bead described on the label.
Do not try to compensate for an oversized gap by applying an unnecessarily thick mass of sealant.
Use the joint dimensions and backing materials recommended by the manufacturer.
How Long Does Acrylic Latex Caulk Take to Dry?
Acrylic latex caulk is commonly used for:
- Baseboards
- Interior window trim
- Door trim
- Crown molding
- Small gaps around painted surfaces
- Certain suitable kitchen and bathroom applications
Many acrylic latex products dry relatively quickly at the surface.
However, drying through the bead takes longer.
Typical Acrylic Caulk Times
| Stage | Common Planning Range |
|---|---|
| Surface becomes tack-free | About 20 minutes–2 hours |
| Painting with some fast-dry products | As little as 20–30 minutes |
| Drying through a normal bead | Often around 24 hours |
| Larger or deeper beads | Longer, depending on conditions |
For example, DAP ALEX FAST DRY acrylic latex caulk is designed for rapid painting, but that does not mean its entire bead has finished drying at the same moment.
Can Acrylic Caulk Be Painted Before It Is Fully Dry?
Some products specifically allow this.
However, you must follow the product’s paint-ready instructions.
Painting too early with an incompatible coating may cause cracking, discoloration, poor adhesion, or surface defects.
For projects involving wall and trim painting, our guide to how long it takes to paint a room explains the broader painting schedule, including preparation and drying between coats.
How Long Does Bathroom Caulk Take to Dry?
Bathroom caulk timing depends on the sealant formulation and the type of moisture exposure expected.
A bathtub or shower requires more careful timing than a dry interior trim joint.
The sealant must be suitable for wet-area use, and its installation instructions must be followed.
Common Bathroom Caulking Situations
| Location | Recommended Approach |
|---|---|
| Bathtub-to-wall joint | Use appropriate wet-area caulk; follow water-ready time |
| Shower corners | Follow sealant instructions and joint design requirements |
| Around a bathroom sink | Allow the specified time before splashing |
| Vanity backsplash | Protect from water until permitted |
| Around plumbing penetrations | Use material suitable for the joint and exposure |
| Dry decorative bathroom trim | Paintable caulk may be appropriate |
| Shower pan perimeter | Follow shower system and sealant manufacturer’s requirements |
Do not assume the same sealant is suitable for every bathroom joint.
A shower’s waterproofing system also matters. Surface caulk should not be treated as a substitute for properly installed waterproofing behind the tile or shower enclosure.
Should You Wait 24 Hours Before Using a Shower?
For many conventional shower sealants, allowing approximately 24 hours is a sensible planning assumption.
However, there are important exceptions.
Some products require longer, while others are specifically labeled for earlier water exposure.
For example, DAP KWIK SEAL ULTRA Advanced Kitchen & Bath Sealant lists a four-hour water-ready period.
The manufacturer’s instructions determine when a particular shower can be used.
How Long Should You Wait After Caulking a Bathtub?
Use the product’s stated water-ready or return-to-service period.
Also make sure the original surface was clean and dry before the caulk was applied.
Even a properly cured sealant may not bond correctly if it was installed over water, soap residue, or deteriorating old caulk.
If you are planning a bathtub installation or replacement, see our guide to standard bathtub dimensions for sizing and clearance considerations.
How Long Before You Can Shower After Caulking?
This is usually the most important question for homeowners completing bathroom repairs.
The correct answer is based on water-ready time, not merely how quickly the caulk feels dry.
Shower Waiting Times by Product Type
| Product Description | Possible Water-Ready Time | Important Note |
|---|---|---|
| Conventional bathroom silicone | Often approximately 24 hours | Verify exact product |
| Fast-water-ready silicone | As little as 30 minutes for certain products | Specific bead and environmental conditions apply |
| Advanced kitchen-and-bath sealant | Some products allow water after 4 hours | Not representative of every acrylic or hybrid product |
| Traditional tub-and-tile caulk | May require 24–48 hours or longer | Follow instructions |
| General interior acrylic latex | Not necessarily suitable for direct shower use | Choose a wet-area-rated sealant |
What Happens If You Shower Too Soon?
Premature water exposure may:
- Wash away or disturb uncured water-based caulk
- Interfere with adhesion
- Deform the bead
- Produce surface defects
- Compromise the seal
- Require removal and reapplication
The risk depends on the product and how far curing has progressed.
What If the Caulk Says 30-Minute Shower Ready?
Follow the manufacturer’s conditions.
The instruction may specify:
- Maximum bead dimensions
- Temperature
- Relative humidity
- Surface preparation
- Type of water exposure
- Longer waiting periods under unfavorable conditions
Do not apply the 30-minute claim to an oversized bead or a different sealant.
How Long Does Caulk Take to Dry Around a Sink?
Caulking around sinks usually involves smaller joints than some bathtub or shower installations.
However, the sealant may be exposed to water splashes, cleaning products, and repeated movement.
A kitchen or bathroom sink can generally return to normal splash exposure once the product’s stated water-ready time has passed.
Bathroom Sink Caulk
Use a sealant compatible with the countertop, sink material, and expected exposure.
Protect the joint until the manufacturer permits water contact.
Kitchen Sink Caulk
Kitchen sinks often experience frequent water exposure and cleaning.
The sealant must be suitable for those conditions.
Do not assume that a paintable trim caulk will perform adequately around a frequently wet kitchen sink.
What About Stone Countertops?
Natural stone and engineered countertop materials may have special compatibility requirements.
Some sealants can discolor porous materials.
Check the countertop manufacturer’s instructions before selecting or applying caulk.
Our standard bathroom sink dimensions guide covers common sink sizes and installation-planning considerations.
How Long Does Caulk Take to Dry Before Painting?
Painting time depends primarily on the caulk formulation.
Fast-drying acrylic products may be paint-ready in 20–30 minutes.
Other caulks require several hours or longer.
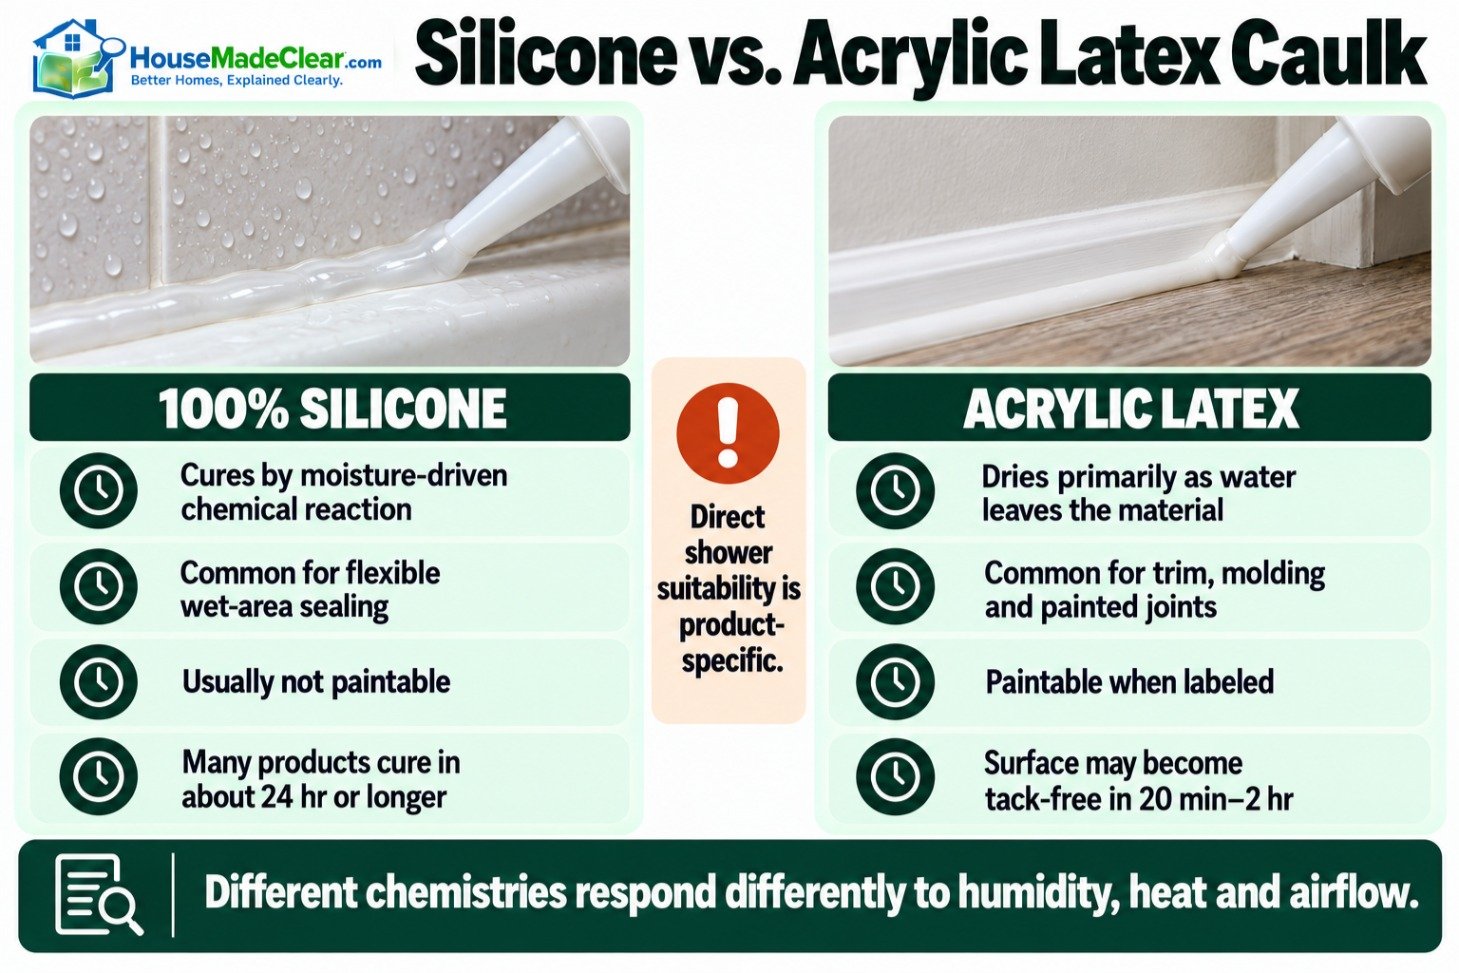
Paintable Caulk vs. Silicone
| Feature | Acrylic Latex Caulk | 100% Silicone |
|---|---|---|
| Commonly paintable | Yes, if labeled | Usually no |
| Typical use | Trim, molding, painted joints | Flexible wet-area sealing |
| Early paint-ready products | Available | Generally not applicable |
| Cleanup before curing | Often water | Product-specific |
| Direct shower suitability | Product-specific | Many bathroom-rated products suitable |
| Drying or curing mechanism | Primarily water loss and film formation | Usually moisture-driven chemical cure |
Can You Paint Over Silicone Caulk?
Most conventional 100% silicone caulks are not designed to be painted.
Paint may not adhere properly and can peel away.
If the area requires painting, choose a suitable paintable sealant from the beginning.
Why Does Paint Crack Over Caulk?
Possible causes include:
- Painting before the specified time
- Using incompatible paint
- Excessive joint movement
- Applying caulk too thickly
- Poor adhesion
- Inadequate surface preparation
Following both the paint and caulk manufacturers’ instructions is the best way to avoid these problems.
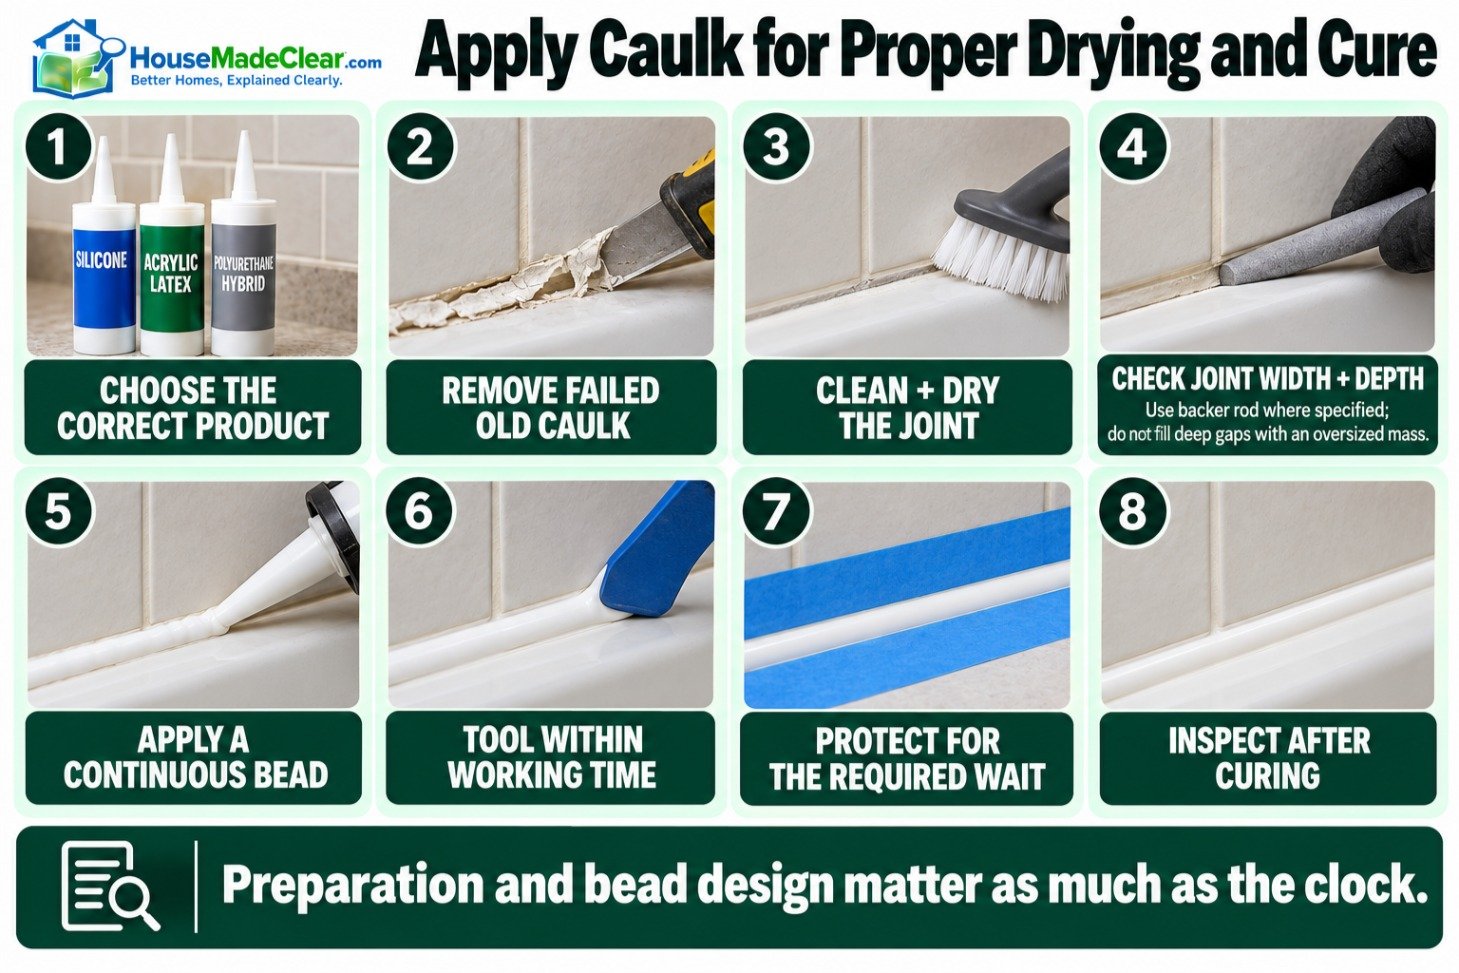
What Factors Affect Caulk Drying Time?
Several conditions can change how quickly a sealant dries or cures.
1. Temperature
Low temperatures often slow drying and many chemical curing reactions.
Very high temperatures can also create installation problems, such as premature surface skinning or poor tooling conditions.
Most products specify an acceptable application-temperature range.
For example, many consumer sealants are intended to be applied above approximately 40°F, but the exact range varies.
2. Humidity
Humidity affects water-based and moisture-curing products differently.
High humidity can slow evaporation from acrylic latex caulk.
In contrast, many silicone sealants rely on atmospheric moisture to cure. Very low humidity may slow their curing, while the effects of high humidity depend on the formulation and conditions.
For general indoor moisture guidance, see our article on the recommended humidity for a house.
3. Bead Thickness
A thicker bead typically takes longer to dry or cure through its full depth.
This is one of the most important reasons actual waiting times may differ from the number printed on the packaging.
4. Surface Material
Porous and nonporous surfaces may influence drying, adhesion, and the movement of moisture.
Some sealants have specific limitations for particular substrates.
5. Air Circulation
Reasonable ventilation can help control humidity and assist evaporation-based drying.
However, forcing hot air directly onto fresh caulk is not a reliable shortcut.
6. Product Age and Storage
Expired or improperly stored sealants may fail to cure or perform correctly.
Check the product’s shelf life and storage requirements.
7. Surface Preparation
A dirty, wet, greasy, or contaminated joint may prevent proper adhesion even when the caulk appears to cure normally.
8. Product Chemistry
Silicone, acrylic latex, polyurethane, and hybrid sealants do not share one universal cure mechanism.
Always prioritize the exact product instructions.
Does Caulk Dry Faster in Heat or Cold?
Most caulks do not perform best in extreme conditions.
Cool temperatures often slow the drying of water-based caulk and may slow the curing of other formulations.
Warmer conditions within the manufacturer’s approved range can support normal drying.
However, excessive heat is not recommended.
Can You Use a Hair Dryer to Dry Caulk Faster?
Using a hair dryer is generally not recommended unless the manufacturer explicitly permits it.
Concentrated heat can:
- Cause uneven skin formation
- Alter the surface appearance
- Damage nearby materials
- Create curing problems
- Overheat sensitive finishes
A natural drying or curing process under suitable room conditions is safer.
Can You Use a Space Heater?
Avoid directing excessive heat at the sealant.
If the room is too cold, maintain an appropriate ambient temperature while observing heater safety instructions and the product’s application requirements.
Does Caulk Dry Faster With a Fan?
For some water-based products, gentle ventilation may help manage humidity and evaporation.
But increased airflow does not automatically accelerate every sealant’s cure.
Some silicone products rely on moisture in the air, so extremely dry airflow may not be beneficial.
The goal is to maintain reasonable environmental conditions rather than force the sealant to dry unnaturally.
Should You Run the Bathroom Exhaust Fan?
Bathroom ventilation helps reduce excessive humidity and supports moisture management.
Use suitable exhaust ventilation as appropriate for the work area, while following any sealant-specific curing requirements.
The U.S. EPA’s mold and moisture guidance recommends controlling indoor moisture and using bathroom exhaust fans or ventilation to reduce persistent dampness.
Our guide on how long to run a bathroom fan after showering explains bathroom ventilation in more detail.
How Can You Tell If Caulk Is Dry or Fully Cured?
Appearance alone is not a dependable test for full curing.
A bead may look smooth and feel firm on the outside while remaining uncured underneath.
Signs the Surface Has Dried
Depending on the product, you may notice:
- Reduced tackiness
- Formation of a surface skin
- Change in color or opacity
- Increased firmness
- Reduced surface moisture
However, none of these observations reliably proves that curing is complete through the entire joint.
Is the Touch Test Reliable?
Not for establishing full cure.
Touching fresh caulk may damage the bead or compromise its surface.
A better method is to record the application time and follow the manufacturer’s stated waiting period.
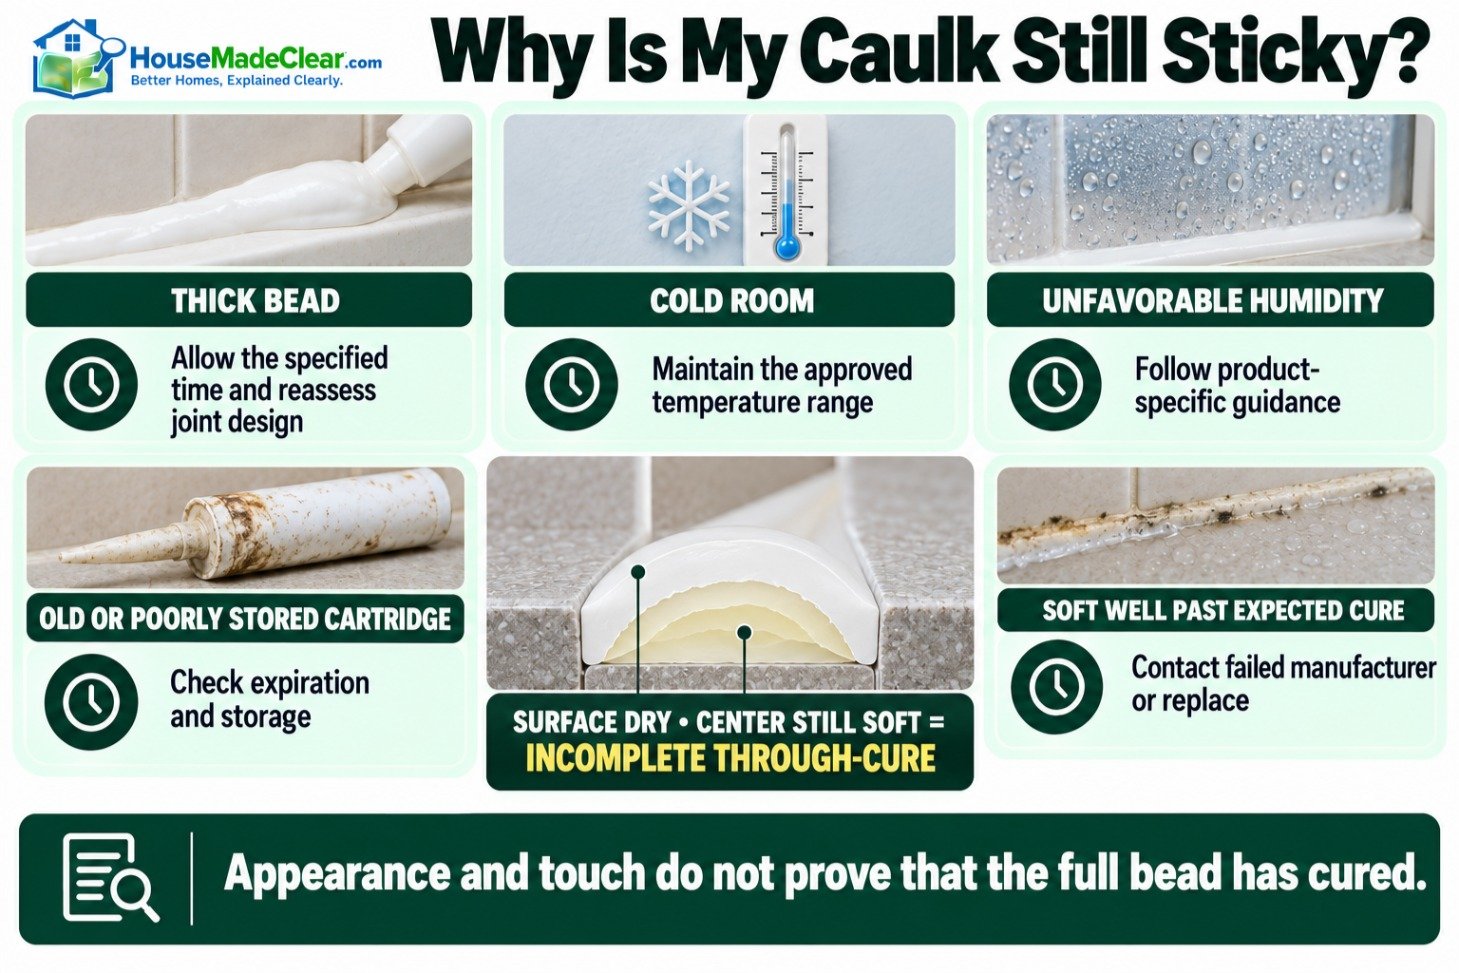
What If the Caulk Is Still Sticky After 24 Hours?
Possible causes include:
- Thick application
- Low temperature
- Unfavorable humidity
- Expired material
- Incorrect storage
- A curing problem
- Product-specific longer curing requirements
Check the technical data before assuming the sealant has failed.
If the material remains unusually soft or sticky beyond the expected cure period, contact the manufacturer or replace it according to the appropriate procedure.
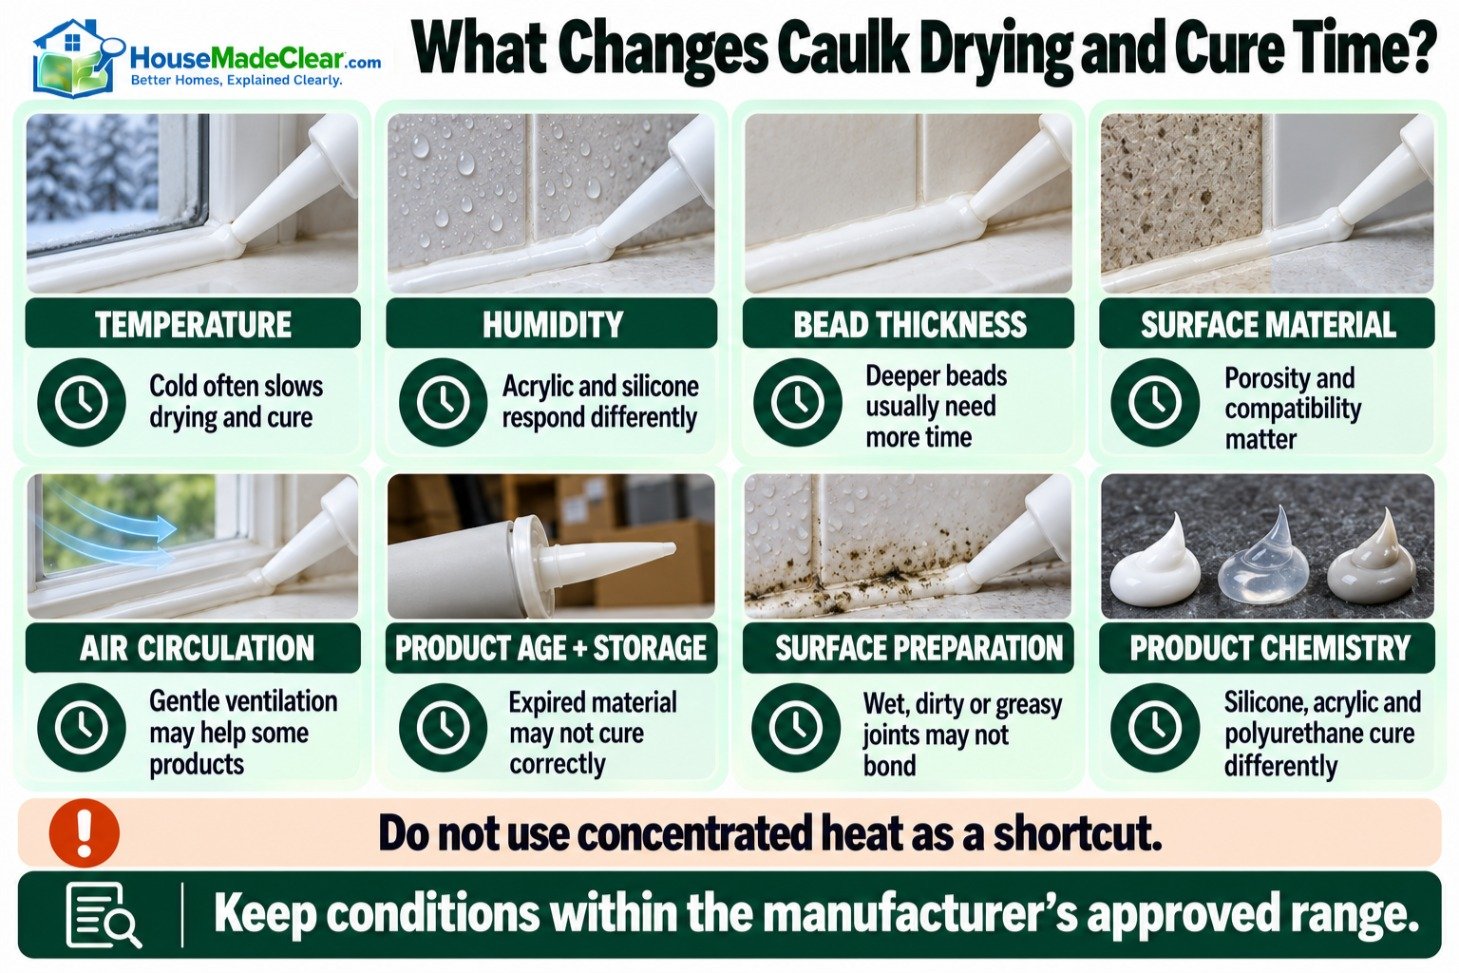
How to Apply Caulk So It Dries and Cures Properly
Good curing begins before the cartridge is opened.
Step 1: Choose the Correct Caulk
Use a product designed for the surface, joint movement, and water exposure.
For wet bathroom joints, select a suitable bathroom-rated sealant.
For paintable interior trim, select a compatible paintable caulk.
Step 2: Remove Failed Old Caulk
If existing caulk is loose, moldy, cracked, or peeling, remove it before resealing.
Do not apply new caulk directly over deteriorating material simply to hide the problem.
Step 3: Clean the Joint
Remove:
- Soap residue
- Dirt
- Loose material
- Grease
- Old sealant fragments
- Other contaminants
Use cleaning products compatible with the substrate and sealant.
Step 4: Dry the Area Thoroughly
Unless the product specifically permits damp-surface application, the joint should be dry.
The EPA advises against caulking over moldy surfaces and emphasizes cleaning and drying before repairs.
Step 5: Prepare the Joint
Check the permitted joint width and depth.
Use an appropriate backer rod where the manufacturer specifies one.
Deep joints should not simply be filled with excessive amounts of sealant.
Step 6: Apply a Continuous Bead
Apply enough material to create an effective seal without leaving gaps.
Keep the bead consistent.
Step 7: Tool the Caulk Promptly
Smooth it within the manufacturer’s specified tooling time.
Some silicone sealants develop a surface skin quickly.
Step 8: Protect the Fresh Joint
Avoid touching, splashing, painting, or loading the sealant before the appropriate stage.
Step 9: Allow the Required Waiting Period
Check whether the upcoming activity requires:
- Tack-free time
- Paint-ready time
- Water-ready time
- Return-to-service time
- Full cure
Step 10: Inspect the Finished Joint
After the appropriate cure period, visually inspect for:
- Gaps
- Cracks
- Poor adhesion
- Voids
- Uneven separation
- Uncured areas
A seal that looks defective should be corrected rather than assumed to be waterproof.
How Long Does New Caulk Take to Dry in Different Areas of the Home?
| Area | Common Caulk Choice | What Determines When It Can Be Used? |
|---|---|---|
| Shower enclosure | Bathroom-rated silicone or suitable sealant | Water-ready instruction |
| Bathtub edge | Wet-area-compatible sealant | Water-ready instruction and joint requirements |
| Bathroom sink | Suitable kitchen-and-bath sealant | Splash or water-ready time |
| Kitchen backsplash | Product compatible with substrate | Water and cleaning exposure |
| Interior baseboards | Paintable acrylic latex | Paint-ready time |
| Interior door trim | Paintable caulk | Paint-ready time |
| Window trim | Appropriate interior or exterior sealant | Exposure and paint requirements |
| Exterior siding joint | Exterior-rated flexible sealant | Rain-ready and cure requirements |
| Countertop seam | Substrate-compatible sealant | Product-specific service time |
| Plumbing fixture perimeter | Suitable sealant for the installation | Water exposure and fixture instructions |
Not every gap should be caulked. Some building assemblies include drainage or movement provisions that must remain open.
For example, sealing a designed drainage path in a shower, window, or other building component can create moisture problems.
What Happens If Caulk Gets Wet Before It Dries?
Premature water exposure may affect the seal, especially with water-based products that have not developed sufficient resistance.
Possible consequences include:
- Surface washing or deformation
- Reduced adhesion
- Soft or weakened areas
- Visible cracking
- Gaps in the joint
- Delayed drying
- Seal failure
What Should You Do If Fresh Caulk Gets Wet?
First, check the product’s water-ready instructions.
If the permitted waiting period has already passed, brief water exposure may be acceptable.
If water contacted the bead too early:
- Stop further water exposure.
- Allow the area to dry according to the manufacturer’s guidance.
- Inspect for visible damage.
- Avoid smoothing or disturbing partially cured caulk.
- Consult the manufacturer if the bead remains soft, deformed, or poorly adhered.
- Remove and reapply the sealant if the joint has failed.
Do not assume that applying a second layer over damaged fresh caulk will restore a proper seal.
Why Is My Caulk Not Drying?
Sometimes caulk remains soft or tacky much longer than expected.
This does not always mean the material is defective.
Common Causes and Fixes
| Problem | Possible Explanation | Recommended Action |
|---|---|---|
| Still sticky after several hours | Normal longer cure or dry time | Check label |
| Very thick bead | Slower drying through material | Allow required time; reassess joint design |
| Cold room | Slow drying or cure | Maintain approved temperature |
| Very humid room with latex caulk | Slow evaporation | Improve appropriate ventilation |
| Very dry conditions with moisture-curing silicone | Slower moisture-driven cure | Follow product guidance |
| Old cartridge | Material deterioration | Check expiration and storage |
| Caulk peeling away | Poor adhesion or contamination | Remove failed material and prepare surface |
| Surface dry but center soft | Incomplete through-cure | Allow manufacturer-specified cure |
| Persistent softness well past cure period | Possible product or installation problem | Contact manufacturer or replace |
Can Caulk Stay Sticky Permanently?
A sealant may fail to cure properly if it is defective, expired, incompatible with the conditions, or improperly applied.
If a product remains uncured beyond a reasonable period established by its manufacturer, investigate rather than continuing to use the joint.
Common Mistakes That Slow Caulk Drying
Mistake 1: Confusing Drying With Curing
A dry-looking surface does not mean the entire bead has cured.
Mistake 2: Using the Shower Too Early
Water exposure before the approved period can damage fresh sealant.
Mistake 3: Applying an Excessively Thick Bead
Large beads may take longer to cure and may not match the joint specifications.
Mistake 4: Applying Caulk Over Old, Failed Sealant
This can interfere with adhesion.
Mistake 5: Caulking a Wet Surface
Surface moisture can compromise certain products.
Mistake 6: Painting the Wrong Caulk
Most conventional 100% silicone caulks are not paintable.
Mistake 7: Using Heat to Force Drying
Concentrated heat may create more problems than it solves.
Mistake 8: Ignoring Temperature Limits
Products should be applied within their approved temperature ranges.
Mistake 9: Assuming All Silicone Products Have the Same Water-Ready Time
Fast-water-ready silicone and conventional silicone may have different requirements.
Mistake 10: Confusing Shower Readiness With Full Cure
Water-ready means permitted water exposure, not necessarily completion of the entire curing process.
Mistake 11: Using General-Purpose Trim Caulk Inside a Shower
Not every paintable caulk is designed for repeated direct water exposure.
Mistake 12: Ignoring Ongoing Moisture Problems
Caulk alone cannot solve hidden leaks or failed waterproofing.
Practical Caulking Project Timeline
Suppose you are replacing the sealant around a bathtub on Saturday.
Your schedule may look like this:
| Stage | Example Activity | Timing |
|---|---|---|
| Preparation | Remove old sealant | Before application |
| Cleaning | Remove residue and contaminants | Before application |
| Drying | Allow joint surfaces to become appropriately dry | Depends on conditions |
| Application | Apply new sealant | Saturday |
| Tooling | Smooth bead | Immediately, within product working time |
| Protection | Keep joint undisturbed | Per manufacturer |
| Shower use | Return to water exposure | At or after labeled water-ready time |
| Full cure | Allow sealant to develop final properties | Per manufacturer |
Example: Conventional Silicone
If the label specifies 24 hours before shower use and you finish caulking at 10 a.m. Saturday, the earliest permitted use would be 10 a.m. Sunday, assuming the stated conditions were met.
Example: Fast-Water-Ready Sealant
If the product specifically allows water exposure after four hours and you finish at 10 a.m., permitted water exposure may begin at 2 p.m. under the specified conditions.
Example: Unfavorable Conditions
If the room is unusually cold, the bead is oversized, or another condition falls outside the manufacturer’s assumptions, allow more time and follow the technical instructions.
Do not select the fastest time from an unrelated brand or product.
Caulk Drying and Bathroom Moisture: Why Preparation Matters
Bathrooms are exposed to frequent humidity and condensation.
A properly installed sealant can help control water entry at suitable joints, but sealing over moisture can create problems rather than solve them.
Before applying new caulk, investigate any recurring wetness, leaks, or mold.
The EPA’s guidance on indoor moisture emphasizes repairing water problems and drying affected surfaces rather than concealing them.
If shower humidity remains high long after bathing, our article on bathroom humidity after a shower explains the factors that influence drying.
Likewise, if you are working around a shower entrance, use our guide to shower curb height and width for related enclosure-planning considerations.
Remember that surface caulk is only one part of a properly designed wet-area installation.
Caulk Drying Checklist Before Using the Area
| Check | Why It Matters |
|---|---|
| Correct sealant selected | Ensures suitability for water and movement |
| Joint cleaned | Supports adhesion |
| Old failed material removed | Reduces bonding problems |
| Substrate dried | Supports proper application |
| Bead size acceptable | Helps curing and performance |
| Tooling completed | Creates intended joint shape |
| Product label checked | Establishes required waiting time |
| Temperature within range | Supports curing |
| Humidity conditions considered | Prevents unexpected delays |
| Water-ready time reached | Determines permitted water exposure |
| Paint-ready time reached | Determines permitted painting |
| Finished joint inspected | Identifies visible problems |
Final Thoughts
So, how long does caulk take to dry?
For many acrylic latex caulks, the surface may become tack-free within minutes to a few hours, while full drying commonly takes around a day or longer.
For many standard silicone sealants, approximately 24 hours is a useful initial curing estimate, although the real time depends on the product, environment, and bead dimensions.
Specialty bathroom caulks can be water-ready much sooner, sometimes within 30 minutes or four hours under specific conditions.
The key is understanding what the product’s timing claim means.
Tack-free, paint-ready, water-ready, and fully cured are different stages.
Before using a freshly caulked shower or bathtub, follow the exact manufacturer’s waiting period and account for conditions that may slow curing.
A little patience during installation can help prevent failed seals, unnecessary rework, and avoidable moisture problems.
Frequently Asked Questions
How long does caulk take to dry?
Many acrylic latex caulks become tack-free in about 20 minutes to 2 hours, while drying through the bead may take around 24 hours or more. Silicone sealants commonly require approximately 24 hours to cure, although exact times vary by product.
How long does silicone caulk take to dry?
Many conventional silicone sealants require approximately 24 hours to cure under normal conditions. Thick beads and unfavorable environmental conditions may extend curing. Some specialty products allow earlier water exposure without being fully cured.
How long does bathroom caulk take to dry?
Bathroom caulk drying time depends on the formulation. Some quick-water-ready products permit water exposure in 30 minutes or four hours, while other shower sealants require approximately 24–48 hours or longer. Follow the manufacturer’s instructions.
How long should you wait to shower after caulking?
Wait until the sealant’s specified water-ready or return-to-service time. Many conventional bathroom products require approximately 24 hours, but certain fast-water-ready sealants permit earlier use under specific conditions.
Can you shower 12 hours after caulking?
Only if the exact product permits water exposure after 12 hours or less under the installation conditions. Do not assume a conventional 24-hour sealant is ready simply because 12 hours have passed.
Can you shower 24 hours after caulking?
Often, yes, if the product specifies a 24-hour water-ready time and the required application conditions were met. Some sealants require longer, especially with thick beads or unfavorable temperatures.
What happens if caulk gets wet before it dries?
Premature water exposure may deform uncured sealant, interfere with adhesion, or compromise the finished joint. The severity depends on the material and its curing stage. Inspect the bead and follow the manufacturer’s corrective guidance.
How long does acrylic latex caulk take to dry?
Acrylic latex caulk may become tack-free within minutes to a few hours, while drying through the bead often takes approximately 24 hours or longer. Some fast-dry formulas can be painted much sooner.
How long does caulk take to dry before painting?
Some fast-drying paintable acrylic latex caulks permit painting after approximately 20–30 minutes, while others require several hours or more. Check the product’s paint-ready instructions and paint compatibility.
Does caulk dry faster in heat or cold?
Many caulks dry or cure more slowly in cold conditions. Suitable warmer temperatures may support normal curing, but excessive heat can cause problems. Follow the manufacturer’s approved application-temperature range.
Does humidity affect caulk drying time?
Yes. High humidity can slow drying for water-based acrylic caulk. Many silicone sealants cure using atmospheric moisture, so humidity affects them differently. The exact effect depends on the product chemistry and conditions.
Can you use a hair dryer to dry caulk faster?
It is generally not recommended unless the manufacturer expressly permits it. Concentrated heat can affect surface formation, surrounding materials, or sealant performance.
Why is my caulk still sticky after 24 hours?
Possible reasons include a thick bead, low temperature, unsuitable humidity, an expired product, or a formulation that needs longer to cure. Check the technical data and investigate if stickiness persists beyond the expected cure time.
How do you know when caulk is fully cured?
The most dependable approach is to follow the manufacturer’s stated cure time under the actual application conditions. A dry-looking or tack-free surface does not prove the material is fully cured underneath.
Can you paint over silicone caulk?
Most conventional 100% silicone caulks are not paintable because paint may not adhere properly. Use a product specifically labeled paintable when the joint needs to be painted.
Does thicker caulk take longer to dry?
Generally, yes. Larger or deeper beads often require more time to dry or cure throughout. Use the joint dimensions and backing materials specified by the manufacturer rather than applying unnecessarily thick sealant.
Is caulk waterproof before it cures?
Not necessarily. Water resistance depends on the product and curing stage. Some specialty sealants are water-ready before full cure, while other products must remain dry until the specified waiting period has passed.
Is 30-minute shower-ready caulk fully cured after 30 minutes?
No. A 30-minute shower-ready claim refers to permitted water exposure under stated conditions, not necessarily complete curing. The final cured properties may take longer to develop.