














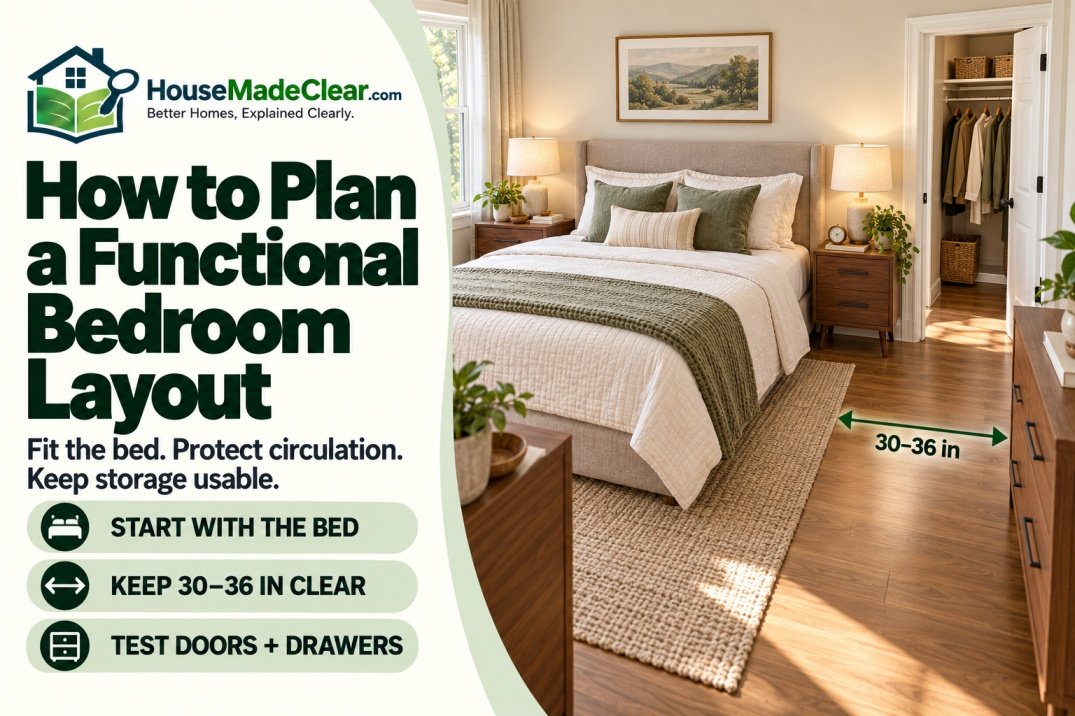
A functional bedroom layout starts with the bed, but it must also account for walking space, doors, windows, closets, nightstands, dressers, lighting and storage. A room can contain all the required furniture and still function poorly if drawers collide, doors cannot open fully or the main walking path passes through a narrow gap.
Start by measuring the room and every permanent obstruction. Position the bed on the most suitable wall, preserve approximately 30 to 36 inches along frequently used sides, and then add furniture according to the remaining operating space.
Quick Answer
To create a functional bedroom layout:
- Measure the finished room, including doors, windows, closets and wall projections.
- Choose a bed size that leaves usable circulation space.
- Place the bed on the strongest uninterrupted wall where practical.
- Allow about 30 to 36 inches along frequently used sides of the bed.
- Match nightstand height to the top of the mattress.
- Leave approximately 36 inches between a dresser and the nearest obstruction where possible.
- Test every door, drawer and walkway at full operation.
- Keep emergency escape openings, vents, outlets and heating equipment accessible.
Twenty-four inches can work beside a bed in a tight room, but it should be treated as a compact planning dimension rather than an ideal target.
What Makes a Bedroom Layout Functional?
A functional bedroom layout supports sleeping, dressing, storage and movement without unnecessary conflicts.
The best arrangement is not necessarily the one containing the most furniture. A functional room provides:
- A suitable bed for the intended occupants
- A clear route from the doorway to the bed
- Comfortable access to frequently used sides of the bed
- Usable nightstands
- Storage that opens fully
- Unobstructed doors and windows
- Accessible outlets and controls
- Appropriate lighting
- Safe furniture placement
- Enough open floor area for everyday movement
Bedroom layout is a three-dimensional problem. Width and length determine what fits on the floor, while furniture height affects windows, switches, mirrors, shelves and wall-mounted lighting.
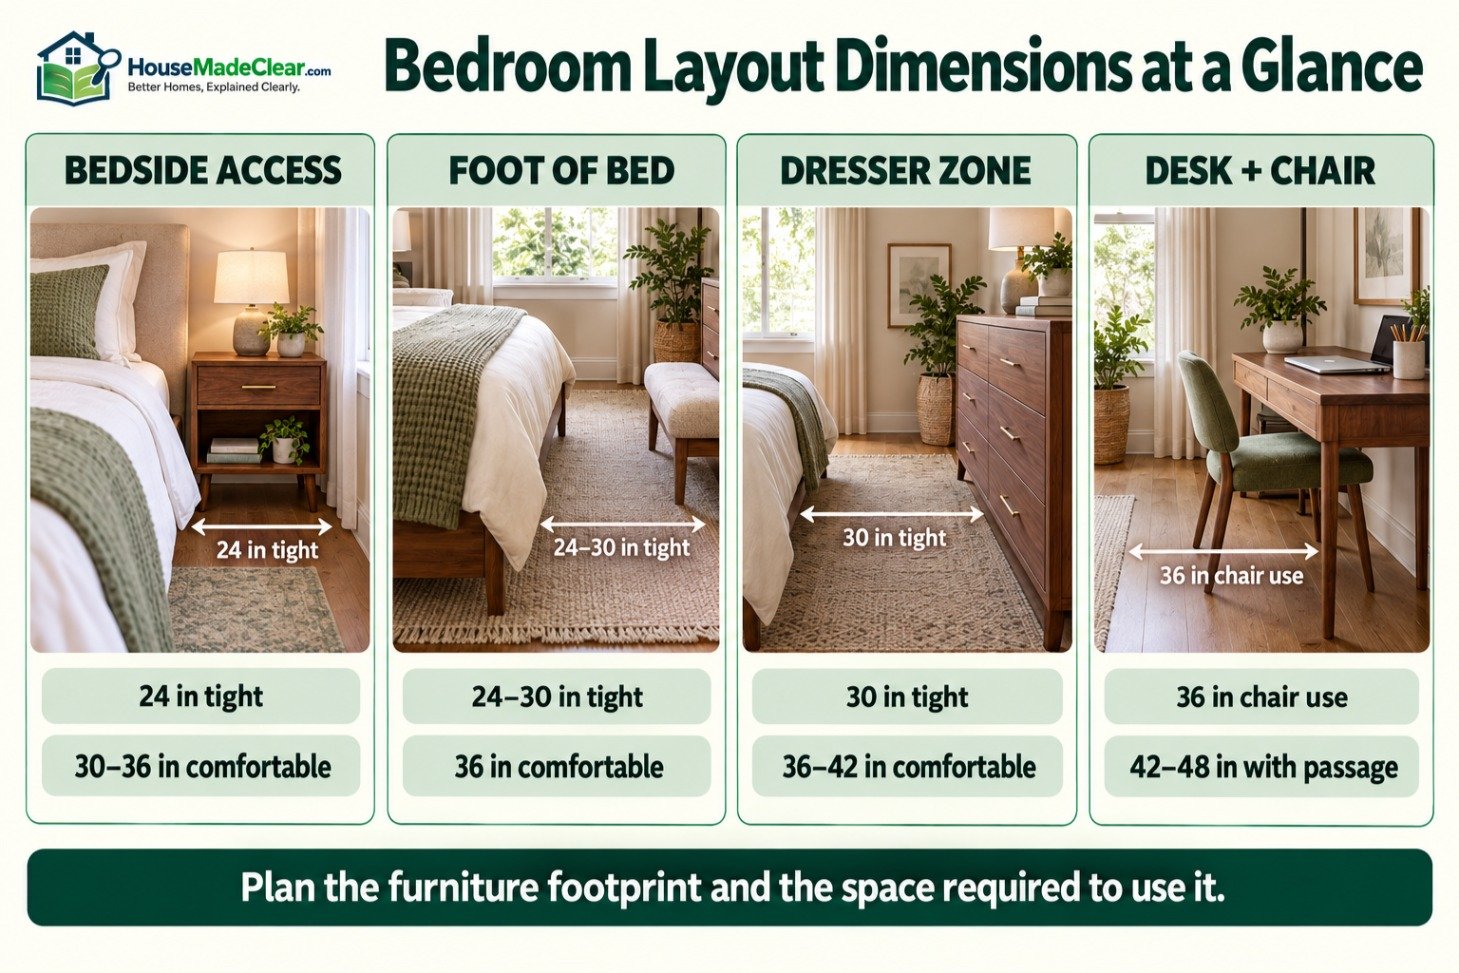
Bedroom Layout Dimensions at a Glance
These measurements provide practical planning targets for many residential bedrooms.
| Layout Element | Tight Planning Range | More Comfortable Target |
|---|---|---|
| Space beside an occupied side of bed | 24 inches | 30–36 inches |
| Space at foot of bed | 24–30 inches | 36 inches |
| Main walking route | 30 inches | 36 inches or more |
| Bed-to-nightstand gap | 2–4 inches | 2–3 inches |
| Closed dresser to bed or wall | 30 inches | 36–42 inches |
| Space in front of open closet | 24–30 inches | 36 inches |
| Desk-chair operating area | 36 inches | 42–48 inches |
| Space between two separate beds | 24 inches | 30–36 inches |
| Outside nightstand clearance | 1–2 inches | 2–3 inches |
These are furniture-planning recommendations, not universal building-code requirements. Accessibility needs, local codes and individual mobility may require different dimensions.
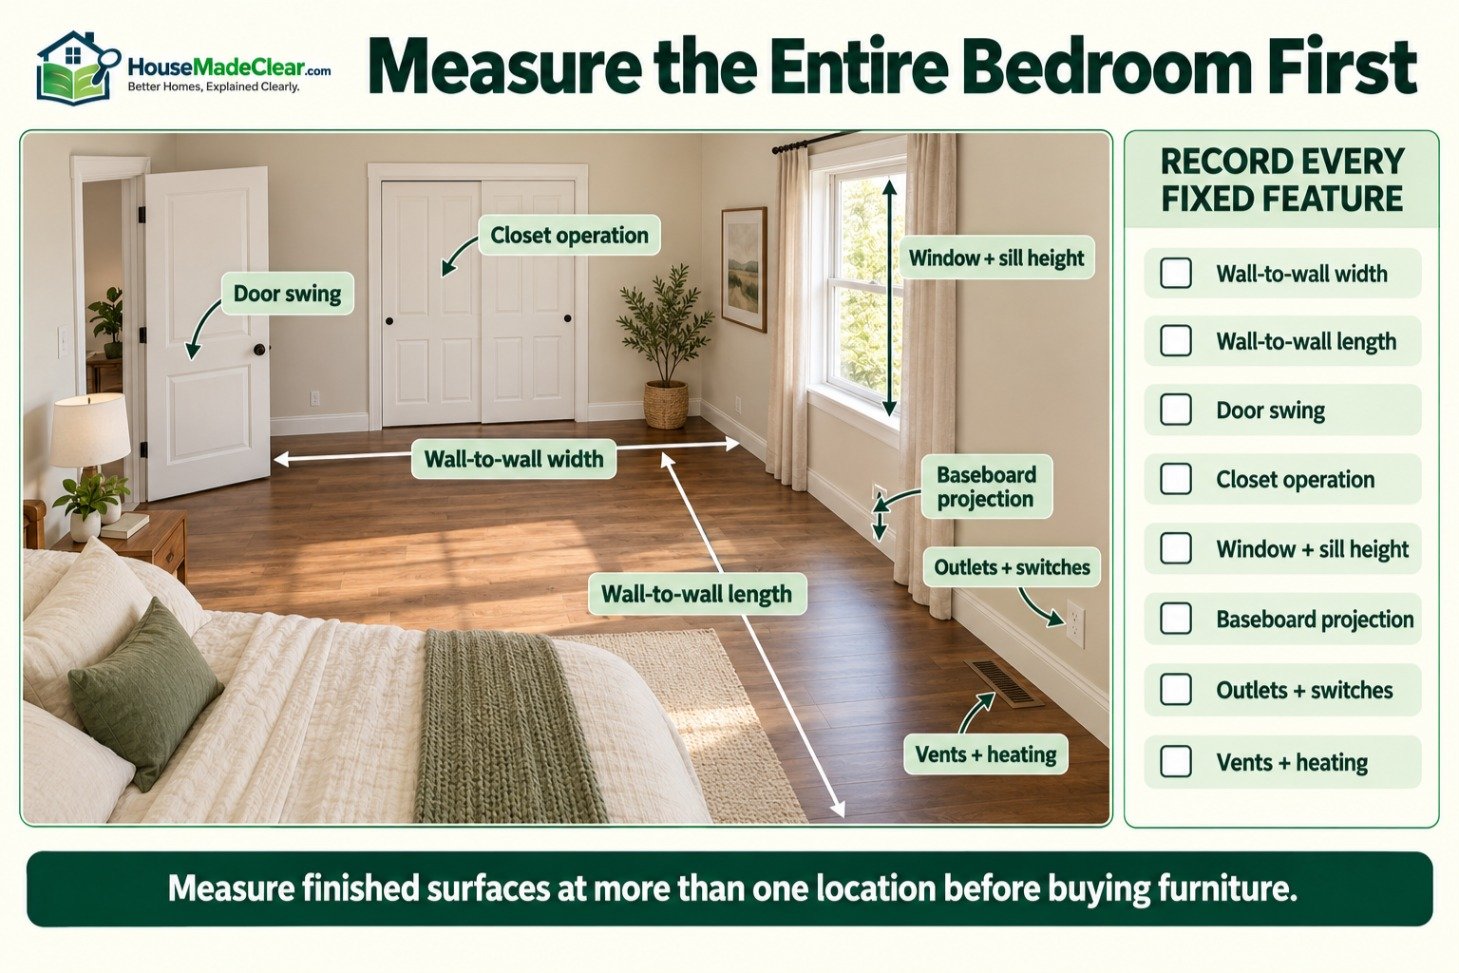
Step 1: Measure the Entire Bedroom
Do not begin with furniture shopping. Begin with a complete measured plan of the finished room.
Measure:
- Wall-to-wall width
- Wall-to-wall length
- Ceiling height
- Door width and swing
- Closet width and door operation
- Window width, height and sill height
- Distance between corners and openings
- Baseboard projection
- Heating and cooling equipment
- Floor and wall vents
- Electrical outlets
- Light switches
- Thermostats
- Radiators
- Sloped ceilings
- Built-in storage
Measure at more than one location. Older rooms may not be perfectly square, and walls can vary slightly from one end to the other.
Measure Finished Surfaces
Use the completed wall surfaces as your reference.
Drywall, paneling, trim and baseboards affect the furniture footprint. A bed or dresser planned against rough framing may not fit after finishes are installed.
Record Door Swings
Draw the complete arc of every hinged door, including:
- Bedroom entrance door
- Closet door
- Bathroom door
- Balcony door
- Built-in cabinet door
A door may clear the bed frame but strike a nightstand, lamp or drawer pull.
Sliding and bifold doors do not create the same swing arc, but they still need an unobstructed approach and space for handles.
Record Window Operation
Measure the complete window assembly, including:
- Casing
- Sill
- Crank or lock
- Curtain stack
- Blind controls
- Radiator or vent below the window
Do not position furniture where it prevents the window from opening or makes required maintenance and cleaning impractical.
Sleeping rooms may be subject to emergency escape and rescue opening requirements. The applicable rules depend on local code adoption and the building. The International Residential Code’s building-planning provisions provide a model-code reference, but your local building department determines the enforceable requirements.
Create a Scale Floor Plan
Draw the room using a consistent scale, such as:
- ¼ inch on paper equals 1 foot in the room
- One grid square equals 6 inches
- One digital-plan unit equals 1 inch
Include permanent features before adding furniture.
A floor plan helps compare arrangements, but test the preferred layout at full scale with painter’s tape before purchasing large pieces.
Step 2: Choose the Bed Size
The bed usually occupies more floor area than any other bedroom item. Its size determines how much space remains for circulation and storage.
Common U.S. mattress dimensions include:
| Mattress Size | Typical Width | Typical Length |
|---|---|---|
| Twin | 38 inches | 75 inches |
| Twin XL | 38 inches | 80 inches |
| Full or double | 53–54 inches | 75 inches |
| Queen | 60 inches | 80 inches |
| King | 76 inches | 80 inches |
| California king | 72 inches | 84 inches |
The mattress is not the complete bed footprint. Add the dimensions of:
- Bed frame
- Headboard
- Footboard
- Side rails
- Upholstered wings
- Storage drawers
- Adjustable base
- Bedding overhang
An upholstered king bed may be several inches wider and longer than its mattress.
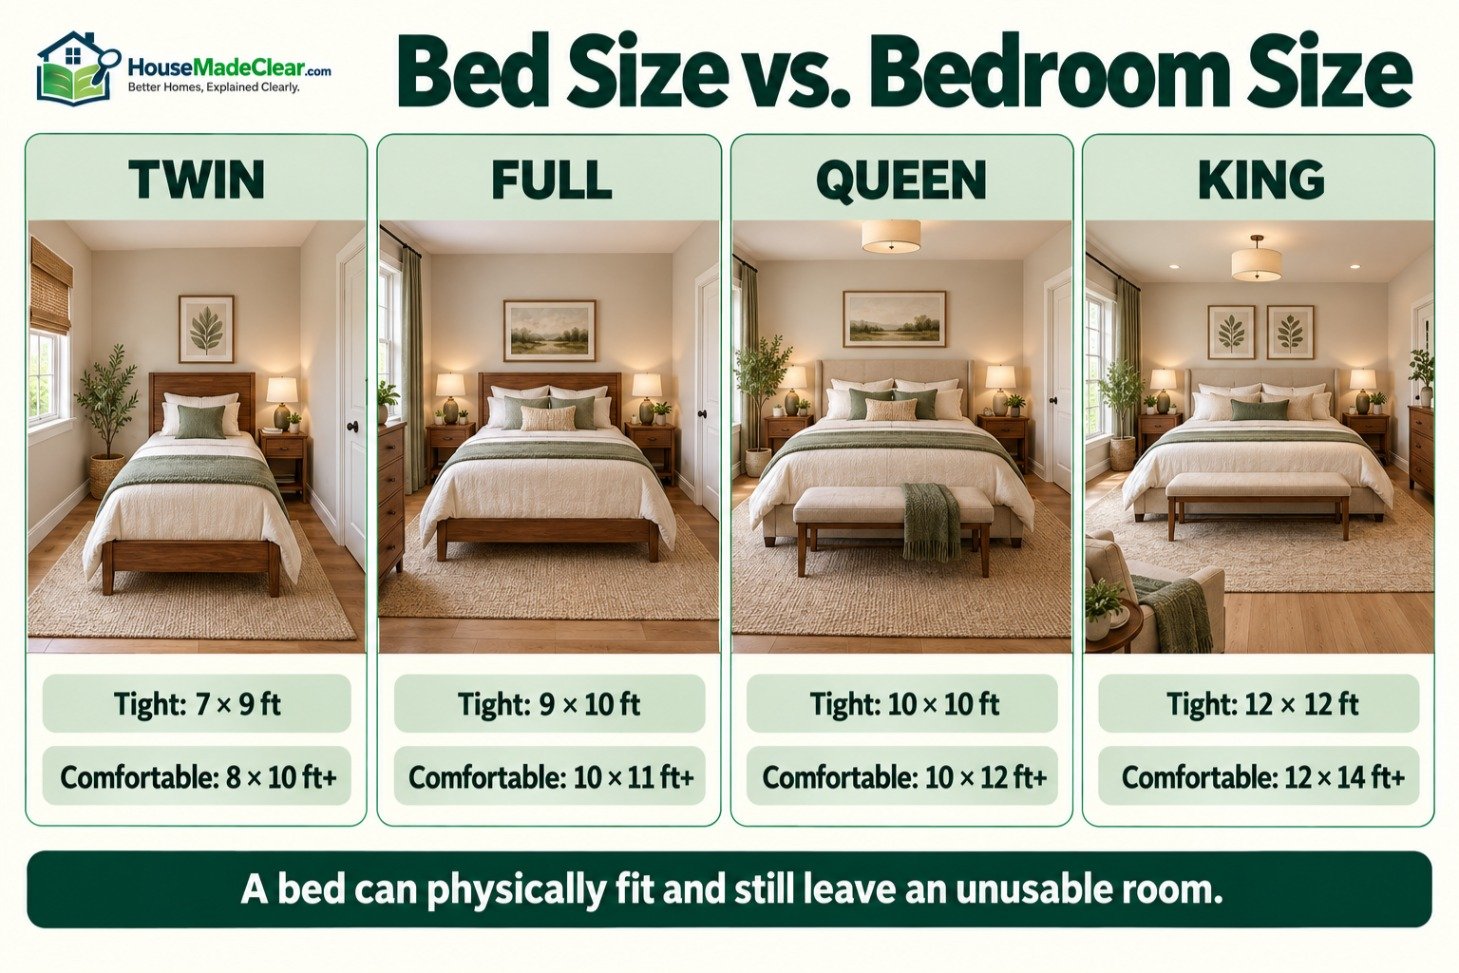
Bed Size vs. Bedroom Size
A bed can physically fit in a room without leaving a functional layout.
Useful bedroom-size starting points include:
| Bed Size | Tight Room Starting Point | More Comfortable Room |
|---|---|---|
| Twin | 7 × 9 feet | 8 × 10 feet or larger |
| Twin XL | 7 × 10 feet | 8 × 10 feet or larger |
| Full | 9 × 10 feet | 10 × 11 feet or larger |
| Queen | 10 × 10 feet | 10 × 12 feet or larger |
| King | 12 × 12 feet | 12 × 14 feet or larger |
| California king | 12 × 12 feet | 12 × 14 feet or larger |
These are planning ranges, not legal minimums.
Our standard bedroom size guide compares room dimensions, bed sizes and furniture-clearance requirements in more detail.
Do Not Automatically Choose the Largest Bed
A king bed may provide more sleeping space but leave no room for:
- Two usable nightstands
- A dresser
- Closet access
- Comfortable walkways
- A reading chair
- A desk
- Future furniture changes
A slightly smaller bed can produce a more comfortable bedroom overall.
Step 3: Select the Best Wall for the Bed
The bed is normally the visual and functional anchor of the room. Its position should establish a clear layout rather than interrupt circulation.
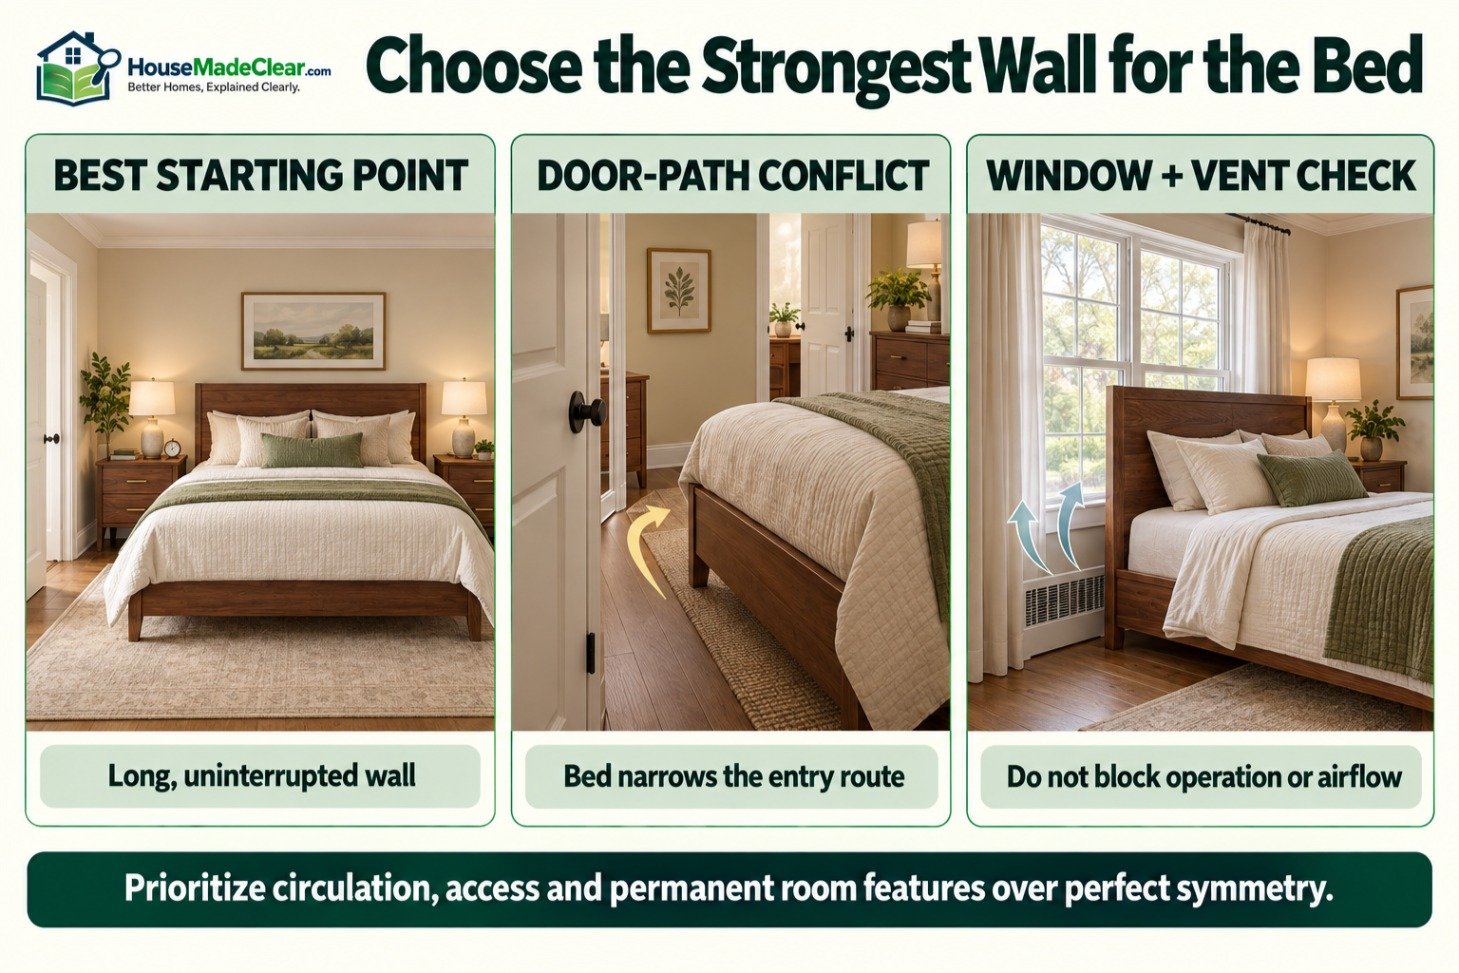
Use an Uninterrupted Wall Where Practical
The strongest bed wall is usually:
- Long enough for the bed and nightstands
- Free from doors
- Free from low windows
- Away from major vents and radiators
- Visible from the room entrance without blocking it
- Suitable for the headboard and lighting
This does not mean the bed must always be centered. An off-center position can be more functional when one side requires a wider walkway or the room is asymmetrical.
Avoid the Main Door Path
Do not place the foot or side of the bed directly in the narrowest part of the entry route.
A person entering the room should not have to turn sideways immediately to avoid the bed frame.
Consider Closet Access
A bed placed opposite a closet may leave adequate space when the doors are closed but interfere with:
- Hinged-door swing
- Bifold-door folding
- Drawer units inside the closet
- Standing space for selecting clothing
- Laundry baskets
Test the closet and bed as one operating zone.
Can a Bed Go Under a Window?
A bed can be placed under a window when the layout requires it, but the arrangement has drawbacks.
Check:
- Window operation
- Emergency escape requirements
- Curtain and blind access
- Drafts and direct sunlight
- Heating equipment
- Headboard height
- Moisture or condensation
- Exterior noise
- Cleaning access
Do not permanently obstruct a required emergency escape opening.
Can a Bed Go in a Corner?
Placing a bed against two walls saves circulation space and works well for:
- Children’s rooms
- Guest rooms
- Daybed-style arrangements
- Very small bedrooms
- Single sleepers
The disadvantages include:
- Difficult bed-making
- Limited access for two occupants
- Poor access to one side
- Bedding rubbing against the wall
- Reduced nightstand options
A corner arrangement is usually unsuitable for a bed shared regularly by two adults unless space is extremely limited.
Step 4: Plan Clearance Around the Bed
The space around the bed determines whether the room feels usable.
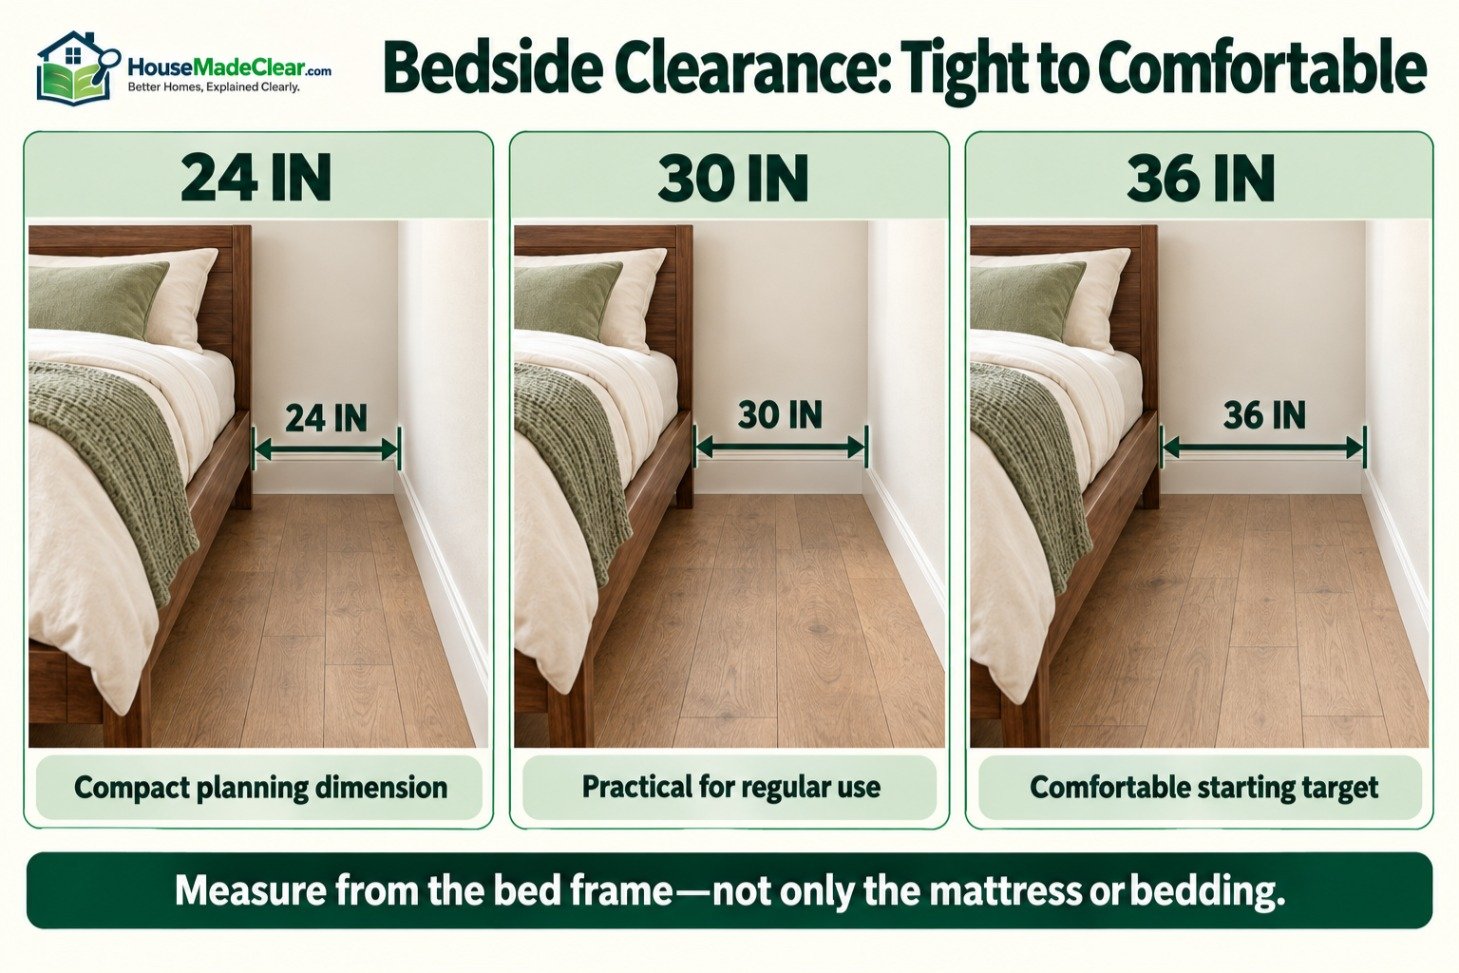
Clearance Beside the Bed
Allow approximately:
- 24 inches: workable in a compact room
- 30 inches: practical for regular use
- 36 inches: comfortable for many users
A shared bed should ideally provide usable access on both sides.
A single bed can be placed against a wall if the arrangement suits the occupant.
Clearance at the Foot of the Bed
Allow:
- 24 inches: tight passage
- 30 inches: workable
- 36 inches: comfortable starting target
- 42 inches or more: useful when a dresser or bench is opposite
Measure from the nearest part of the bed frame, not only the mattress.
A footboard can add several inches and become the controlling point.
Main Circulation Route
Identify the main route from the entrance to:
- The bed
- Closet
- Bathroom
- Window
- Dresser
- Desk
Try to preserve approximately 36 inches along the primary path where space allows.
Avoid routing everyday movement through the narrow gap between a bed and open drawer.
Step 5: Add Nightstands
Nightstands should be selected after the bed position and finished mattress height are known.
A standard nightstand is commonly:
- 24–28 inches high
- 18–30 inches wide
- 16–20 inches deep
The top should generally align with the mattress or sit within approximately 2 to 4 inches of it.
Leave approximately 2 to 4 inches between the bed and nightstand. A larger gap can make the surface difficult to reach.
Our standard nightstand dimensions guide explains how to select height, width and depth for different bed sizes.
Calculate the Complete Bed Wall
Use this formula:
Bed-wall requirement = bed-frame width + nightstand widths + gaps + outside clearances
For example:
- Queen bed frame: 64 inches
- Two nightstands: 22 inches each
- Two bed-to-nightstand gaps: 3 inches each
- Outside clearance: 2 inches at each end
Calculation:
64 + 22 + 22 + 3 + 3 + 2 + 2 = 118 inches
The arrangement requires approximately 9 feet 10 inches of wall width.
It may fit on a 10-foot wall, but only with careful placement.
When Two Nightstands Do Not Fit
Possible alternatives include:
- Use narrower nightstands.
- Use one nightstand.
- Install wall-mounted shelves.
- Use different sizes on each side.
- Use a headboard with integrated storage.
- Relocate one lamp to the wall.
- Replace a wide bed frame with a slimmer design.
Symmetry should not override door access or circulation.
Step 6: Position the Dresser
A dresser needs wall space, drawer-opening space and safe anchoring access.
Common low dressers are approximately:
- 50–72 inches wide
- 16–20 inches deep
- 30–36 inches high
Tall chests are commonly:
- 30–40 inches wide
- 16–20 inches deep
- 42–60 inches high
The dresser-dimensions guide compares common sizes by type and drawer count.
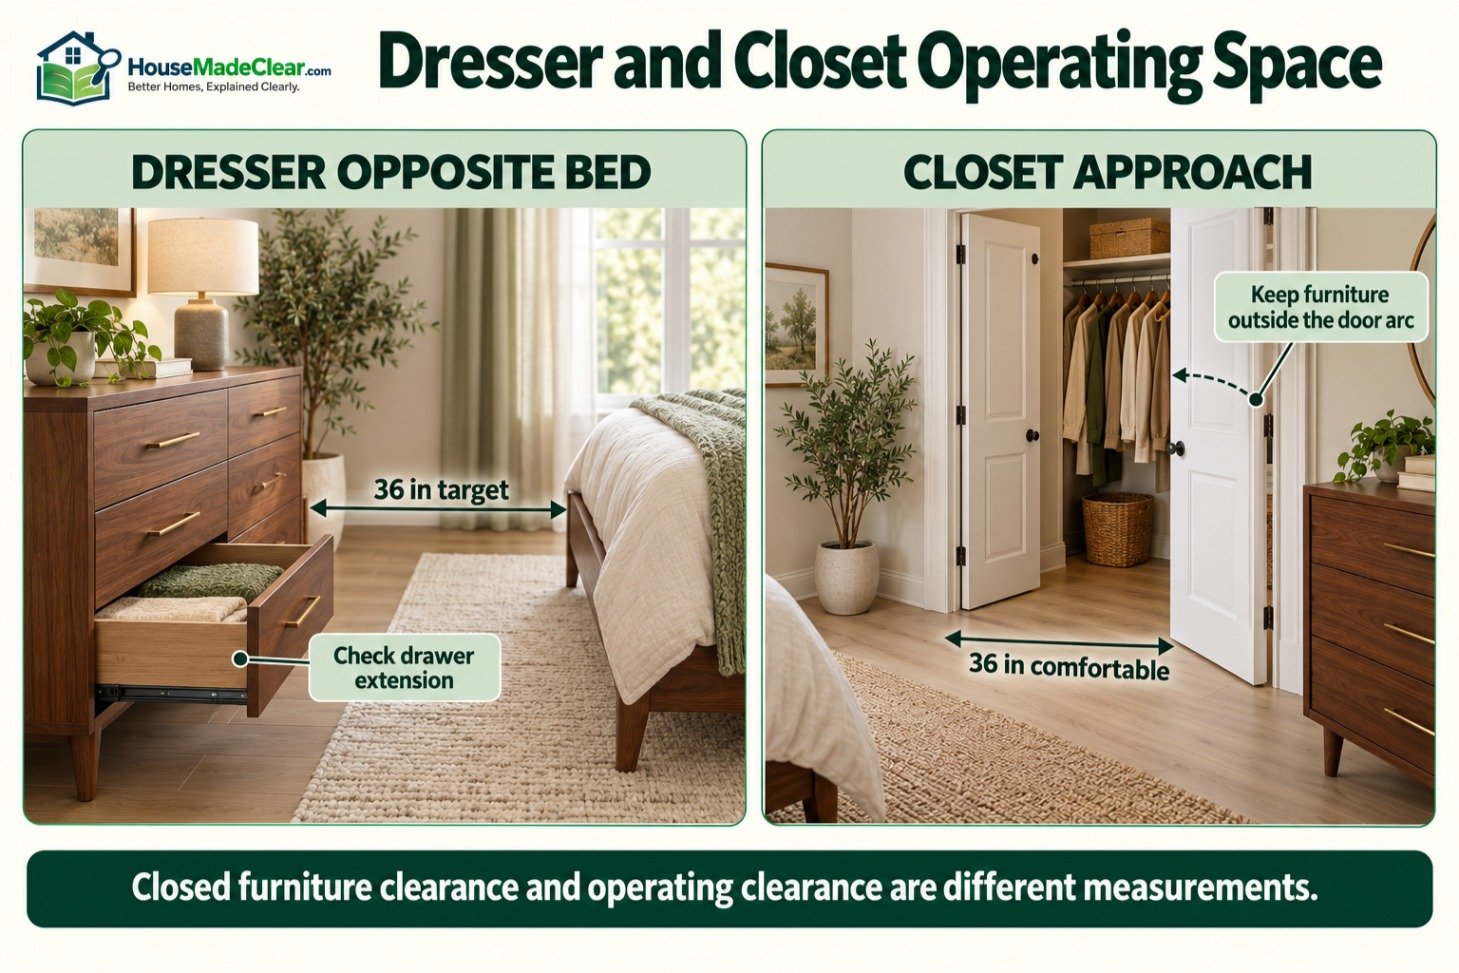
Dresser Opposite the Bed
This is a common layout because it creates visual balance and keeps storage near the dressing area.
Aim for approximately 36 inches between the closed dresser and the nearest part of the bed. Thirty inches can work in a compact layout, while 42 inches is more comfortable.
Remember that open drawers occupy part of that clearance.
Dresser Beside the Bed
A low dresser may serve as a wide nightstand if:
- Its top is reasonably close to mattress height.
- Frequently used drawers open without hitting the bed.
- It remains easy to reach.
- It does not obstruct the walking path.
- It can be properly anchored.
Dresser Under a Window
This arrangement can use otherwise empty wall space, but the dresser must not interfere with:
- Window operation
- Curtains and blinds
- Heating equipment
- Emergency escape
- Airflow
- Moisture management
Dresser Inside the Closet
Moving the dresser into a closet can free bedroom floor space.
Check the complete closet depth with drawers open. Also verify door operation, lighting, hanging-clothing clearance and anchoring access.
For rooms with difficult wall conditions, see our guide to dresser placement in a small bedroom.
Step 7: Plan the Closet Operating Zone
A closet requires more than the width of its opening.
Hinged Closet Doors
Mark the complete door swing and keep furniture outside the arc.
Allow standing space in front of the closet after the door is open.
Bifold Closet Doors
Bifold panels project into the room as they open. Measure their folded depth and handle projection.
Sliding Closet Doors
Sliding doors do not project into the room, but only part of the closet opening is accessible at one time.
Furniture placed close to the opening can still block the user’s approach.
Walk-In Closets
Preserve the entrance route and make sure the bedroom door, bed and nearby furniture do not restrict access.
Do not use the closet entrance as the only remaining circulation space beside the bed.
Step 8: Add a Desk or Work Area
A bedroom desk requires more space than the desktop footprint.
A standard desk is commonly approximately:
- 40–60 inches wide
- 20–30 inches deep
- 28–30 inches high
Our standard desk dimensions guide explains common desk sizes and user-clearance requirements.
Desk-Chair Clearance
The chair needs space to:
- Pull away from the desk
- Allow the user to sit
- Turn or roll
- Let another person pass
Allow approximately:
- 36 inches behind the desk for basic chair use
- 42–48 inches where someone must pass behind
- More space for larger chairs or mobility needs
The guide to space behind a desk chair provides more detailed planning dimensions.
Best Desk Locations
Possible desk positions include:
- Near a window for daylight
- On a wall opposite the bed
- Beside the dresser
- Inside a large closet
- At the foot of the bed in a large room
Avoid placing a monitor where direct window glare makes it difficult to view.
Do not let the desk consume the main route between the bedroom entrance and bed.
Step 9: Plan Additional Furniture Carefully
Every additional item creates another footprint and operating zone.
Bedroom Bench
A bench at the foot of the bed is useful only when adequate space remains beyond it.
Calculate:
Bed length + bench depth + walking clearance
For example:
- Bed frame length: 84 inches
- Bench depth: 18 inches
- Walkway: 36 inches
Total required depth:
84 + 18 + 36 = 138 inches
The arrangement requires 11 feet 6 inches from the headboard wall to the far edge of the walking route.
Reading Chair
A reading chair may require:
- Chair footprint
- Space to approach
- Side table
- Floor lamp
- Reclining clearance
- Ottoman
- Clear path around the grouping
Do not place the chair where it blocks closet access or becomes a place to collect clothing.
Vanity
A bedroom vanity needs:
- Table depth
- Stool or chair space
- Mirror height
- Lighting
- Drawer clearance
- Electrical access
A vanity can sometimes replace a separate desk, but only if its surface and seating work for both uses.
Wardrobe or Armoire
A freestanding wardrobe requires wall anchoring, door clearance and enough room to access its full interior.
Measure:
- Overall width
- Depth
- Height
- Door swing
- Drawer extension
- Crown molding
- Baseboard gap
- Delivery route
Tall furniture should not be placed beneath a low ceiling, sloped roof or inaccessible anchoring point.
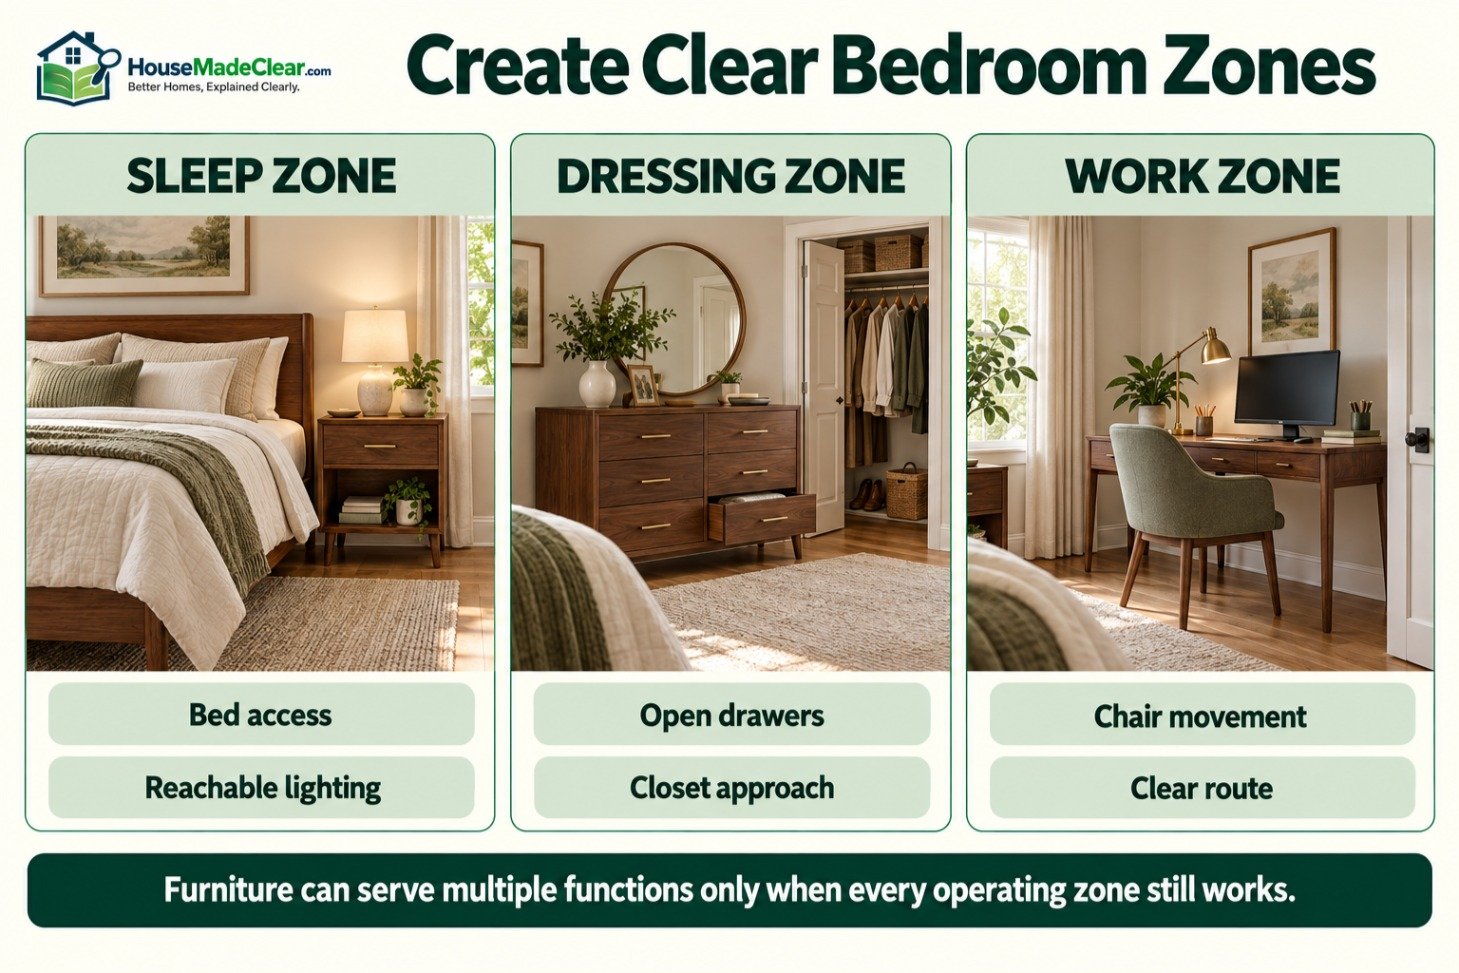
Step 10: Create Clear Operating Zones
A functional layout separates furniture footprints from the space required to use them.
Sleep Zone
Includes:
- Bed
- Nightstands
- Bedside lighting
- Space to enter and exit
- Bedding movement
Dressing Zone
Includes:
- Closet
- Dresser
- Mirror
- Laundry basket
- Standing space
- Open doors and drawers
Work or Study Zone
Includes:
- Desk
- Chair
- Monitor
- Task lighting
- Charging equipment
- Chair movement
Relaxation Zone
May include:
- Reading chair
- Bench
- Bookshelf
- Floor lamp
- Side table
In a small room, furniture may serve multiple zones. A dresser can support a mirror, a desk can serve as a vanity and a bench can provide storage.
Multi-use furniture helps only when each function remains convenient.
Step 11: Plan Bedroom Storage
Storage should reduce clutter without reducing circulation.
Prioritize:
- Closet storage
- Dresser or drawer storage
- Bedside storage
- Under-bed storage
- Wall-mounted storage
- Occasional-use storage above comfortable reach
Use Vertical Space Selectively
Tall storage saves floor width but can create reach and stability problems.
Keep frequently used items between comfortable waist and shoulder height. Store lightweight, rarely used items higher.
Use Under-Bed Storage
Under-bed storage works best when:
- Containers fit beneath the frame.
- They can be removed without moving furniture.
- A rug does not block them.
- The room has enough space to pull them out.
- The containers do not interfere with bed supports.
Avoid Overfilling the Room
If storage furniture consumes every available wall, reduce belongings or consolidate storage rather than eliminating walkways.
Our small-bedroom storage ideas without a closet provide alternatives for rooms with limited built-in storage.
Step 12: Position the Bedroom Rug
A rug should relate to the bed while preserving stable furniture placement and clear door movement.
Common approaches include:
- Place the rug beneath the lower two-thirds of the bed.
- Place the rug beneath the entire bed and nightstands.
- Use runners on both sides of the bed.
- Place a small rug beside a twin or full bed.
Common starting sizes include:
| Bed Size | Common Rug Starting Point |
|---|---|
| Twin | 5 × 8 feet |
| Full | 5 × 8 or 6 × 9 feet |
| Queen | 6 × 9 or 8 × 10 feet |
| King | 8 × 10 or 9 × 12 feet |
| California king | 9 × 12 feet |
Room proportions and rug placement affect the final choice. Our standard rug sizes guide compares sizes and placement options.
Keep rug edges away from door swings and places where furniture creates unstable transitions.
Step 13: Plan Lighting and Electrical Access
A functional bedroom needs more than one overhead fixture.
Use layers of lighting:
- General ceiling light
- Bedside reading lights
- Closet lighting
- Desk or vanity lighting
- Low-level night lighting
Bedside Lighting
Bedside lamps should be reachable without excessive twisting or stretching.
Confirm that:
- Lamp bases fit the nightstand.
- Shades do not touch curtains or bedding.
- Switches are accessible.
- Cords do not cross walking paths.
- Plugs are not crushed behind furniture.
- Light does not create direct glare.
Wall-mounted sconces can free nightstand space, but their placement should be based on the final bed and mattress position.
Electrical Outlets
Identify outlet locations before placing the headboard and storage furniture.
Consider power needs for:
- Lamps
- Phone chargers
- Medical equipment
- Adjustable bed
- Alarm clock
- Smart speaker
- Television
- Air purifier
- Fan
Avoid relying on extension cords as a permanent substitute for properly located electrical service.
Step 14: Protect Windows, Vents and Heating Equipment
Furniture should not obstruct systems the room needs to function safely.
Keep clear access to:
- Supply and return vents
- Radiators
- Baseboard heaters
- Window locks
- Smoke alarms
- Carbon-monoxide alarms where applicable
- Thermostats
- Electrical panels
- Emergency escape openings
Curtains, bedding and furniture should be kept away from heat-producing equipment according to the manufacturer’s instructions.
Do not position a tall dresser where it alters airflow from a return grille or makes a window impossible to operate.
Step 15: Address Furniture Safety
Tall and drawer-based furniture can create tip-over hazards if incorrectly assembled, loaded or installed.
The U.S. Consumer Product Safety Commission’s Anchor It guidance recommends securing furniture and televisions to help prevent tip-over incidents.
Use these precautions:
- Follow all assembly instructions.
- Install supplied anti-tip restraints.
- Attach restraints to suitable wall structure.
- Use hardware appropriate for the wall type.
- Place furniture on a stable, level floor.
- Store heavier items in lower drawers.
- Open one drawer at a time.
- Close drawers after use.
- Do not allow children to climb furniture.
- Do not place tempting objects on top of tall furniture.
- Recheck anchors after moving furniture.
- Verify top-load ratings before adding a television or heavy object.
Anchoring does not correct damaged, recalled or incorrectly assembled furniture.
Functional Bedroom Layouts by Room Size
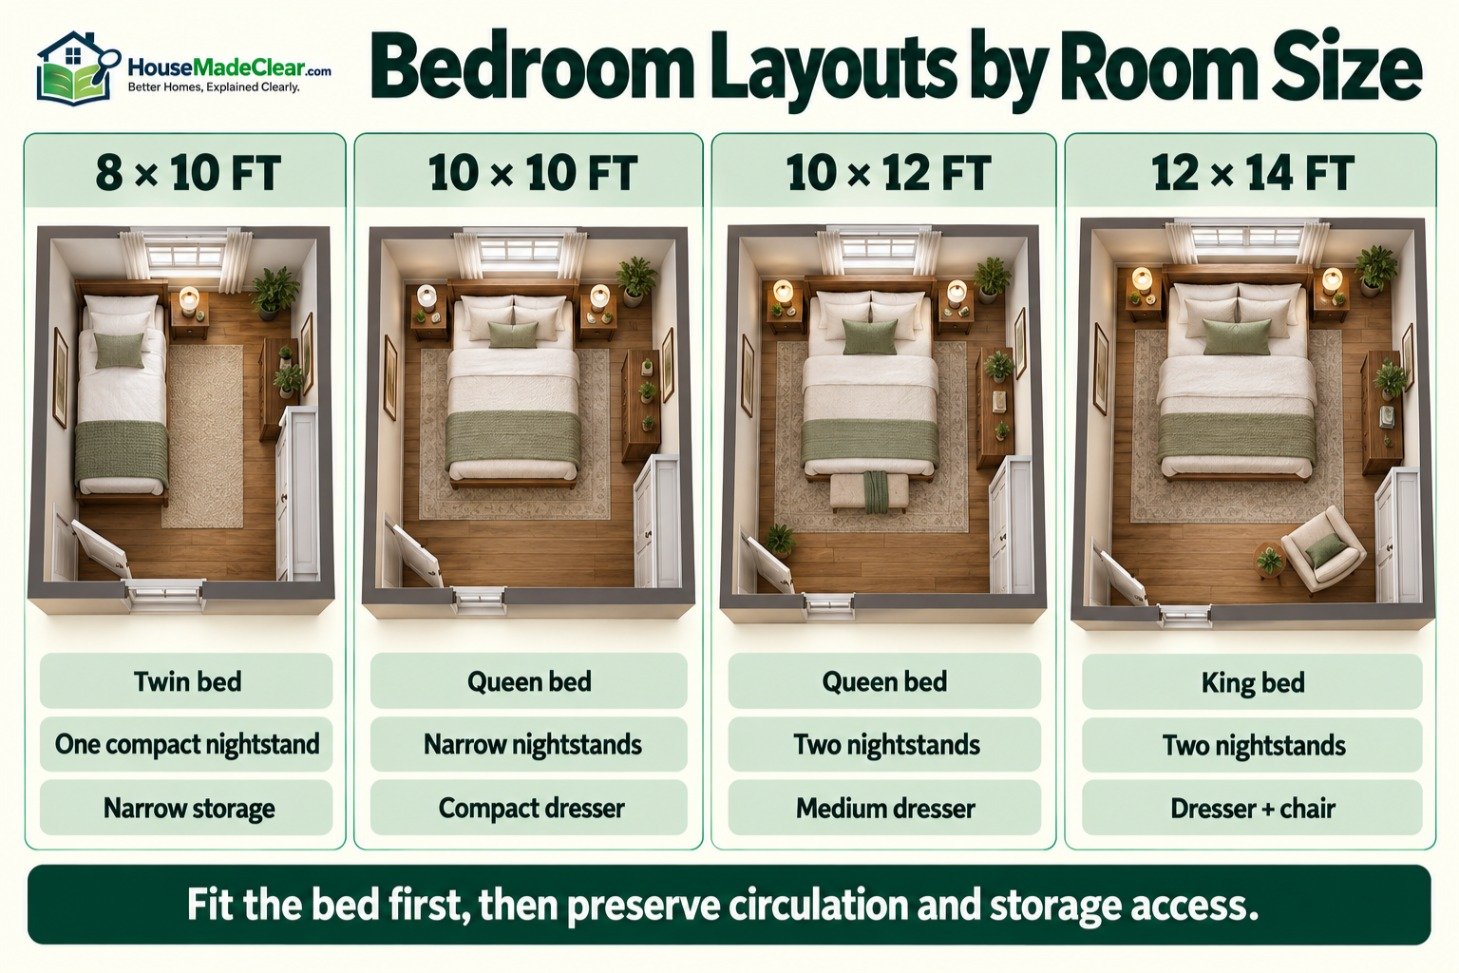
8 × 10 Bedroom Layout
An 8-by-10-foot room contains 80 square feet and requires a compact arrangement.
A practical layout may include:
- Twin or twin XL bed
- One compact nightstand
- Narrow dresser or tall chest
- Reach-in closet
- Wall-mounted lighting
Place the bed along the longest wall or in a corner if only one person uses it.
A full bed may fit, but it will reduce storage and circulation options.
Avoid trying to include a queen bed, two conventional nightstands, dresser and desk in this room. The furniture may technically fit, but the operating zones will overlap.
10 × 10 Bedroom Layout
A 10-by-10-foot room contains 100 square feet.
Possible layouts include:
- Twin or full bed with two compact nightstands
- Queen bed with one or two narrow nightstands
- Small dresser
- Wall-mounted storage
A queen mattress occupies 60 by 80 inches before adding the frame. If centered on a 10-foot wall, the mattress alone leaves 30 inches on each side. The frame and bedside gaps reduce that amount.
Use shallow storage and avoid a wide dresser opposite the bed unless the clearance calculation works.
10 × 12 Bedroom Layout
A 10-by-12-foot room contains 120 square feet and works well for many secondary bedrooms.
A functional layout may include:
- Full or queen bed
- Two nightstands
- Medium dresser
- Reach-in closet
- Compact desk if door and closet positions permit
Place the bed so the 12-foot dimension supports the most important furniture grouping.
A king bed may physically fit but can crowd the room.
12 × 12 Bedroom Layout
A 12-by-12-foot room contains 144 square feet.
It can accommodate:
- Queen bed comfortably
- King bed with controlled furniture selection
- Two nightstands
- Medium or wide dresser
- Small desk or chair in some layouts
With a king bed, calculate the complete bed-wall width before choosing large nightstands.
Avoid assuming that every wall remains usable. Doors and windows may reduce the effective room dimensions.
12 × 14 Bedroom Layout
A 12-by-14-foot room contains 168 square feet and provides flexibility for a primary bedroom.
Possible furniture includes:
- Queen or king bed
- Two nightstands
- Wide dresser
- Reading chair
- Bench
- Compact work area
Keep the sleep, dressing and seating zones distinct rather than distributing furniture randomly around the perimeter.
14 × 16 Bedroom Layout
A 14-by-16-foot room contains 224 square feet.
A room this size may support:
- King or California king bed
- Wide nightstands
- Large dresser
- Reading area
- Desk or vanity
- Bench
- Freestanding wardrobe
The main challenge becomes zoning rather than fitting furniture. Use rugs, lighting and clear circulation paths to organize the space without filling every wall.
Layout for a Small Bedroom
A small-bedroom layout should prioritize:
- Bed
- Main walkway
- Closet access
- Essential bedside surface
- Necessary clothing storage
Remove or reduce:
- Oversized footboards
- Decorative benches
- Wide nightstands
- Deep dressers
- Unused chairs
- Multiple small storage pieces
One well-sized dresser is usually more useful than several small units that fragment the room.
Use a full-scale mockup before committing to a queen bed in a room near 10 by 10 feet.
A shared bedroom needs individual access and storage.
Possible bed arrangements include:
- Two beds on opposite walls
- Two parallel beds with a shared nightstand
- Beds placed head-to-head along one wall
- Bunk beds
- L-shaped corner beds
Allow approximately 24 inches between separate beds in a tight layout and 30 to 36 inches where possible.
Do not position a bunk bed where it blocks a window, ceiling fan, light fixture or required escape route. Follow the manufacturer’s clearance and safety instructions.
Layout for a Primary Bedroom
A primary bedroom often combines sleeping, dressing and relaxation.
Start with the bed and primary circulation route. Then establish:
- Bedside zones
- Dresser wall
- Closet approach
- Seating or work zone
- Bathroom route
Avoid placing a bench or chair where it narrows the path from the bed to the bathroom.
Shared bedrooms benefit from balanced access, but exact symmetry is less important than comfortable movement for both occupants.
Layout for a Guest Bedroom
A guest bedroom should be simple to understand and easy to use.
Provide:
- Clear bed access
- Bedside surface
- Reading light
- Charging access
- Empty drawer or hanging space
- Place for luggage
- Unblocked door and window
- Simple route to the bathroom
Do not fill every available surface with decoration. Guests need space for their belongings.
A luggage rack or clear bench may be more useful than a large dresser in a short-stay room.
Layout for a Bedroom With a Desk
Separate the desk visually from the sleep zone where possible.
Place it:
- Near natural light without direct screen glare
- Away from the main bed-entry route
- Where the chair can move freely
- Near suitable outlets
- Away from closet-door conflicts
A desk opposite the bed can work in a room with enough depth. In a smaller room, a narrow wall-mounted desk may preserve floor space.
Keep work materials contained so the bedroom does not become visually dominated by the office zone.
Accessibility and Aging-in-Place Considerations
Generic furniture clearances may not support a wheelchair, walker, caregiver or person with limited mobility.
Consider:
- Wider bedside access
- Clear transfer space
- Stable furniture
- Reachable lighting controls
- Rounded furniture corners
- Doors that do not trap an occupant
- Reduced trip hazards
- Firm, secure rugs
- Accessible closet storage
- Bed height suited to transfers
- Space for mobility equipment
A few extra inches do not automatically create an accessible bedroom. The complete route from the entrance to the bed, closet and bathroom must work for the user.
Individual planning with an occupational therapist or accessibility professional may be appropriate.
Common Bedroom Layout Mistakes
Starting With Furniture Instead of Measurements
Buying a bedroom set before measuring creates unnecessary compromises. The room should determine the furniture dimensions.
Using Only Mattress Dimensions
Bed frames can be several inches wider and longer than the mattress.
Ignoring Door and Drawer Operation
Furniture that fits while closed may fail when doors and drawers open.
Centering the Bed Automatically
Centering can leave two unusably narrow gaps. A slightly off-center bed may create one functional walkway and one compact side.
Choosing a Bed That Is Too Large
A large bed can eliminate useful storage and circulation.
Placing a Dresser Too Close to the Bed
Measure the dresser with its deepest drawer open.
Blocking the Closet
Closet access is part of the everyday layout, not leftover space.
Overcrowding the Room
More furniture does not produce more function when operating zones overlap.
Ignoring Furniture Height
A dresser may block a window, switch or thermostat even when its floor footprint fits.
Blocking Airflow
Furniture placed over vents or directly against radiators can interfere with room comfort and equipment operation.
Treating Decorative Symmetry as a Requirement
Two matching nightstands are not useful if one blocks a door.
Forgetting Wall Anchoring
The layout must leave suitable access for restraints and appropriate wall structure.
Skipping the Full-Scale Test
A scaled plan cannot show how the room feels during actual movement. Use painter’s tape and walk through each activity.
Bedroom Layout Calculation Examples
Example 1: Queen Bed on a 10-Foot Wall
Assume:
- Wall width: 120 inches
- Bed-frame width: 64 inches
- Two nightstands: 22 inches each
- Two bed gaps: 3 inches each
Calculation:
120 − 64 − 44 − 6 = 6 inches
Only 6 inches remain outside the arrangement, or approximately 3 inches at each end.
The layout fits tightly but leaves little tolerance for trim, uneven walls or wider furniture.
Example 2: Dresser Opposite a Bed
Assume:
- Room depth: 144 inches
- Bed-frame length: 84 inches
- Dresser depth: 18 inches
Remaining space:
144 − 84 − 18 = 42 inches
The room provides 42 inches between the closed dresser and bed, which is comfortable for many layouts.
Example 3: Bench at the Foot of a Queen Bed
Assume:
- Room depth: 144 inches
- Bed-frame length: 84 inches
- Bench depth: 18 inches
Remaining passage:
144 − 84 − 18 = 42 inches
The arrangement leaves 42 inches beyond the bench if the bed begins at the wall. A projecting headboard or gap behind it reduces that clearance.
Example 4: Desk Opposite a Full Bed
Assume:
- Room depth: 132 inches
- Bed-frame length: 80 inches
- Desk depth: 24 inches
Remaining space:
132 − 80 − 24 = 28 inches
Twenty-eight inches is generally insufficient for comfortable desk-chair operation. The desk should move to another wall or be replaced with a shallower design.
Example 5: Two Twin Beds
Assume:
- Room width: 144 inches
- Two twin bed frames: 42 inches each
- Space between beds: 30 inches
Remaining space:
144 − 42 − 42 − 30 = 30 inches
This leaves 15 inches outside each bed if the arrangement is centered. The room may work, but wall-side access will be limited.
Bedroom Layout Checklist
| Item | What to Verify |
|---|---|
| Room dimensions | Measure finished wall to finished wall |
| Ceiling height | Include slopes, beams and fans |
| Door operation | Draw every complete swing |
| Window access | Preserve operation and required escape |
| Closet access | Check doors, drawers and standing space |
| Bed footprint | Use complete frame dimensions |
| Bedside clearance | Aim for 30–36 inches where practical |
| Foot clearance | Aim for approximately 36 inches |
| Nightstand height | Match finished mattress height |
| Bed-wall width | Include nightstands and gaps |
| Dresser clearance | Check deepest drawer fully open |
| Desk clearance | Include chair movement |
| Rug placement | Keep edges stable and clear of doors |
| Outlets | Preserve access for required devices |
| Lighting | Provide general and task lighting |
| Heating and cooling | Keep equipment and vents clear |
| Main walking route | Avoid furniture and drawer conflicts |
| Furniture anchoring | Follow manufacturer instructions |
| Delivery route | Measure doors, stairs and turns |
| User mobility | Adjust layout to actual occupants |
| Full-scale test | Mark furniture with tape before buying |
Frequently Asked Questions
How do I plan a functional bedroom layout?
Measure the complete room, select a bed that leaves usable circulation space, position it on the best wall and then add nightstands, storage and other furniture according to their full operating footprints. Test all doors, drawers and walking routes before purchasing.
Where should a bed be placed in a bedroom?
Place the bed on a long, relatively uninterrupted wall where it does not block the doorway, closet or required window access. The best wall depends on the room’s openings and circulation pattern.
How much space should be left around a bed?
Approximately 30 to 36 inches is a comfortable target along frequently used sides and at the foot. Twenty-four inches can work in a compact room but will feel tighter.
Is 24 inches enough beside a bed?
Twenty-four inches can provide basic access for many people in a small bedroom, but it is a tight planning dimension. Approximately 30 to 36 inches is more comfortable.
Should a bed face the bedroom door?
A bed can face the door if the arrangement creates a clear route and does not place the bed directly in a congested entry zone. Door visibility is a preference rather than a universal layout requirement.
Can a bed be placed under a window?
Yes, provided the bed and headboard do not interfere with window operation, emergency escape, curtains, heating equipment or cleaning access.
How much space should be between a bed and dresser?
Approximately 36 inches between the closed dresser and bed is a useful target. Thirty inches can work in a compact layout, while 42 inches provides easier drawer use and circulation.
How much space should be between a bed and nightstand?
Leave approximately 2 to 4 inches between the bed and nightstand. This allows room for bedding while keeping the surface within reach.
What should I remove from an overcrowded bedroom?
Remove furniture that duplicates another function or obstructs circulation. Oversized benches, unused chairs, deep dressers and unnecessarily wide nightstands are common candidates.
Can a king bed fit in a 12 × 12 bedroom?
A king bed can fit in many 12-by-12-foot rooms, but nightstand width, door position, closet access and dresser placement may be limited. Use the complete bed-frame dimensions rather than the mattress alone.
What is the best layout for a small bedroom?
Prioritize the bed, main walkway, closet and essential storage. Use compact nightstands, shallow storage, wall-mounted lighting and under-bed containers instead of filling every wall with furniture.
How do I test a bedroom layout before buying furniture?
Mark the full furniture footprints with painter’s tape. Include open drawers, door swings and chair movement, then walk through everyday activities such as entering, making the bed, dressing and using the closet.