













Outdoor motion sensor lights work best when they illuminate the places people actually approach, enter, walk through or use after dark.
A bright fixture mounted randomly on the side of a house may still leave the front steps dark. A light aimed too high may create glare without improving visibility. A sensor pointed toward the street may activate every time a vehicle passes. And a fixture placed directly beside a security camera can sometimes make nighttime images worse rather than better.
The goal is not simply to install more outdoor lights.
The goal is to place them where they improve visibility, movement and awareness around the property without creating unnecessary glare, false activations or dark gaps between important areas.
Quick answer: Start with exterior doors, driveways, side passages, garage approaches and commonly used walkways. Mount motion sensor lights high enough to illuminate the intended area without shining directly into people’s eyes, neighboring windows or security cameras. Aim the sensor across likely movement routes rather than directly toward distant streets or sidewalks, and test every light after dark before finalizing its position.
Outdoor lighting should support the rest of the home’s security rather than act as the only security measure. House Made Clear’s guide to common home security mistakes explains why doors, windows, lighting, cameras and access control should be considered together.
Why Motion Sensor Light Placement Matters
A motion light has two jobs:
- Detect movement in the area you care about.
- Illuminate that area in a useful way.
Poor placement can cause problems such as:
- Frequent activation from passing cars
- Detection of pedestrians outside the property
- Dark areas near doors
- Harsh glare
- Light entering bedrooms
- Security-camera washout
- Shadows behind parked vehicles
- Sensors blocked by landscaping
- Lights that switch on only after someone has already passed the important area
A useful installation therefore needs both sensor coverage and lighting coverage.
These are not always the same thing.
The sensor may detect movement across a wider area than the fixture illuminates, or the light may cover an area that the sensor does not detect effectively.
The Best Places for Outdoor Motion Sensor Lights
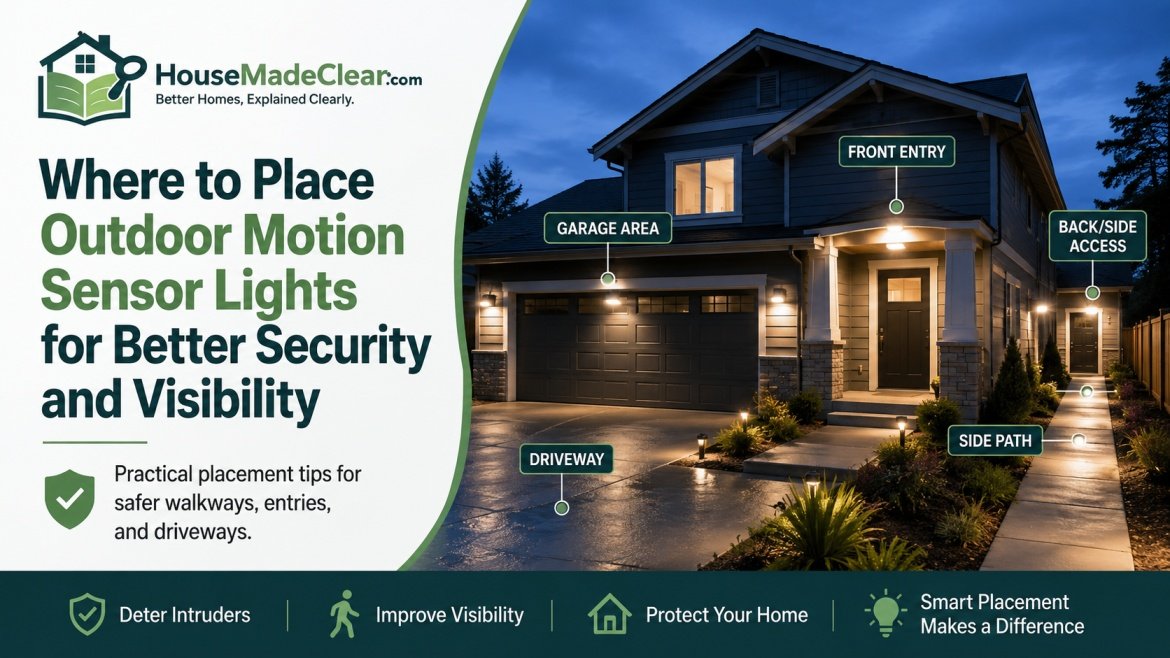
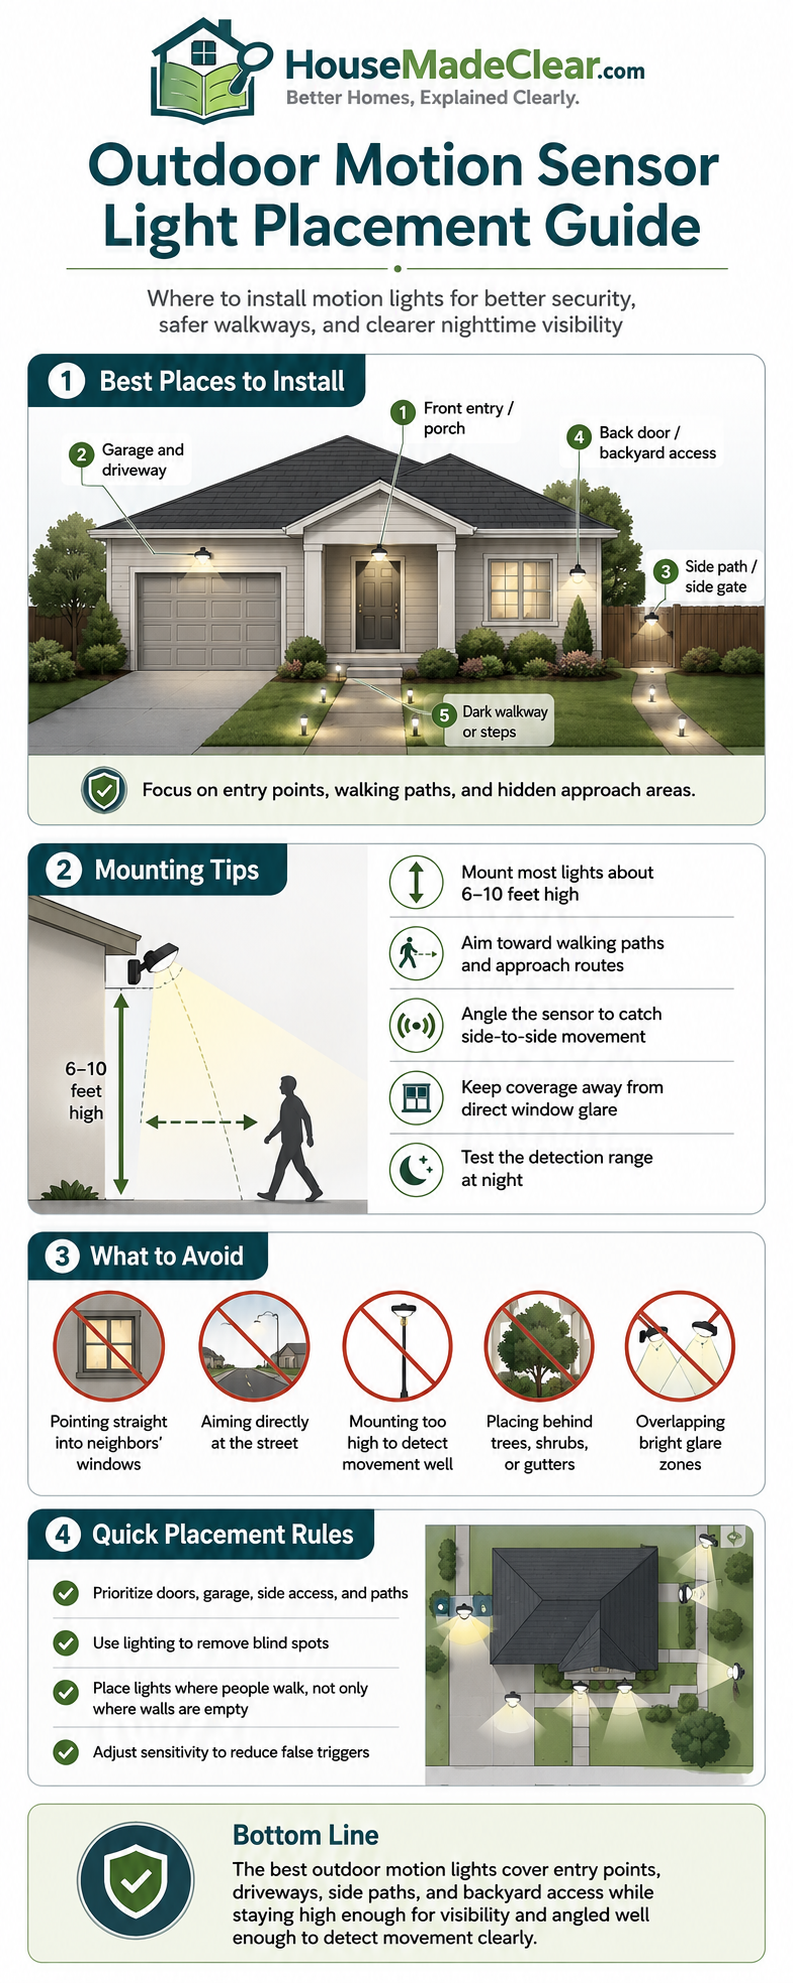
For most homes, start with the places where people naturally approach or enter the property.
Priority areas usually include:
- Front entrance
- Side entrance
- Back door
- Garage door
- Driveway
- Path from driveway to entrance
- Side passage
- Patio or deck steps
- Basement entrance
- Detached garage or shed approach
- Dark corners near frequently used routes
You usually do not need every part of the yard to become brightly illuminated whenever motion occurs.
Focus first on access routes and activity zones.
1. Front Door and Porch
The front entrance is one of the most useful places for motion-activated lighting.
A good front-door light can help:
- Residents find keys
- Visitors see steps
- Delivery drivers locate the entrance
- Cameras capture a better-lit scene
- Homeowners notice activity near the door
Where to position it
Possible locations include:
- Above the doorway
- Beside the doorway
- Under the porch roof
- On the wall facing the approach
The exact position depends on the architecture.
The light should illuminate:
- Door area
- Lock
- Steps
- Immediate approach
without shining directly into the eyes of someone standing at the door.
Avoid pointing the sensor directly toward the street
If the home sits close to a public road or sidewalk, a forward-facing sensor may react to:
- Cars
- Cyclists
- Pedestrians
- Animals
Instead, angle the sensor toward the part of the approach that belongs to the property.
2. Driveway
Driveways are another strong location because they are common approach routes.
A motion light can improve visibility around:
- Parked vehicles
- Garage entrance
- Walk from vehicle to house
- Driveway edges
Possible mounting points
- Garage wall
- Eave above garage
- Side wall of house
- Post near driveway where suitable
The light should cover the area people actually use rather than merely lighting the center of the pavement.
Watch for parked vehicles
Cars can create large shadows.
Test the light with the driveway in its normal occupied condition.
A fixture that seems adequate when the driveway is empty may leave the walkway beside a parked SUV dark.
3. Garage Entrance
Garages often need more than one type of lighting.
You may have:
- General garage-door lighting
- Motion-activated approach light
- Interior garage lighting
For an attached garage, the path between the vehicle and entry door is particularly important.
Make sure the motion sensor detects a person approaching:
- From the driveway
- From the side
- From the garage door where relevant
without constantly reacting to traffic beyond the property.
4. Side Passages
The side of a house can become one of the darkest parts of a property.
These areas may contain:
- Gates
- Trash bins
- Utility equipment
- Side doors
- Narrow walkways
A strategically placed motion light can make the route easier to use at night.
Positioning matters more in narrow spaces
A very bright floodlight in a narrow side passage may create uncomfortable glare and extreme contrast.
Instead, use enough light to see:
- Ground
- Gate
- Steps
- Door
- Obstacles
without turning the passage into a brightly lit tunnel.
5. Back Door
Back doors are frequently used but often receive less lighting attention than front entrances.
Good motion lighting should illuminate:
- Door handle
- Lock
- Steps
- Patio edge
- Immediate walkway
If there is a security camera nearby, coordinate the light and camera rather than installing them independently.
House Made Clear’s guide to positioning home security cameras without creating blind spots explains how lighting, glare, mounting angle and nighttime visibility affect useful camera coverage.
6. Patio and Deck Steps
Steps need predictable visibility.
Motion lighting may be useful around:
- Deck stairs
- Patio steps
- Changes in level
- Paths leading back to the house
A single high floodlight may illuminate the area but still leave individual step edges in shadow.
Depending on the layout, combine:
- General motion lighting
- Low-level step lighting
- Path lighting
The motion fixture does not need to solve every lighting requirement by itself.
7. Walkways
A path from the driveway, sidewalk or backyard to the house should be visible enough to follow safely after dark.
Motion lighting can be placed to illuminate:
- Changes in direction
- Steps
- Gates
- Uneven transitions
- Door approaches
Avoid aiming a powerful fixture directly down the length of the path at eye level.
Side lighting or downward-directed illumination often creates a more comfortable result.
8. Detached Garage, Shed or Workshop
Outbuildings can be very dark when separated from the main house.
Motion lighting can help around:
- Door
- Lock
- Path
- Equipment area
- Vehicle entrance
However, do not assume that lighting alone secures an outbuilding.
Locks, doors and windows still matter.
Should Motion Sensor Lights Be Installed at Every Door?
Not necessarily.
Prioritize doors based on:
- Frequency of use
- Existing lighting
- Visibility
- Nearby street lighting
- Camera coverage
- Property layout
A rarely used service door may need less lighting than a side entrance used every evening.
The objective is not maximum fixture count.
It is adequate coverage of meaningful access points.
How High Should Outdoor Motion Sensor Lights Be Mounted?
There is no single mounting height suitable for every fixture.
The correct height depends on:
- Manufacturer instructions
- Sensor technology
- Detection pattern
- Light beam
- Wall or eave position
- Intended coverage
Many exterior motion fixtures are designed to be mounted above normal head height, but the specific product’s installation guidance should control the final position.
Mounting too low may:
- Increase glare
- Reduce coverage
- Make the fixture easier to tamper with
Mounting too high may:
- Reduce useful light near the ground
- Create a steep detection angle
- Leave faces or door areas poorly illuminated
Follow the manufacturer’s recommended mounting range rather than using a universal number for every product.
Aim the Sensor Across Movement, Not Only Toward It
Many motion sensors detect movement more effectively when a person crosses their detection zones rather than moving directly toward the sensor.
That means a useful strategy is often to place or angle the sensor so people move across its field as they approach.
For example, at a driveway:
Less useful:
- Sensor points straight down the driveway toward the road.
Potentially better:
- Sensor watches movement across the driveway closer to the house.
This can also help reduce detection of distant street traffic.
The exact behavior depends on the sensor technology and manufacturer specifications.
Avoid Pointing the Sensor Toward the Street
This is one of the most common mistakes.
A sensor aimed toward a street may activate repeatedly because of:
- Cars
- Pedestrians
- Bicycles
- Pets
- Nearby property activity
Frequent unnecessary activation can:
- Annoy occupants
- Annoy neighbors
- Reduce the usefulness of alerts
- Increase light-on time
Instead, narrow the detection zone to the part of the property that matters.
Many modern motion lights allow adjustment of:
- Sensor direction
- Detection distance
- Sensitivity
- Activation duration
Use those controls during nighttime testing.
Do Not Aim Bright Lights at Neighbors
Outdoor security lighting should remain focused on your property where practical.
Poorly aimed fixtures may shine into:
- Neighboring windows
- Bedrooms
- Gardens
- Public paths
A brighter light is not automatically a better security light.
Use:
- Downward aiming
- Shielding
- Lower appropriate output
- Better fixture position
to illuminate the target area rather than everything around it.
Avoid Excessive Glare
Glare occurs when a light source is too bright relative to its surroundings or visible directly from the viewing position.
It can actually reduce useful visibility.
For example, a very bright floodlight near a doorway may make the area immediately beneath it bright while creating deep shadows beyond.
Potential problems include:
- Difficulty seeing faces
- Loss of detail
- Strong shadows
- Camera overexposure
- Visual discomfort
A better lighting plan usually spreads appropriate light across the area rather than relying on one extremely bright fixture.
Motion Lights and Security Cameras
Motion lights can help cameras, but they can also create problems.
Potential issues include:
- Light shining directly into camera lens
- Sudden overexposure
- Reflections from walls
- Infrared reflection
- Deep shadows
- Camera switching awkwardly between night and color modes
When using cameras and motion lighting together:
- Identify the camera’s field of view.
- Position the light outside the direct lens line.
- Illuminate the subject area rather than the camera.
- Test the image before and after activation.
- Test during complete darkness.
The camera should capture useful detail when the light activates.
It should not become temporarily blinded.
This is particularly important around doors and driveways, where House Made Clear already recommends testing camera views during both daylight and darkness.
Where Should a Motion Light Go Relative to a Camera?
There is no universal distance.
The better rule is:
Keep the light source out of the camera’s direct field while illuminating the area the camera needs to see.
Possible arrangements include:
Camera above light
Can work when the light points down and does not flare into the lens.
Light above camera
Can work if the fixture is angled outward/downward rather than directly across the camera.
Light and camera separated horizontally
Often gives better control because the light illuminates the subject from an angle.
Always test the final image.
Lighting the Front Door With a Doorbell Camera
A video doorbell already looks directly at visitors.
Poor lighting may create:
- Dark faces
- Strong backlighting
- Harsh shadows
A porch light should illuminate the visitor without shining directly into the camera.
Side-mounted lights can sometimes create better facial illumination than a powerful fixture directly above.
Again, architecture matters.
Do Motion Sensor Lights Deter Burglars?
Outdoor lighting can improve visibility and make activity around the home more noticeable, but it should not be treated as a guaranteed burglary-prevention device.
Effective home security also depends on:
- Door condition
- Locks
- Window security
- Access control
- Cameras where appropriate
- Alarm systems
- Household routines
House Made Clear’s article on whether you really need a smart home security system makes the same broader point: sometimes better locks and improved exterior lighting are more useful first steps than adding more connected equipment.
Motion Sensor Lights vs Dusk-to-Dawn Lights
These solve different problems.
Motion sensor lights
Switch on when movement is detected.
Useful for:
- Door approaches
- Side passages
- Driveways
- Intermittently used areas
Dusk-to-dawn lights
Switch on when ambient light falls below a set level and remain on through the night.
Useful for:
- Constant entrance visibility
- House numbers
- Low-level porch lighting
- Path orientation
Which is better?
Often, a combination works best.
For example:
- Low-output dusk-to-dawn light at the front entrance
- Brighter motion-activated light for driveway activity
This prevents the property from going completely dark while avoiding full-brightness lighting all night.
Smart Motion Lights
Connected motion lighting may allow:
- Scheduling
- App control
- Adjustable sensitivity
- Integration with cameras
- Automation
- Notifications
These features can be convenient, but they are not essential for basic exterior lighting.
A conventional motion sensor may be completely adequate.
If you use smart lighting, retain practical manual control where possible and keep:
- Firmware updated
- Accounts secured
- Wi-Fi reliable
The House Made Clear home-office guide makes a similar point about smart-home controls: automation should support basic functions rather than make them unnecessarily dependent on apps.
Should Motion Lights Stay On for 30 Seconds or Several Minutes?
The ideal duration depends on the area.
Shorter periods may suit:
- Side passages
- Brief detection zones
Longer periods may suit:
- Parking
- Walking from vehicle to house
- Carrying groceries
- Unlocking doors
The light should remain on long enough for the normal activity to finish.
Avoid extremely short settings that switch off while someone is still using the area.
Also avoid very long settings unless they are genuinely necessary.
How Sensitive Should the Motion Sensor Be?
Start with moderate sensitivity.
Then observe real activations.
Increase sensitivity if:
- People are not detected soon enough
- Important parts of the walkway are missed
Reduce it if the light constantly reacts to:
- Vehicles
- Branches
- Small animals
- Activity outside the property
Many false activations are a placement problem rather than a technology problem.
Adjust the sensor’s direction before simply reducing sensitivity drastically.
Trees and Plants Can Cause Problems
Landscaping changes over time.
A motion sensor that works well in winter may become partially blocked by foliage in summer.
Plants can also move in wind.
Check whether:
- Branches enter the sensor field
- Shrubs block the light
- Leaves create changing shadows
- Vegetation hides the approach route
House Made Clear’s camera-placement guide similarly recommends accounting for plants because landscaping can create new blind spots as it grows.
Include exterior lighting in seasonal property checks.
Watch for HVAC Equipment and Heat Sources
Some motion sensors can be affected by environmental conditions.
Avoid positioning sensors unnecessarily close to:
- Dryer vents
- Exhaust outlets
- Heating equipment
- Other heat-emitting sources
Follow the manufacturer’s instructions regarding unsuitable mounting locations.
Motion Lighting Around a Porch
A porch may need several types of light depending on its use.
Possible layers include:
- General porch light
- Motion-activated approach light
- Step light
- Decorative light
The goal is both function and comfort.
House Made Clear’s guide to setting up a porch for summer recommends planning evening lighting alongside seating, circulation and outdoor use rather than treating lighting as a final decoration.
If people regularly sit on the porch at night, a harsh motion floodlight may be unpleasant.
In that case, use a lower-level ambient light for normal occupancy and reserve brighter motion lighting for the approach zone.
Motion Sensor Lights on Corner Lots
Corner properties may experience more public movement on two sides.
That increases the risk of false activations.
Strategies include:
- Narrower sensor zones
- Lower detection distance
- Sideways orientation
- Shielding
- Carefully chosen mounting position
Do not simply increase mounting height and hope to avoid the sidewalk.
Test the actual detection boundary.
Motion Lights for Townhouses
Townhouses often have:
- Narrow frontages
- Close neighbors
- Shared paths
- Small rear yards
A wide floodlight may illuminate neighboring properties unnecessarily.
Use:
- Narrower beam
- Lower appropriate output
- Shielded fixture
- Carefully adjusted sensor
The compact property does not necessarily need less thoughtful planning; it often needs more precise planning.
Motion Lights for Detached Homes
Detached homes may have:
- Multiple approaches
- Side passages
- Larger driveway
- Detached garage
- Backyard access
Rather than installing one powerful fixture intended to cover everything, consider several smaller zones.
For example:
- Front entrance
- Driveway
- Side gate
- Rear entrance
This provides more controlled illumination.
Where to Place Motion Lights on a Two-Story Home
Do not automatically mount lights at second-story height just because the electrical point is available.
A very high light may illuminate a wide area but provide poor useful light near:
- Door
- Face level
- Steps
Exterior security lighting should be designed around the target area, not simply the highest mounting location.
If second-story mounting is necessary, choose a fixture designed for that application and follow its recommended mounting specifications.
Motion Sensor Lights for Renters
Renters may need non-permanent or landlord-approved solutions.
Options may include:
- Battery-powered motion lights
- Solar motion lights
- Plug-in outdoor-rated fixtures
- Existing fixture upgrades with permission
Check:
- Lease
- Exterior modification rules
- Electrical safety
- Weather rating
- Mounting method
Do not drill into exterior cladding or alter fixed wiring without permission where required.
Are Solar Motion Sensor Lights Good Enough?
Solar lights can work in some locations, but performance varies.
They depend on:
- Solar-panel exposure
- Battery capacity
- Weather
- Season
- Fixture quality
- Light output
They may be useful for:
- Shed paths
- Garden gates
- Supplemental lighting
They may be less dependable where:
- The panel receives little sun
- Winter days are short
- Trees create heavy shade
- Reliable security lighting is essential
Do not assume a solar fixture will provide the same performance as a properly wired exterior light.
Outdoor Fixture Ratings Matter
Exterior lights are exposed to:
- Rain
- Humidity
- Dust
- Temperature changes
- Snow
- Wind
Use fixtures intended for the proposed outdoor location and follow product installation requirements.
A covered porch and an exposed wall can present different moisture conditions.
Do not install an indoor fixture outside simply because it fits aesthetically.
Electrical Safety
Fixed exterior lighting involves electricity in a location exposed to weather.
Electrical work should comply with:
- Product instructions
- Local electrical requirements
- Applicable codes
Use an appropriately qualified electrician when fixed wiring, circuits or uncertain outdoor electrical conditions are involved.
House Made Clear provides general educational guidance; see the site’s Disclaimer before undertaking electrical or security modifications.
Common Motion Sensor Light Placement Mistakes
1. Aiming the Sensor at the Road
Problem: Frequent activation from vehicles and pedestrians.
Better approach: Aim across the relevant approach area closer to the home.
2. Mounting the Light Too High
Problem: Wide illumination but poor useful detail near doors and ground level.
Better approach: Follow the fixture’s recommended mounting range.
3. Using One Extremely Bright Floodlight
Problem: Glare and deep shadows.
Better approach: Use controlled lighting zones.
4. Pointing the Light Into a Camera
Problem: Overexposed or washed-out nighttime video.
Better approach: Illuminate the subject area from outside the camera’s direct lens line.
5. Ignoring Neighbors
Problem: Light trespass into neighboring windows.
Better approach: Aim and shield the fixture carefully.
6. Letting Plants Block the Sensor
Problem: Reduced detection or false activations.
Better approach: Check vegetation seasonally.
7. Installing the Fixture Before Testing the Area
Problem: Light covers the wrong zone.
Better approach: Map normal routes first.
8. Making the Detection Zone Too Large
Problem: Constant activation.
Better approach: Cover only the useful part of the property.
9. Forgetting Parked Vehicles
Problem: Cars create unexpected dark areas.
Better approach: Test lighting with vehicles in their normal positions.
10. Assuming Lighting Replaces Locks or Cameras
Problem: A visible property may still have weak physical security.
Better approach: Treat exterior lighting as one security layer.
Step-by-Step: How to Plan Outdoor Motion Sensor Light Placement
Step 1: Walk Around the Property After Dark
Do this before buying fixtures.
Identify:
- Dark doors
- Steps
- Driveway
- Side gate
- Walkways
- Garage
- Backyard entrance
Step 2: Mark Important Movement Routes
Think about how:
- Residents
- Visitors
- Delivery workers
actually move through the property.
Step 3: Prioritize Areas
Start with:
- Exterior doors
- Driveway and garage
- Side passages
- Steps and main walkways
- Other useful zones
Step 4: Check Existing Lights
You may not need another fixture where existing lighting already provides adequate visibility.
Step 5: Check Camera Positions
Make sure the new light will complement rather than interfere with cameras.
Step 6: Choose a Suitable Fixture
Consider:
- Detection area
- Beam pattern
- Light output
- Weather rating
- Adjustment
- Timer
- Sensitivity control
Step 7: Follow Mounting Instructions
Use the manufacturer’s specified height and installation method.
Step 8: Aim the Sensor
Focus on the property approach rather than distant public movement.
Step 9: Aim the Light
Illuminate:
- Ground
- Entrance
- Steps
- Relevant subject area
without unnecessary glare.
Step 10: Test at Night
Walk toward the area from every normal direction.
Check:
- When the light activates
- What remains dark
- Whether the light shines into eyes
- Whether it affects cameras
- Whether street activity triggers it
Step 11: Adjust Sensitivity and Duration
Fine-tune rather than accepting the factory setting automatically.
Step 12: Repeat With Normal Conditions
Test when:
- Vehicles are parked
- Porch furniture is present
- Gates are closed
- Cameras are operating
Quick Placement Guide
| Area | What the Light Should Cover | Main Thing to Avoid |
|---|---|---|
| Front door | Door, lock, steps, visitor | Glare into visitor/camera |
| Driveway | Vehicles and walking route | Street-triggered activation |
| Garage | Door and approach | Shadows behind vehicles |
| Side passage | Path and gate | Excessive brightness in narrow space |
| Back door | Door and immediate patio | Camera overexposure |
| Deck steps | Step edges and landing | Harsh eye-level glare |
| Shed/outbuilding | Door and path | Weak solar exposure if solar-powered |
Outdoor Motion Sensor Light Checklist
Before considering the installation complete, check:
- Important entrance illuminated
- Driveway route covered
- Side entrance checked
- Back entrance checked
- Steps visible
- Sensor does not constantly detect street traffic
- Neighboring windows are not directly illuminated
- Camera image remains usable
- Light is not aimed directly at camera
- Parked vehicles do not create major dark gaps
- Landscaping does not block sensor
- Detection range is appropriate
- Activation time is long enough
- Sensitivity is not excessive
- Fixture is suitable for outdoor exposure
- Installation follows manufacturer guidance
- Electrical work complies with local requirements
- Coverage has been tested after dark
Final Thoughts
The best place for an outdoor motion sensor light is not simply the darkest wall.
Place lighting where it supports real movement and access.
Start with:
- Exterior doors
- Driveway
- Garage
- Side passages
- Frequently used walkways
Then make sure the sensor detects movement within your property rather than constantly reacting to the street.
Keep the light:
- Directed toward the useful area
- Away from neighboring windows
- Out of the security camera’s direct lens line
- Appropriate for the size of the space
And test everything after dark.
Outdoor lighting works best as part of a wider security plan. Good locks, functional doors, useful cameras and appropriate lighting reinforce each other. For the next step, House Made Clear’s home security camera placement guide shows how to coordinate outdoor visibility with camera coverage and reduce blind spots.
Frequently Asked Questions
Where is the best place to put outdoor motion sensor lights?
Prioritize exterior doors, driveways, garage approaches, side passages, steps and frequently used walkways. Position the light so it illuminates the area where people actually move rather than simply covering the widest possible area.
How high should an outdoor motion sensor light be mounted?
Use the mounting height recommended by the specific fixture manufacturer. Mounting too low can increase glare and reduce coverage, while mounting too high can reduce useful illumination near doors and walkways.
Should a motion sensor face the street?
Usually not if street traffic causes frequent false activation. Aim or restrict the sensor toward the relevant part of your property and across likely movement routes where possible.
Should motion lights be placed near security cameras?
They can be, but the light should illuminate the area being recorded rather than shine directly into the camera lens. Always test nighttime footage after installation.
Are motion sensor lights good for home security?
They can improve visibility and awareness around entrances and approach routes, but they should be used alongside appropriate doors, locks, windows, cameras or alarms rather than treated as a complete security system.
Is it better to use motion lights or leave outdoor lights on all night?
It depends on the area. Low-level dusk-to-dawn lighting can provide constant orientation, while brighter motion lighting can illuminate activity when needed. Some homes benefit from using both.
How long should a motion light stay on?
Set it long enough for the normal activity in that area, such as walking from the driveway to the door. Very short settings may switch off too early, while unnecessarily long settings waste energy and create more light exposure.
Why does my motion light keep turning on by itself?
Common causes include street traffic, pedestrians, animals, moving vegetation or an overly wide detection zone. Adjust sensor direction, range and sensitivity before assuming the fixture is faulty.
Can trees trigger a motion sensor light?
Depending on the sensor and conditions, moving vegetation can contribute to unwanted activation or obstruct the detection area. Trim or reposition vegetation when necessary.
Are solar motion lights suitable for security?
They can provide useful supplemental lighting, but their performance depends on sunlight, battery capacity and fixture quality. For critical areas, confirm that the light remains reliable under normal seasonal and weather conditions.