














A home office can look polished in photographs and still be uncomfortable to use.
The desk may face strong window glare. The chair may not fit properly beneath the work surface. Cables may cross the walking route. Storage may be positioned too far away, while the video-call background reveals clutter, personal documents or household movement.
These problems usually occur when the room is decorated before the work itself is understood.
A functional home office should support:
- The type of work being performed
- Comfortable use of the computer and chair
- Clear movement around the workspace
- Suitable natural and artificial lighting
- Accessible storage
- Reliable power and internet access
- Video calls and phone conversations
- Privacy and information security
- Separation between work and home life
Quick answer:
Begin by identifying the work you do, the equipment you use and how long you spend at the desk. Position the desk to control glare and protect movement, then adjust the chair, monitor and keyboard as one connected workstation. Add storage, task lighting, cable management and decoration only after the basic setup works.
There is no single workstation arrangement that suits everyone. OSHA’s computer-workstation guidance specifically notes that no one posture or component arrangement works for every user, although basic design goals can make a workstation safer and more comfortable.
What Makes a Home Office Functional?
A functional home office is not defined by expensive furniture or a perfectly styled background.
It should allow the user to:
- Begin work without repeatedly setting up equipment
- Reach frequently used items without excessive stretching
- See the screen without strong glare
- Sit and move comfortably
- Take calls without major background distractions
- Store paperwork and devices securely
- Finish work without leaving the room permanently cluttered
The best home-office design follows the user’s real routine rather than copying a generic office photograph.
Step 1: Define How the Home Office Will Be Used
Start by listing every activity the workspace needs to support.
Possible activities include:
- Laptop work
- Desktop-computer work
- Video meetings
- Phone calls
- Writing
- Reading
- Drawing or design work
- Printing
- Filing paperwork
- Product photography
- Client meetings
- Online teaching
- Creative work
- Shared household use
Rank Each Activity
Use three priority levels:
| Priority | Meaning |
|---|---|
| Essential | The office must support this activity every working day |
| Regular | The activity takes place several times a week |
| Occasional | The activity happens only from time to time |
For example:
| Activity | Priority |
|---|---|
| Laptop work | Essential |
| Video calls | Essential |
| Paperwork | Regular |
| Printing | Regular |
| In-person meetings | Occasional |
| Product storage | Occasional |
This exercise prevents occasional requirements from controlling the entire room.
A person who works mainly from a laptop may need a compact desk, external monitor and task light. Someone using two monitors, files, samples and a printer may need a deeper work surface and more accessible storage.
Step 2: Choose the Best Available Location
A dedicated room is useful, but it is not the only workable option.
A home office may be created in:
- A spare bedroom
- A bedroom corner
- A living-room alcove
- A hallway niche
- A dining room
- A landing
- A converted closet
- An under-stairs area
- A garden office
- A shared family room
Assess each location according to the work rather than appearance alone.
Consider:
- Noise
- Privacy
- Natural light
- Electrical outlets
- Wi-Fi reliability
- Heating and cooling
- Household movement
- Storage
- Video-call background
- Whether work can be closed away
Dedicated Office Room
A separate room provides the greatest control over:
- Noise
- Lighting
- Storage
- Video calls
- End-of-day separation
However, it can still function poorly if the desk, chair and screen are badly positioned.
Bedroom Office
A bedroom workspace may be necessary in a smaller home, but the work area should not dominate the room.
Useful strategies include:
- A desk that closes
- A curtain or screen
- Separate lighting
- Limited visible paperwork
- Closed storage
- A defined end-of-day shutdown routine
Living-Room Workspace
A living-room office should remain visually connected to the room while still supporting work.
Use:
- Furniture finishes that relate to the room
- Compact storage
- A restrained desk
- Concealed cables
- Equipment that can be stored after work
- A layout that protects the main walking route
Before adding a workspace to a shared living area, review the principles in HouseMadeClear’s guide to planning a functional living-room layout.
Step 3: Measure the Space and Equipment
Do not buy a desk based only on wall width.
Measure:
- Available wall width
- Available floor depth
- Door movement
- Window position
- Window-sill height
- Radiators and vents
- Electrical outlets
- Internet-equipment location
- Ceiling height
- Existing storage
- Desk dimensions
- Chair movement
- Monitor depth
- Printer access
- Drawer and cabinet clearance
Include the Chair’s Movement Area
A desk may fit against the wall while leaving too little room to:
- Pull the chair back
- Stand up comfortably
- Open a cabinet
- Walk behind the chair
- Reach a nearby door
Mark both the desk and the chair movement with painter’s tape before buying furniture.
Measure the Equipment
Record the size of:
- Laptop
- Monitor
- Second monitor
- Keyboard
- Mouse
- Dock
- Speakers
- Microphone
- Printer
- Scanner
- Drawing tablet
- Document holder
The work surface should accommodate the actual equipment without forcing frequently used items to overlap.
Step 4: Position the Desk Correctly
There is no universally correct desk direction.
The best position depends on:
- Window location
- Glare
- Room size
- Video calls
- Privacy
- Door movement
- Storage
- Cables
- The user’s preference
Desk Facing a Wall
This can work well in:
- Small rooms
- Alcoves
- Bedrooms
- Workspaces requiring reduced visual distraction
Advantages include:
- Efficient use of wall space
- Easy access to wall-mounted storage
- A clear room behind the user for video calls
Possible disadvantages include:
- Feeling enclosed
- Limited forward view
- A potentially busy video-call background
Desk Facing a Window
This may provide:
- A pleasant view
- Daylight
- A more open feeling
However, it may also create:
- Screen glare
- Strong contrast
- Distraction
- Heat
- Privacy concerns
- Backlighting for a secondary camera angle
A window view is valuable only when the light can be controlled.
Desk Perpendicular to a Window
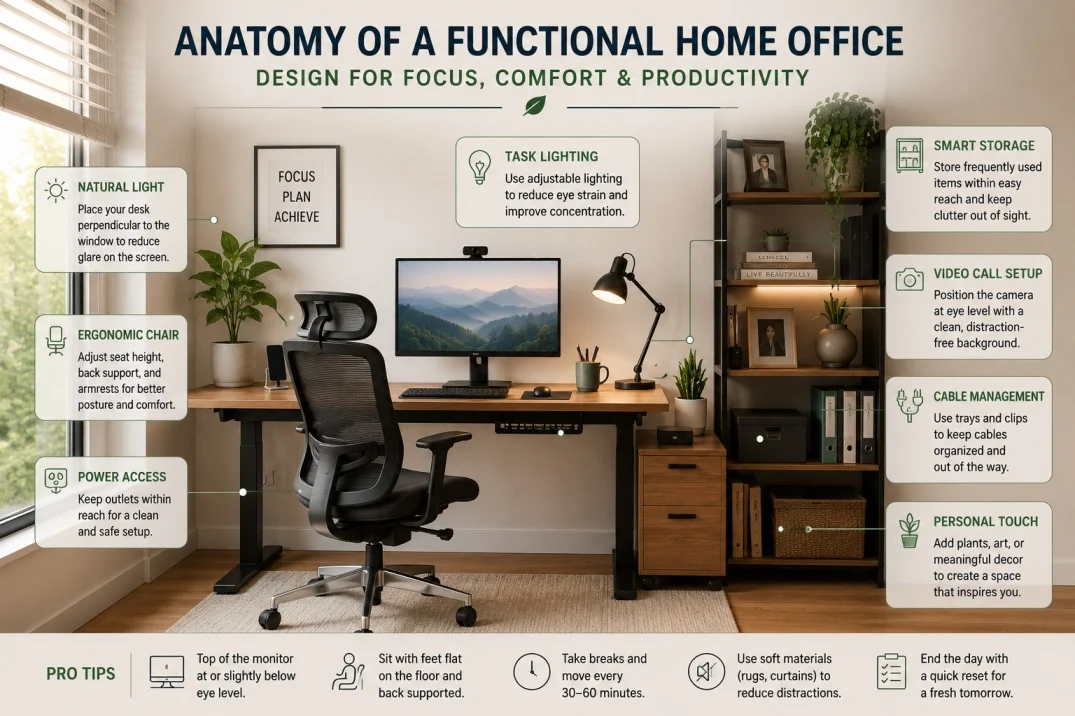
Positioning the desk at a right angle to the window is often a useful starting point.
Side daylight may help illuminate the workspace while reducing direct glare on the screen.
This arrangement is not automatically correct, but it is worth testing before choosing a wall-facing or window-facing setup.
Floating Desk
A desk positioned away from the wall can suit:
- Larger rooms
- Client-facing offices
- Formal workspaces
- Rooms where the user prefers to face the entrance
Potential problems include:
- Visible cables
- More floor-space use
- Difficult outlet access
- A restricted walking route
Cable and power planning should be completed before choosing a floating arrangement.
Step 5: Control Natural Light and Screen Glare
Daylight can improve the feel of a home office, but uncontrolled light may make the screen difficult to use.
Check the room at:
- Morning
- Midday
- Afternoon
- Evening
Look for:
- Direct sunlight on the screen
- Window reflection
- Strong brightness behind the monitor
- Light behind the user during video calls
- Seasonal sun changes
The UK Health and Safety Executive includes adjusting screens and lighting to avoid reflections and glare among its core display-screen training recommendations.
Use Adjustable Window Treatments
Possible options include:
- Blinds
- Curtains
- Roller shades
- Shutters
- Solar shades
- Privacy film
The treatment should allow the user to reduce glare without making the room unnecessarily dark.
Do Not Position the Monitor Directly Against a Bright Window
A monitor in front of a bright window may force the eyes to move constantly between the darker screen and the brighter background.
A monitor facing the window may reflect daylight across the screen.
Both arrangements can be improved through:
- Desk rotation
- Monitor adjustment
- Window treatments
- Side lighting
- A different working position
Step 6: Choose the Desk Based on the Work
A larger desk is not automatically more functional.
Choose the desk according to:
- Equipment
- Paper use
- Storage needs
- Room size
- Legroom
- Chair movement
- Cable access
Laptop Desk
A compact desk may be enough where the user has:
- One laptop
- Minimal paperwork
- Limited accessories
- Nearby storage
For long periods of laptop work, an external keyboard, mouse and raised screen may provide a more adjustable setup.
Dual-Monitor Desk
Two monitors require sufficient:
- Width
- Depth
- Cable access
- Viewing distance
- Stable support
Do not push the keyboard to the desk edge because the screens consume most of the depth.
Corner Desk
A corner desk may use an awkward corner efficiently, but check:
- Legroom
- Monitor angle
- Window glare
- Access to both sides
- Cable routing
- Drawer placement
Some corner desks create a large surface while leaving much of it difficult to reach.
Sit-Stand Desk
A height-adjustable desk can support position changes, but it does not solve poor monitor, keyboard or cable placement automatically.
OSHA advises changing position throughout the day rather than remaining in one posture for prolonged periods.
Before buying, check:
- Height range
- Stability
- Weight capacity
- Cable length
- Monitor-arm compatibility
- Noise
- Space below the desk
Wall-Mounted or Folding Desk
This can work well in:
- Small bedrooms
- Hallways
- Guest rooms
- Multipurpose spaces
Check:
- Load capacity
- Wall suitability
- Installation requirements
- Legroom
- Closed depth
- Storage
- Cable access
Step 7: Choose and Adjust the Chair
The chair, desk, keyboard and monitor should be planned together.
OSHA advises adjusting the chair in relation to the monitor, keyboard and desk rather than treating it as a separate item.
Consider:
- Adjustable seat height
- Stable base
- Back support
- Seat depth
- Armrest adjustment
- Floor surface
- Chair movement
- Desk clearance
Check the Desk Height
A traditional desk may be too high for some users.
If the chair is raised to create a comfortable keyboard position, the user’s feet may no longer rest comfortably.
Possible adjustments include:
- Footrest
- Keyboard tray
- Different desk
- Adjustable chair
- Lower work surface
OSHA notes that a keyboard tray may be useful where the desk or chair cannot otherwise be adjusted properly.
Avoid Choosing the Chair Only by Appearance
A decorative chair may suit a bedroom visually but become uncomfortable during long work periods.
Check:
- Whether the backrest supports the user
- Whether the seat edge presses behind the knees
- Whether the arms fit beneath the desk
- Whether the chair moves safely on the floor
- Whether the user can change position
Individual pain, mobility or medical concerns may require advice from an occupational-health, ergonomic or medical professional.
Step 8: Position the Monitor, Keyboard and Mouse
The monitor should be positioned in relation to the desk, chair and input devices.
OSHA’s workstation guidance identifies viewing distance, angle, height, side-to-side position and clarity as key monitor considerations.
Main Monitor
Place the main monitor directly in front of the primary working position where practical.
Avoid requiring repeated neck rotation for the most frequently used screen.
Two Monitors
If both screens are used equally:
- Position them close together
- Centre the join between them
- Angle them toward the user
If one is used more often:
- Centre the primary monitor
- Place the secondary monitor beside it
Laptop
A laptop combines the screen and keyboard, limiting adjustment.
For longer work sessions, consider:
- Laptop stand
- External keyboard
- External mouse
- Separate monitor
- Docking station
Keyboard and Mouse
Keep the keyboard and mouse close enough to avoid unnecessary reaching.
OSHA recommends positioning the mouse so the wrist can remain in a neutral position and avoiding arrangements that require excessive reach.
Frequently used devices should remain within the easiest reach zone.
Step 9: Build Layered Home-Office Lighting
One ceiling fixture rarely provides all the light a home office needs.
Use several lighting layers.
Ambient Lighting
Ambient lighting provides general room illumination.
Possible sources include:
- Ceiling fixture
- Recessed lighting
- Wall lights
- Floor lamp
It should make the room easy to move through without creating strong screen reflections.
Task Lighting
Task lighting supports:
- Reading
- Writing
- Paperwork
- Drawing
- Keyboard use
Possible options include:
- Adjustable desk lamp
- Floor lamp beside the desk
- Wall-mounted task light
- Under-shelf lighting
Position task lighting so the user’s hand and body do not create strong shadows across the work.
Video-Call Lighting
Video calls usually look better when soft light reaches the face from the front or slightly to one side.
Avoid:
- Bright window directly behind the user
- Strong ceiling-only light
- Bare lamp reflected in glasses
- Very bright screen light in a dark room
- Mixed light colours across the face
A small diffused lamp may provide a better result than a highly decorative background fixture.
Accent Lighting
Accent lighting can improve the background by highlighting:
- Shelf
- Artwork
- Plant
- Textured wall
It should remain secondary to task and ambient lighting.
The same principle of combining ambient, task and focused lighting is discussed in HouseMadeClear’s guide to planning bathroom lighting.
Step 10: Choose a Consistent Light Colour
Colour temperature affects whether the light appears warmer, neutral or cooler.
ENERGY STAR explains that lower Kelvin values appear warmer, while higher values appear whiter or bluer. It identifies approximately 2200–3000 K as warmer-looking and 3500–4100 K as whiter light.
There is no single best colour temperature for every office.
Warmer Light May Suit
- Relaxed evening work
- Traditional interiors
- Bedrooms
- Background lighting
Neutral or Whiter Light May Suit
- Detailed paperwork
- Daytime work
- Creative tasks
- Video calls
- Contemporary interiors
Avoid combining noticeably different light colours without a deliberate reason.
A very warm desk lamp beside a cool ceiling light may make the room and video image feel inconsistent.
Step 11: Plan Storage Around Frequency of Use
Storage should follow how often each item is needed.
Daily-Use Items
Keep within easy reach:
- Notebook
- Pen
- Charger
- Headset
- Current files
- Calendar
- Frequently used reference material
Weekly-Use Items
Store nearby:
- Printer paper
- Spare cables
- Office supplies
- Reference books
- Accessories
Occasional Items
Store farther away:
- Archived files
- Packaging
- Spare equipment
- Seasonal materials
- Old notebooks
Closed Storage
Closed storage is useful for:
- Confidential paperwork
- Visual clutter
- Electronics
- Supplies
- Multipurpose rooms
Potential disadvantages include:
- Greater visual weight
- Door clearance
- Less immediate access
Open Shelves
Open shelves provide:
- Easy access
- Display space
- A video-call background
However, they can become crowded quickly.
Do not fill every shelf. Leave some open space so the arrangement remains clear.
Mobile Storage
A drawer unit or cart can be useful in:
- Shared rooms
- Bedroom offices
- Dining-room workspaces
- Temporary setups
It can be moved or stored after work.
Step 12: Reduce Visual Clutter
A home office can be organised but still look visually busy.
Common sources include:
- Several chargers
- Loose paperwork
- Packaging
- Too many small accessories
- Open shelves filled edge to edge
- Unused electronics
- Multiple notebooks
- Tangled cables
Use three categories:
Keep nearby: Used daily
Store elsewhere: Used occasionally
Remove: No longer useful
The desk should retain enough open surface for the actual work.
Step 13: Manage Cables Safely
Cable management should make the office easier to use and clean.
Possible tools include:
- Under-desk cable tray
- Reusable ties
- Cable clips
- Labelled chargers
- Floor cable cover where appropriate
- Desk grommet
- Power strip mounted according to its instructions
Avoid cables:
- Across walkways
- Beneath chair wheels
- Stretched tightly
- Trapped in drawers
- Pressed against heat sources
- Hidden in unsafe ways
Fixed electrical work or new outlets should be handled by an appropriately qualified professional.
Step 14: Create a Better Video-Call Background
The best video-call background is not necessarily decorative.
It should appear:
- Deliberate
- Uncluttered
- Appropriate for the work
- Free from confidential information
- Stable throughout the day
Possible backgrounds include:
- Plain wall
- One artwork
- Restrained shelving
- Closed cabinet
- Curtain
- Plant
- Freestanding screen
Avoid showing:
- Bed
- Laundry
- Personal documents
- Family schedules
- Passwords
- Busy doorway
- Constant household movement
- Strong window light
Test the Camera View
Open the actual video platform and check:
- Camera height
- Face lighting
- Background edges
- Reflections
- Personal information
- Household activity
- Visual clutter
A background that looks balanced from the doorway may look very different through a webcam.
Step 15: Improve Privacy and Acoustics
A home office may need both visual and sound privacy.
Possible improvements include:
- Closing door
- Curtains
- Rug
- Upholstered chair
- Bookcase
- Acoustic panels
- Headset
- External microphone
- Freestanding screen
- Household scheduling
Soft materials can reduce echo, but decorative panels should not be presented as complete soundproofing.
For confidential calls, consider:
- Who can hear the conversation
- What appears on screen
- Whether documents are visible
- Whether smart speakers or cameras are active nearby
Step 16: Design a Small Home Office
A small office should not be filled with scaled-down versions of every office item.
Prioritise:
- Compact desk
- Comfortable chair
- Main screen
- Task light
- Essential storage
- Clear cable route
Useful options include:
- Narrow desk
- Corner desk
- Wall-mounted desk
- Folding desk
- Floating shelves
- Mobile drawer unit
- Vertical storage
- Secretary desk
Use Vertical Storage Carefully
Wall shelves can free floor space, but they should not:
- Overload the wall
- Create head hazards
- Make the desk feel enclosed
- Hold heavy items without suitable support
Avoid Oversized Storage
A large filing cabinet may occupy more space than the actual paperwork requires.
Review what genuinely needs to remain in the office before buying storage.
Step 17: Create a Home Office in a Bedroom
A bedroom office should be functional during work hours and visually quieter afterward.
Possible strategies include:
- Desk facing away from the bed
- Closed storage
- Secretary desk
- Curtain or screen
- Distinct desk lamp
- Separate rug
- Limited equipment
- End-of-day clearing routine
Separate Work and Sleep Visually
The separation does not need to be structural.
Use:
- Lighting
- Paint
- Rug
- Screen
- Furniture direction
- Closed cabinet
- Fold-away desk
Avoid Using the Bed as Permanent Office Seating
It may appear convenient, but it usually provides limited support and no stable work surface.
Use an appropriate chair and desk where regular work is expected.
Two people sharing a room may have very different needs.
Assess:
- Working hours
- Video-call frequency
- Noise
- Equipment
- Storage
- Lighting
- Privacy
- Backgrounds
Possible layouts include:
Side-by-Side Desks
Useful when:
- Both users have compact equipment
- Calls are limited
- One wall is long enough
Potential problem:
- Noise and visual distraction
Opposite-Wall Desks
Useful when:
- Each user needs a separate background
- The room has adequate width
- Individual storage is required
Back-to-Back Desks
Useful in a larger room, but cable management and chair movement need careful planning.
Separate Zones
Use:
- Storage unit
- Screen
- Rug
- Lighting
- Different walls
Do not place two users close together when both spend much of the day on calls.
Step 19: Make the Office Work in a Multipurpose Room
A multipurpose room should be able to return to its main function after work.
Useful choices include:
- Desk with doors
- Mobile storage
- Concealed printer
- Foldable work surface
- Coordinated furniture
- Closed cable box
- Limited equipment
In a living room, choose office furniture that relates to the room’s scale and finishes.
HouseMadeClear’s guide to affordable living-room updates includes further ideas for reducing visual clutter and improving shared spaces without replacing everything.
Step 20: Add Smart Features Selectively
Smart-home features can support convenience, but they should not make basic work dependent on an app or internet connection.
Useful options may include:
- Smart plug
- Lighting schedule
- Smart blinds
- Motion sensor
- Temperature sensor
- Energy monitor
- Automated focus scene
Retain manual controls for:
- Main lighting
- Desk lighting
- Window treatment where practical
- Heating or cooling
Smart equipment also needs:
- Updates
- Secure accounts
- Strong passwords
- Network access
- Compatibility planning
Step 21: Protect Work Devices and Information
A home office may contain:
- Client documents
- Financial information
- Passwords
- Work devices
- Private calls
- Business records
Use basic protections such as:
- Locking the computer when away
- Closing confidential paperwork
- Securing filing cabinets where necessary
- Avoiding visible passwords
- Reviewing the camera background
- Limiting unnecessary account access
- Using multifactor authentication where available
- Keeping work devices updated
The FTC recommends securing a home Wi-Fi network with WPA3 Personal or WPA2 Personal encryption, with WPA3 being the newer option.
Also review:
- Router password
- Network name
- Firmware updates
- Guest-network use
- Connected smart devices
Do not place drinks directly beside valuable electronics.
Step 22: Add Personality After the Workspace Functions
Decoration should support the workspace, not compete with it.
Possible additions include:
- Artwork
- Plant
- Books
- Personal object
- Coordinated desk accessories
- Suitable wall colour
- One background feature
Avoid:
- Filling every shelf
- Several unrelated colours
- Too many small objects
- Decorative items that reduce the work surface
- Plants that block light or equipment
The workspace should still look like part of the home, but function comes first.
Common Home-Office Design Mistakes
1. Buying the Desk Before Measuring
Why it fails: The desk may block the door, window or chair movement.
Better approach: Mark the full footprint before ordering.
2. Facing the Monitor Toward Direct Glare
Why it fails: Reflections and brightness can make the screen harder to use.
Better approach: Test side daylight and adjustable window treatments.
3. Using Dining Furniture Permanently
Why it fails: Dining chairs and tables may not support long computer use or correct equipment placement.
Better approach: Create a workstation intended for the hours spent there.
4. Ignoring Chair Movement
Why it fails: The user cannot stand, turn or access storage comfortably.
Better approach: Measure the chair in both seated and pulled-back positions.
5. Placing Storage Too Far Away
Why it fails: Frequently used items require repeated reaching or standing.
Better approach: Store according to frequency of use.
6. Depending on One Ceiling Light
Why it fails: The desk may remain shadowed or suffer from glare.
Better approach: Combine ambient and adjustable task lighting.
7. Using a Bright Window as the Video Background
Why it fails: The face may appear dark.
Better approach: Place soft light in front and control the window.
8. Allowing Cables Into the Walkway
Why it fails: Cables create trip risks and may be damaged by chair wheels.
Better approach: Route them through trays, clips or suitable covers.
9. Filling Every Shelf
Why it fails: The background becomes visually cluttered.
Better approach: Use fewer objects and leave open areas.
10. Mixing Work and Bedroom Storage
Why it fails: The bedroom never feels separate from work.
Better approach: Use defined, closable office storage.
11. Choosing Style Over Comfort
Why it fails: Attractive furniture may become uncomfortable during long use.
Better approach: Test adjustability, support and movement first.
12. Building an Office Larger Than the Work Requires
Why it fails: The workspace takes over the room and encourages accumulation.
Better approach: Match the furniture to actual tasks and equipment.
13. Making Controls App-Dependent
Why it fails: Network or account problems interrupt basic functions.
Better approach: Retain physical switches and controls.
14. Forgetting the End-of-Day Reset
Why it fails: Work remains visually and mentally present throughout the home.
Better approach: Store paperwork, close equipment and clear the desk after work.
Step-by-Step Home Office Setup
Step 1: List the Work Activities
Record essential, regular and occasional tasks.
Step 2: Measure the Equipment
Include screens, keyboard, printer and storage.
Step 3: Choose the Location
Assess noise, light, privacy, power and Wi-Fi.
Step 4: Mark Fixed Features
Record doors, windows, outlets, radiators and vents.
Step 5: Position the Desk
Test wall-facing, side-window and floating arrangements where practical.
Step 6: Test Daylight and Glare
Review the room throughout the working day.
Step 7: Add and Adjust the Chair
Coordinate the seat, desk, keyboard and monitor.
Step 8: Position the Screens
Keep the main screen aligned with the primary working position.
Step 9: Plan Storage
Arrange items according to frequency of use.
Step 10: Add Task Lighting
Check the desk, face and screen for glare.
Step 11: Manage Cables
Keep cords away from movement and chair wheels.
Step 12: Test Video Calls
Review lighting, background and camera height.
Step 13: Review Sound
Check echo, privacy and household noise.
Step 14: Add Limited Decoration
Use only items that support the room.
Step 15: Use the Office Before Buying More
Work in the setup for several days and note real problems before making additional purchases.
Functional Home Office Checklist
Before treating the office as complete, confirm:
- Work requirements listed
- Space measured
- Equipment measured
- Desk footprint tested
- Chair movement protected
- Natural light assessed
- Screen glare checked
- Outlets accessible
- Wi-Fi tested
- Monitor positioned for the main task
- Keyboard and mouse within comfortable reach
- Storage arranged by frequency
- Task lighting added
- Video background reviewed
- Camera height tested
- Cables controlled
- Confidential materials protected
- Shared-room needs considered
- Manual controls available
- Smart devices secured
- Layout tested before further purchases
Final Thoughts
A functional home office should begin with the work, not the decoration.
Choose a location that supports privacy, light, power and movement. Measure the desk and equipment before buying furniture. Position the screen to control glare, then adjust the chair, keyboard and mouse as one connected workstation.
After the layout works, add:
- Storage
- Task lighting
- Video-call background
- Cable management
- Limited decoration
The best home office is not necessarily the largest or most expensive one. It is the workspace that allows the user to begin work easily, remain organised, change position and close the working day without the office taking over the home.
For more practical room-planning guidance, explore the HouseMadeClear Interior Design section and learn more about the experience behind the site on the Meet Charu page.
Frequently Asked Questions
Where should a desk be placed in a home office?
Place the desk where it supports comfortable movement, manageable glare, accessible outlets and a suitable background. A position perpendicular to a window is often worth testing because it may provide side daylight without direct screen reflection.
Should a home-office desk face a window?
It can, but a window-facing desk may cause glare, heat or distraction. Test the position at different times of day and use adjustable window treatments where necessary.
How can I create a home office in a small room?
Use a compact or wall-mounted desk, vertical storage and only the equipment needed for regular work. Protect the chair movement and avoid adding oversized filing or display furniture.
What lighting is best for a home office?
Combine general ambient lighting with an adjustable task light. Add soft front lighting for video calls where needed. Position lights so they do not reflect strongly from the screen.
How can I reduce glare on my computer screen?
Move the desk or monitor away from direct window reflection, use blinds or curtains and avoid placing a bright lamp directly behind or in front of the screen. A desk perpendicular to the window may help.
How do I create a professional video-call background?
Use a plain wall, restrained shelving, artwork, a curtain or closed storage. Remove personal documents and distracting clutter, and avoid placing a bright window directly behind you.
How can I separate a home office from a bedroom?
Use a screen, curtain, secretary desk, closed cabinet, rug or separate lighting. Clear the work surface and close equipment at the end of the day so the bedroom can return to its primary function.
What storage works best in a home office?
Keep daily-use items within easy reach, weekly-use supplies nearby and occasional items in higher, lower or more distant storage. Closed cabinets reduce visual clutter, while open shelves provide faster access.