














A toilet needs more room than its physical footprint suggests. The bowl may be only about 15 to 20 inches wide, but the layout must also provide usable space on both sides, sufficient clearance in front, room for the door, and access to nearby fixtures.
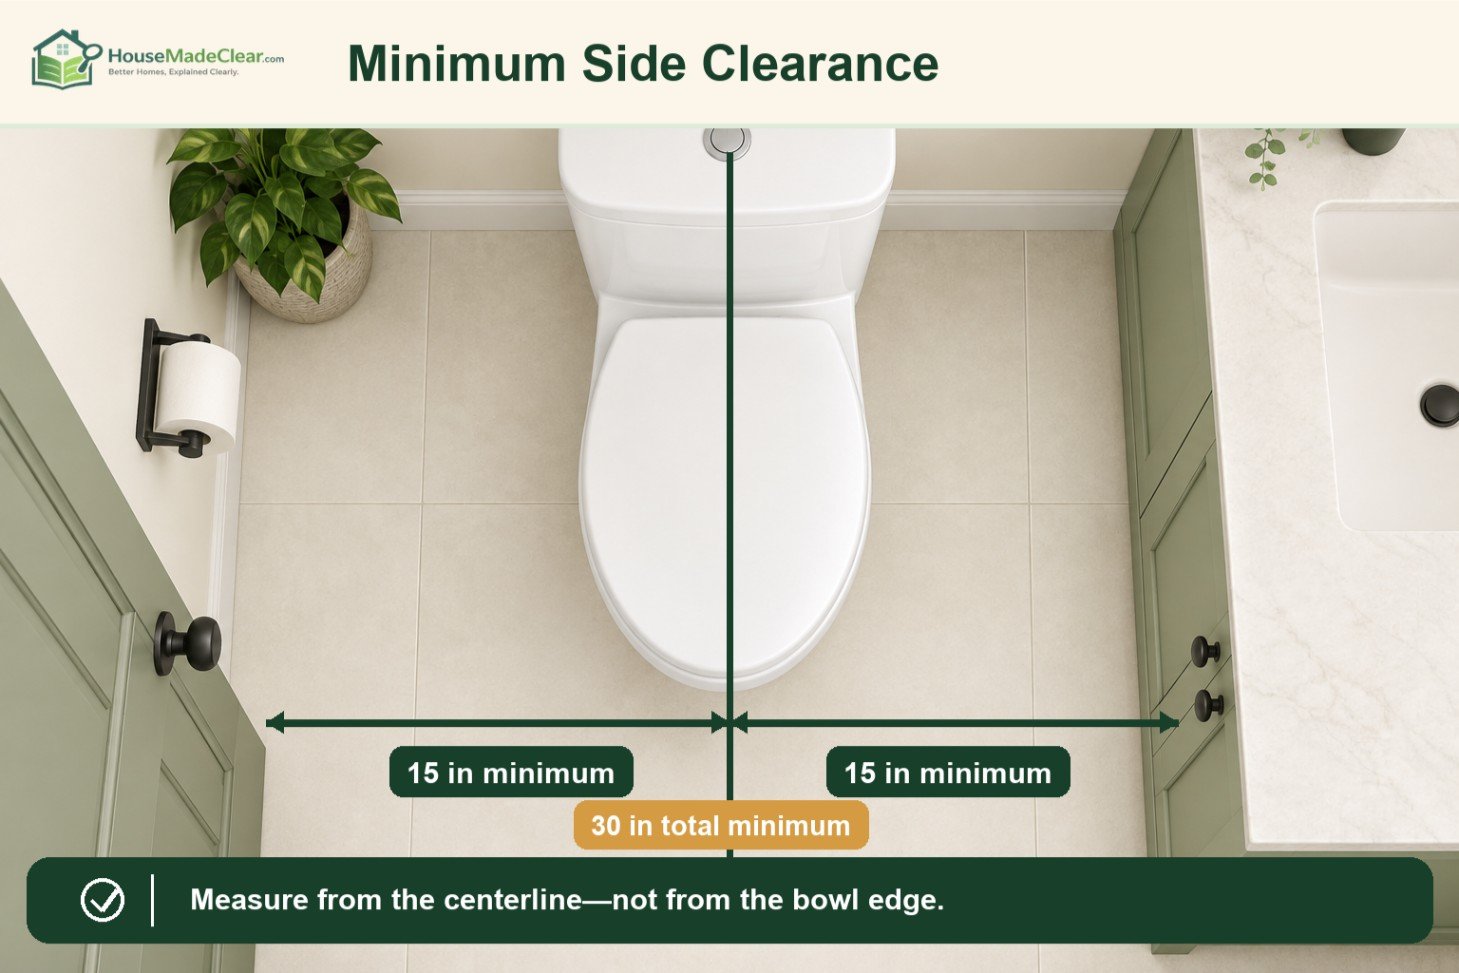
For many residential bathrooms in the United States, a common model-code starting point is at least 15 inches from the toilet centerline to each side wall, vanity, fixture, or other obstruction. This creates a minimum toilet zone approximately 30 inches wide.
Front clearance varies between plumbing codes. The International Plumbing Code commonly requires at least 21 inches in front of the toilet, while the Uniform Plumbing Code commonly uses 24 inches. Comfortable layouts generally provide more space than these minimums.
Quick Answer
For a conventional residential toilet, plan for:
- Minimum side clearance: 15 inches from the toilet centerline to each side wall or obstruction
- Minimum total toilet width: approximately 30 inches
- Comfortable side clearance: about 18 inches from the centerline on each side
- Comfortable total width: approximately 36 inches
- Minimum front clearance: commonly 21 inches under the IPC or 24 inches under the UPC
- Comfortable front clearance: approximately 30 inches
- Toilet-to-toilet spacing: at least 30 inches center to center where two fixtures are adjacent
- Common toilet rough-in: 12 inches from the finished wall to the center of the floor drain or closet flange
Measure side clearance from the toilet’s centerline, not from the outside edge of the bowl. Measure front clearance from the front edge of the toilet bowl to the nearest wall, closed door, vanity, tub, shower, or other obstruction.
These are common U.S. planning dimensions, not a substitute for your locally adopted code. Confirm the requirements with your local building department before construction or major remodeling.
Toilet Clearance Dimensions at a Glance
The following table separates common model-code minimums from more comfortable residential planning dimensions.
| Measurement | Common Minimum | Comfortable Planning Target |
|---|---|---|
| Toilet centerline to side wall | 15 inches | 18 inches |
| Toilet centerline to vanity or obstruction | 15 inches | 18 inches |
| Total clear toilet width | 30 inches | 36 inches |
| Centerline between two adjacent toilets | 30 inches | 36 inches or more |
| Clear space in front under IPC-based rules | 21 inches | 30 inches |
| Clear space in front under UPC-based rules | 24 inches | 30 inches |
| Typical floor-mounted toilet rough-in | 12 inches | Select according to toilet specifications |
| Accessible water-closet clearance | 60 inches wide by 56 inches deep | More space improves maneuverability |
| Accessible floor-mounted toilet compartment | 60 inches wide by 59 inches deep | More than the minimum where possible |
The International Plumbing Code and Uniform Plumbing Code do not use identical front-clearance requirements. The International Plumbing Code fixture-clearance provisions commonly establish a 21-inch minimum in front of a water closet. The Uniform Plumbing Code commonly uses a 24-inch minimum.
States and local jurisdictions may adopt different editions, add amendments, or use another code framework. The enforceable measurement is the one adopted for your specific project location.
What Is the Minimum Space Around a Toilet?
For a typical residential bathroom, the minimum toilet space is determined by three measurements:
- The distance from the toilet centerline to the left obstruction
- The distance from the toilet centerline to the right obstruction
- The clear space from the front of the bowl to the nearest obstruction
A toilet that satisfies only two of these measurements may still fail the complete layout check.
Minimum Side Clearance
A common model-code requirement is 15 inches from the centerline of the toilet to any side wall, partition, vanity, fixture, or other obstruction.
That means the toilet generally needs a clear zone at least 30 inches wide:
- 15 inches from the centerline to the left
- 15 inches from the centerline to the right
- 30 inches total
The 15-inch measurement is not taken from the edge of the toilet seat or tank. Toilet bowls vary in width, so measuring from their outside edges would produce inconsistent layouts.
If the toilet bowl is 16 inches wide, a 15-inch centerline clearance leaves approximately 7 inches between the bowl and the obstruction. That may satisfy the dimensional minimum, but it can still feel tight.
Minimum Front Clearance
The front clearance is measured from the frontmost edge of the toilet bowl to the closest wall, door, vanity, bathtub, shower enclosure, or other obstruction.
Common requirements include:
- 21 inches under IPC-based rules
- 24 inches under UPC-based rules
These numbers are minimum clearances, not recommended comfort targets.
Twenty-one inches can work in a compact powder room, but it leaves little space for approaching the toilet, adjusting clothing, cleaning around the bowl, or helping a child. When the room allows it, approximately 30 inches in front is more practical.
Comparison of 21-inch IPC-based, 24-inch UPC-based and 30-inch comfortable front clearances](https://housemadeclear.com/wp-content/uploads/2026/09/02-front-clearance-comparison.jpg)
Minimum Center-to-Center Spacing
Where two toilets or similar plumbing fixtures are installed side by side, a common minimum is 30 inches from one fixture centerline to the other.
This situation is uncommon in a private home but may appear in shared bathrooms, multifamily projects, or nonresidential facilities.
Do not measure between the outside edges of the bowls. Establish and mark the centerline of each fixture.
Minimum Toilet Clearance vs. Comfortable Toilet Clearance
Building-code minimums are intended to establish a baseline. They do not guarantee that a bathroom will feel comfortable for every user.
| Clearance Area | Tight but Common Minimum | More Comfortable |
|---|---|---|
| Centerline to each side | 15 inches | 18 inches |
| Total width around toilet | 30 inches | 36 inches |
| Clear space in front | 21–24 inches | 30 inches |
| Space for caregiver assistance | Usually inadequate | 36 inches or more may be needed |
| Wheelchair access | Conventional minimum is inadequate | Requires an accessibility-specific layout |
A 30-inch-wide toilet alcove is workable for many adults, but a 36-inch-wide alcove generally feels noticeably less confined. The additional 3 inches on each side also makes cleaning easier and provides more shoulder and elbow room.
Front clearance makes an equally significant difference. Moving from 21 inches to 30 inches adds 9 inches of functional space without changing the toilet itself.
Best General-Purpose Toilet Clearance
For a bathroom intended to serve most household members comfortably, a useful starting target is:
- 18 inches from the toilet centerline to each side
- 36 inches of total clear width
- 30 inches of clear space in front
These are practical planning recommendations, not universal code requirements.
Larger users, older adults, people with limited mobility, and anyone who may need caregiver assistance can require more space. Accessibility planning should be based on the user’s actual needs rather than simply adding a few inches to a conventional layout.
Comparison between a 30-inch minimum toilet zone and a comfortable 36-inch-wide layout](https://housemadeclear.com/wp-content/uploads/2026/09/03-minimum-vs-comfortable-clearance.jpg)
How to Measure Toilet Clearance Correctly
Incorrect measurement is one of the most common reasons a toilet layout fails after installation.
Find the Toilet Centerline
The centerline is an imaginary line running from the midpoint of the toilet tank through the center of the seat and bowl.
For an installed toilet, you can locate it by measuring the bowl or tank width and marking the midpoint. The floor bolts that secure many toilets are also positioned close to the centerline of the waste outlet.
For new construction, the plumber normally establishes the centerline from the floor plan and closet-flange position.
Measure horizontally and perpendicular to the toilet centerline. Do not follow a diagonal line to the nearest corner.
Measure to Finished Surfaces
Toilet clearance should be checked against the completed room, not only the framing.
Account for:
- Drywall
- Tile backer
- Wall tile
- Wainscoting
- Decorative wall panels
- Vanity side panels
- Countertop overhangs
- Baseboards
- Door casing
- Plumbing covers
- Radiators or baseboard heaters
A measurement of 15 inches to an unfinished stud wall may shrink after drywall and tile are installed.
For example, if a toilet centerline is placed 15½ inches from framing and the finished wall assembly adds ¾ inch, the final clearance becomes only 14¾ inches. The framing layout must anticipate the finished surface thickness.
Measure to the Nearest Obstruction
The nearest obstruction is not always the main wall or vanity cabinet.
Check for projections such as:
- Countertop overhangs
- Vanity handles
- Toilet-paper holders
- Shelves
- Towel bars
- Radiators
- Supply pipes
- Window trim
- Shower-door hardware
- Tub ledges
- Decorative molding
A floating countertop can extend beyond the vanity cabinet and become the controlling measurement. Measure to the nearest finished projection that affects the usable space.
Measure Front Clearance From the Bowl
Measure from the front edge of the toilet bowl—not the tank or floor drain—to the nearest obstruction directly in front of it.
The front obstruction may be:
- An opposite wall
- Vanity cabinet
- Vanity countertop
- Bathtub
- Shower curb
- Glass shower door
- Closed bathroom door
- Linen cabinet
- Radiator
- Towel warmer
The toilet model matters because elongated bowls project farther into the room than round-front bowls.
Check the Complete Door Swing
A bathroom door may appear to clear the toilet when shown as a line on a rough sketch but strike the bowl, tank, or user in the completed room.
Mark the full door arc and check:
- Whether the door hits the toilet
- Whether the door blocks access to the toilet
- Whether the door can close while someone is inside
- Whether the door reduces required maneuvering space
- Whether the toilet blocks the path to the doorway
Pocket doors and outward-swinging doors can improve space efficiency, but their use depends on wall construction, electrical and plumbing locations, egress considerations, and locally adopted requirements.
Four-part guide illustrating the centerline, finished surfaces, nearest projections and bowl-front measurement points](https://housemadeclear.com/wp-content/uploads/2026/09/04-how-to-measure-toilet-clearance.jpg)
Toilet Rough-In vs. Toilet Clearance
Toilet rough-in and toilet clearance are different measurements. Confusing them can result in a toilet that connects to the drain but does not fit the room.
What Is a Toilet Rough-In?
The rough-in is the distance from the finished wall behind the toilet to the center of the closet flange or floor mounting bolts.
Common residential rough-ins include:
- 10 inches
- 12 inches
- 14 inches
Twelve inches is the most common, but it is not universal.
Do not include the baseboard when measuring the rough-in unless the toilet or manufacturer specifically requires otherwise. The controlling reference is normally the finished wall surface.
Why Rough-In Size Matters
A toilet designed for a 12-inch rough-in may not fit correctly on a 10-inch rough-in. The tank could contact the wall before the outlet aligns with the flange.
A toilet designed for a shorter rough-in may sometimes fit a longer rough-in, but it can leave an unusually large gap behind the tank. Compatibility depends on the specific model.
Before purchasing a toilet, verify:
- Required rough-in
- Overall toilet depth
- Bowl shape
- Tank width
- Distance from the flange center to the front of the bowl
- Water-supply location
- Base footprint
- Clearance around the mounting area
Rough-In Does Not Determine Side Clearance
A toilet can have the correct 12-inch rough-in and still be too close to a side wall or vanity.
The rough-in controls the front-to-back connection with the waste line. Side clearance is controlled by the toilet centerline’s horizontal position.
Check both independently.
Diagram distinguishing a typical 12-inch toilet rough-in from side and front clearance measurements](https://housemadeclear.com/wp-content/uploads/2026/09/05-rough-in-vs-clearance.jpg)
How Toilet Shape Affects Clearance
Toilet dimensions vary even when two models use the same rough-in.
Round-Front Toilets
Round-front toilets are generally shorter from the wall to the front of the bowl. They are often useful in compact bathrooms and powder rooms.
A round-front bowl may save approximately 2 inches compared with an elongated alternative, although exact dimensions vary by model.
That difference can determine whether a layout achieves the required front clearance. Never select a toilet based on the words “round front” alone; compare the manufacturer’s complete dimensions.
Elongated Toilets
Elongated bowls provide a longer seating surface and are widely used for comfort. However, they project farther into the room.
In a bathroom with 23 inches between the front of a round toilet and the opposite vanity, switching to an elongated toilet that projects 2 inches farther could reduce the clearance to 21 inches.
That may still meet an IPC-based minimum, but it would not meet a 24-inch requirement in a UPC-based jurisdiction.
Compact Elongated Toilets
Compact elongated toilets are designed to provide an elongated bowl shape while limiting overall projection.
They can be useful where a conventional elongated toilet would make front clearance too tight. Compare the total wall-to-bowl projection because “compact” is a product description, not one standardized dimension.
Wall-Hung Toilets
A wall-hung toilet uses an in-wall carrier and can reduce the visible projection into the room. It also keeps the floor beneath the bowl open, which can simplify cleaning.
However, wall-hung installations require:
- Adequate wall-cavity depth
- A compatible carrier
- Structural support
- Correct drain and vent configuration
- Access for service
- Manufacturer-approved installation
- Coordination with wall finishes
The side and front clearance rules still apply. Removing the floor-mounted base does not eliminate the need for usable space around the toilet.
Smart Toilets and Bidet Seats
Smart toilets and bidet seats may require:
- A nearby GFCI-protected electrical receptacle
- Specific water-supply placement
- Additional rear clearance
- Space for side-mounted controls
- Access for maintenance
- Clearance for the lid and seat
- Manufacturer-specified installation dimensions
Do not position an electrical outlet or water valve where it prevents the toilet from fitting or creates an inaccessible maintenance point. Electrical and plumbing work must follow locally adopted codes and manufacturer instructions.
Toilet Clearance Beside a Vanity
A vanity is one of the most common side obstructions beside a toilet.
Measure from the toilet centerline to the closest part of the finished vanity assembly. Depending on the design, that may be the:
- Cabinet side
- Countertop edge
- Countertop overhang
- Drawer pull
- Decorative trim
- Open shelf
- Sink apron
A toilet centerline positioned exactly 15 inches from the cabinet may end up too close if the countertop projects another inch toward the toilet.
Minimum Vanity-to-Toilet Layout
A common minimum arrangement provides:
- 15 inches from the toilet centerline to the vanity
- 15 inches from the centerline to the opposite wall
- 30 inches total clear width
A more comfortable arrangement provides approximately 18 inches from the centerline to the vanity and 18 inches to the opposite wall.
Check Vanity Drawers and Doors
A vanity may satisfy the toilet-clearance measurement while still being difficult to use.
Confirm that:
- Drawers can open without hitting the toilet
- Cabinet doors clear the bowl
- Pullout organizers remain usable
- The user can stand in front of the vanity
- The vanity does not block access to the toilet
- Cleaning tools can reach the floor between fixtures
A shallow vanity or wall-mounted sink can improve a tight bathroom, but the sink must still provide usable washing space and comply with applicable plumbing and accessibility requirements.
Toilet Clearance Beside a Bathtub
Measure from the toilet centerline to the nearest finished edge or obstruction created by the bathtub installation.
Potential controlling points include:
- Tub apron
- Tiled tub deck
- Glass panel
- Shower screen
- Tub-mounted hardware
- Storage ledge
- Projecting trim
A standard alcove bathtub often occupies a large portion of a small bathroom. Before finalizing the toilet position, compare the complete tub footprint with our standard bathtub dimensions guide.
Do not assume the tub framing dimensions equal the finished dimensions. Tile, backer board, waterproofing, and the tub flange can affect the final relationship between fixtures.
Toilet Clearance Beside a Shower
A shower enclosure can affect both side and front toilet clearance.
Measure to the closest finished component, which may be:
- Shower curb
- Fixed glass panel
- Door handle
- Hinged door
- Sliding-door frame
- Shower base
- Tiled half wall
If a hinged shower door swings toward the toilet, confirm that it can open fully without striking the bowl, tank, or a seated user. Our guide to standard shower door sizes explains why the enclosure opening and finished door size must be planned together.
In a compact bathroom, a sliding shower door or fixed glass panel may create fewer conflicts than an outward-swinging hinged door. The decision should still account for entry width, cleaning access, waterproofing, and manufacturer requirements.
When the shower itself is tight, evaluate its usable interior dimensions separately. The guides to small shower dimensions and corner shower dimensions can help compare the space saved by different configurations.
Toilet Clearance in Common Bathroom Layouts
The same toilet-clearance rules can produce very different room sizes depending on the surrounding fixtures.
Toilet in an Open Bathroom
When the toilet is part of an open bathroom, one side may face a vanity and the other a tub or wall.
A practical target is:
- 36-inch-wide toilet zone
- 30 inches clear in front
- No conflict with vanity drawers
- No conflict with shower or bathroom doors
- Clear walking route to the toilet
The room may feel more spacious than a toilet alcove with identical dimensions because the upper body is not enclosed by two walls.
Toilet Alcove
A toilet alcove is a recessed area open at the front.
For conventional use:
- Approximately 30 inches wide is a common minimum starting point
- Approximately 36 inches wide is more comfortable
- Front depth depends on the toilet projection plus the required front clearance
For example, if a toilet projects 28 inches from the rear wall:
- With 21 inches in front, the toilet zone needs about 49 inches of depth
- With 24 inches in front, it needs about 52 inches
- With 30 inches in front, it needs about 58 inches
These calculations cover the toilet footprint and front clearance only. Wall thickness, trim, doors, and other room requirements must be added separately.
Separate Water-Closet Room
A separate room containing only the toilet offers privacy but can become uncomfortably narrow.
A room approximately 30 inches wide may represent the minimum side-clearance envelope, but 36 inches is a more practical residential target.
For a floor-mounted toilet projecting approximately 28 to 30 inches, a room around 60 inches deep often provides a more usable front zone. However, the required room size depends on:
- Actual toilet depth
- Door location and swing
- Plumbing code
- Accessibility goals
- Ventilation
- Wall finish thickness
- Local requirements
Do not assume that every 3-by-5-foot toilet room automatically complies. A poorly positioned inward-swinging door can make a nominally adequate room unusable.
Powder Room
A powder room normally contains a toilet and sink. The smallest workable size depends on how the fixtures face each other and how the door operates.
In a side-by-side arrangement, add:
- The toilet’s required width
- The sink or vanity width
- Any required space between them
- Wall finishes
- Door clearance
In an opposing arrangement, add:
- Toilet projection
- Required front toilet clearance
- Sink or vanity depth
- Required approach space
- Door movement
A shallow wall-mounted sink may save several inches compared with a full-depth vanity. However, fixture dimensions and clearances must be checked as a complete layout rather than independently.
Small Full Bathroom
A compact full bathroom must coordinate the toilet with a tub or shower, vanity, door, and circulation path.
Start with fixed plumbing and the largest fixture. A standard tub can determine the room width, while the toilet and vanity divide the remaining wall.
If replacing a tub with a shower, compare the finished enclosure—not only the nominal base. Our guides to standard shower pan sizes and walk-in shower dimensions explain how finished shower space can differ from product labels and rough openings.
Toilet Clearance Calculation Examples
Example 1: Toilet Between a Wall and Vanity
Suppose the toilet centerline is:
- 16 inches from the left wall
- 17 inches from the vanity countertop
- 25 inches from the bowl front to the opposite wall
This layout exceeds a common 15-inch side minimum on both sides. Its 25-inch front clearance exceeds both the 21-inch IPC and 24-inch UPC starting points.
It is code-dependent but reasonably workable. Moving toward 18-inch side spacing or 30-inch front spacing would improve comfort.
Example 2: Elongated Toilet Opposite a Vanity
Assume:
- Rear wall to vanity face: 52 inches
- Elongated toilet projection: 30 inches
- Remaining front clearance: 22 inches
Calculation:
52 inches − 30 inches = 22 inches
This may satisfy a 21-inch front-clearance rule but would fall short where 24 inches is required. It is also tighter than the 30-inch comfort target.
Possible solutions include:
- Choosing a shorter toilet
- Selecting a compact elongated model
- Using a shallower vanity
- Repositioning the vanity
- Increasing the room depth
Example 3: Compact Toilet Room
Assume a room is:
- 36 inches wide
- 60 inches deep
- Toilet projection: 29 inches
- Door swings outward
If the toilet is centered:
- Side clearance is 18 inches on each side
- Front clearance is 31 inches
This provides comfortable conventional clearance for many users. It is not automatically an accessible bathroom and still requires verification against local code and the selected toilet.
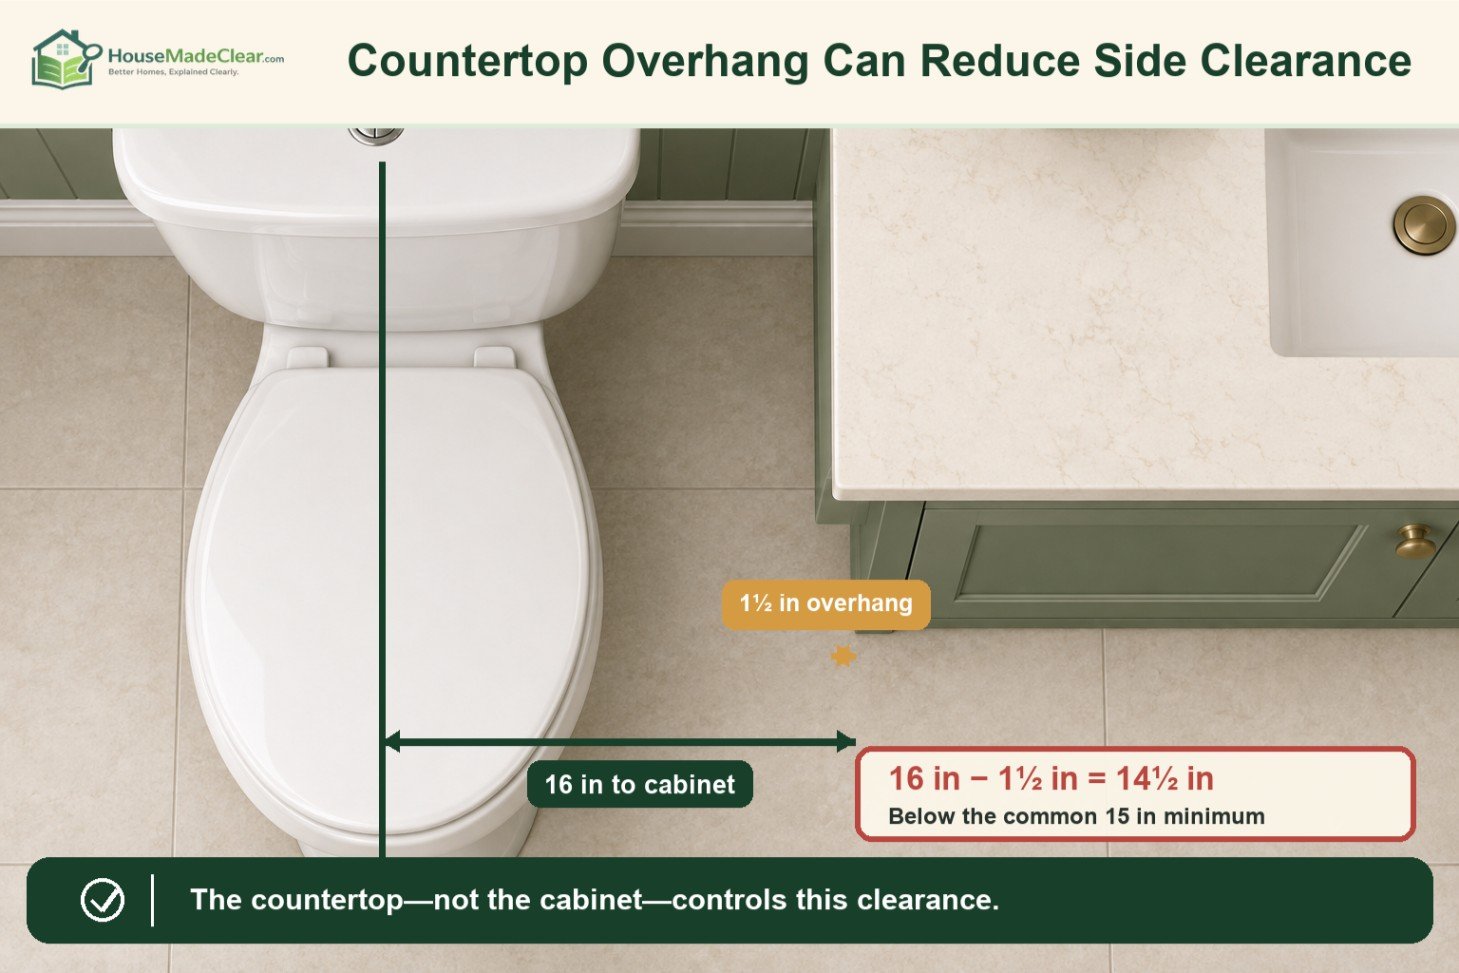
Example 4: Side Clearance Lost to a Countertop
Suppose the toilet centerline is 16 inches from the vanity cabinet, but the countertop extends 1½ inches beyond the cabinet toward the toilet.
The actual clearance is:
16 inches − 1½ inches = 14½ inches
The countertop becomes the nearest obstruction, so the layout falls below a common 15-inch minimum.
Accessible Toilet Clearance
Conventional residential toilet clearance is not enough for wheelchair access or many assisted-use situations.
The U.S. Access Board’s toilet-room guidance explains accessible layouts for facilities covered by the ADA Standards. Among other provisions, the standards address toilet position, clear floor space, transfer space, grab bars, door maneuvering, turning space, seat height, and dispenser placement.
ADA Water-Closet Clearance
For an accessible water closet, the ADA Standards generally establish a clear area:
- 60 inches wide minimum
- 56 inches deep minimum, measured from the rear wall
The toilet centerline is generally positioned 16 to 18 inches from the side wall or partition.
For a wheelchair-accessible toilet compartment, the minimum depth is generally:
- 56 inches for a wall-hung toilet
- 59 inches for a floor-mounted toilet
These measurements are not equivalent to placing a conventional toilet in the middle of a 60-inch-wide room. Accessible toilets are positioned beside a side wall to support transfer and grab-bar use.
Accessible toilet layout showing a 60-by-56-inch clear area, 16–18-inch centerline position and floor-mounted compartment guidance](https://housemadeclear.com/wp-content/uploads/2026/09/07-accessible-toilet-clearance.jpg)
Does the ADA Apply to a Private Home?
A conventional owner-occupied private home is not automatically subject to the ADA Standards.
ADA requirements generally apply to covered public accommodations, commercial facilities, and state or local government facilities. Other accessibility laws, housing rules, building codes, or project requirements may apply to certain residential properties.
Even where the ADA is not legally required, its dimensions can inform a more accessible design. However, selectively copying one measurement does not create a fully accessible bathroom. The toilet, grab bars, door, turning space, lavatory, controls, flooring, and approach route must work together.
Aging-in-Place Planning
For aging in place, consider:
- More space beside the toilet for assistance
- Reinforced walls for future grab bars
- A door that does not trap a fallen occupant
- Slip-resistant flooring
- An appropriate toilet-seat height
- Easy-to-operate controls
- Clear access to toilet paper
- Adequate lighting
- Space for a walker or mobility aid
- A continuous accessible path into the bathroom
Wall reinforcement should be installed in the correct locations and designed for the intended load. Random blocking that does not align with future grab-bar positions may be unusable.
Door, Vanity and Circulation Conflicts
A bathroom can satisfy the toilet dimensions on paper and still function poorly.
Inward-Swinging Bathroom Doors
An inward-swinging door may:
- Hit the toilet
- Reduce front clearance
- Block the sink
- Prevent assistance during an emergency
- Make the room difficult to enter with a walker
- Trap an occupant if they fall behind the door
Before changing a door to swing outward, verify hallway clearance, egress, hardware, and local requirements.
Pocket Doors
Pocket doors eliminate the floor-space arc of a swinging door, but they require an unobstructed wall cavity.
The pocket cannot normally share space with:
- Drain pipes
- Large water lines
- Electrical boxes
- Ductwork
- Structural framing
- Required wall reinforcement
A pocket door may solve one clearance problem while creating a plumbing or structural conflict.
Vanity Drawer Conflicts
Test the vanity with every drawer and door fully open. A lower drawer may strike the bowl even when the countertop clears it.
Also check whether a person can stand at the vanity while another person uses the toilet. This matters in shared family bathrooms.
Main Walking Path
Avoid placing the toilet in the direct path between the door and shower. A layout that forces users to squeeze around the bowl increases the risk of collisions and makes cleaning more difficult.
Common Toilet-Spacing Mistakes
Measuring From the Bowl Edge
The common side-clearance measurement starts at the toilet centerline. Measuring from the bowl edge produces unreliable results because toilets have different widths.
Using Rough Framing Measurements
Clearance must account for finished walls, tile, cabinetry, and trim. A rough opening that appears adequate can become too narrow after finishes are installed.
Ignoring the Countertop Overhang
The countertop may project farther toward the toilet than the vanity cabinet. Measure to the nearest finished obstruction.
Forgetting the Front of the Bowl
The toilet rough-in does not reveal the final front clearance. Two toilets with the same rough-in can have different overall depths.
Assuming Every Code Uses 21 Inches
UPC-based jurisdictions may require 24 inches in front, and local amendments can change the rule. Check the locally adopted code before construction.
Selecting the Toilet Too Late
If the layout is designed around a generic toilet symbol, the chosen product may project farther into the room than expected.
Select or shortlist the toilet before fixing walls, doors, or vanity depth.
Allowing Doors to Collide
Check the bathroom door, shower door, vanity doors, and drawers at full travel. Draw each swing or extension on the floor plan.
Treating Minimum as Comfortable
A 30-inch-wide toilet space with 21 inches in front may satisfy a dimensional minimum in some locations, but it will feel tight to many users.
Where possible, target a 36-inch-wide zone with about 30 inches in front.
Calling a Bathroom “ADA Compliant” From One Measurement
A 36-inch door or 60-inch turning circle alone does not make a bathroom ADA compliant. Accessibility involves the complete route, clearances, fixture locations, controls, grab bars, doors, and applicable scoping requirements.
Planning a Toilet Layout for New Construction
New construction provides the best opportunity to establish correct clearances before the drain is fixed.
Mark Finished Wall Locations
Floor plans often dimension framing, while plumbing clearances depend on finished surfaces.
Account for:
- Stud thickness
- Drywall
- Cement board
- Tile
- Wall panels
- Cabinet fillers
- Countertop overhangs
Select the Toilet Early
Obtain the manufacturer’s specification sheet and record:
- Rough-in size
- Overall length
- Overall width
- Tank width
- Seat height
- Water-supply location
- Electrical requirements
- Bolt spacing
- Base footprint
Do not rely exclusively on a showroom label or online product title.
Coordinate the Closet Flange
The flange center establishes both the rough-in and toilet centerline.
Before the floor is closed, verify its position relative to:
- Finished rear wall
- Finished side wall
- Vanity
- Tub or shower
- Door
- Floor joists
- Drain and vent route
Moving a flange after framing, subfloor, waterproofing, or tile installation is far more disruptive.
Test the Layout at Full Scale
Use painter’s tape or cardboard to mark:
- Finished wall lines
- Toilet base
- Toilet bowl projection
- Vanity footprint
- Door swing
- Shower-door swing
- Required clear zones
Walking through a full-scale mockup is more reliable than judging a small floor-plan drawing.
Planning Toilet Clearance During a Remodel
A remodel may be constrained by the existing flange, floor structure, venting, and nearby fixtures.
Replacing the Toilet Without Moving Plumbing
Measure the existing:
- Rough-in
- Centerline-to-wall clearance
- Centerline-to-vanity clearance
- Front clearance
- Supply-valve location
Then compare those measurements with the new toilet’s specification sheet.
A compact model may improve front clearance without changing the drain.
Replacing the Vanity
Changing vanity depth or countertop overhang can improve toilet clearance.
For example, replacing a 22-inch-deep vanity with an 18-inch-deep model can recover 4 inches of circulation space. However, confirm that the sink, faucet, storage, drain, and user space still function properly.
Moving the Toilet
Moving a toilet can require changes to:
- Closet flange
- Drain line
- Vent connection
- Floor framing
- Subfloor
- Waterproofing
- Finish flooring
- Supply line
- Permits and inspections
A floor joist may block the desired flange position. Do not cut or drill structural framing without an approved plan.
Moving the toilet only 2 or 3 inches can still involve significant work, so determine whether a different toilet or vanity would solve the problem first.
Toilet Clearance Checklist
Before approving the layout or ordering fixtures, verify every item in this table.
| Item | What to Check |
|---|---|
| Left side clearance | Centerline to nearest finished wall or obstruction |
| Right side clearance | Centerline to nearest finished wall or obstruction |
| Total toilet width | Usually at least 30 inches for a conventional layout |
| Front clearance | Check applicable 21-inch, 24-inch, or local requirement |
| Comfort target | Consider 18 inches per side and 30 inches in front |
| Rough-in | Measure from finished rear wall to flange center |
| Toilet projection | Use the selected model’s specification sheet |
| Bowl shape | Round, elongated, or compact elongated |
| Countertop overhang | Measure beyond the vanity cabinet |
| Vanity operation | Open every drawer and door |
| Bathroom door | Check full swing and entry path |
| Shower door | Check swing, handle, and access |
| Wall finishes | Include drywall, tile, panels, and trim |
| Water supply | Confirm valve position and maintenance access |
| Electrical supply | Check smart-toilet or bidet requirements |
| Accessibility | Evaluate transfer, turning, grab bars, and door access |
| Local code | Confirm adopted edition and amendments |
| Installation | Follow manufacturer and inspection requirements |
Frequently Asked Questions
How much space is required on each side of a toilet?
A common minimum is 15 inches from the toilet centerline to each side wall, vanity, fixture, or obstruction. Approximately 18 inches on each side is a more comfortable residential planning target.
Is toilet clearance measured from the wall or the toilet?
Side clearance is measured from the toilet centerline to the finished wall or nearest obstruction. Front clearance is measured from the front edge of the toilet bowl to the nearest wall, fixture, closed door, or obstruction.
What is the minimum width for a toilet space?
A conventional toilet generally requires a space at least 30 inches wide, based on 15 inches from the centerline to each side. A width of approximately 36 inches is more comfortable.
How much clearance is needed in front of a toilet?
A common minimum is 21 inches under the International Plumbing Code or 24 inches under the Uniform Plumbing Code. Approximately 30 inches provides more comfortable everyday use. Local requirements can differ.
Can a toilet be 12 inches from a side wall?
Twelve inches from the toilet centerline to a side wall is generally less than the common 15-inch minimum for a conventional residential layout. Verify the applicable local code before proceeding.
How far should a toilet be from a vanity?
The toilet centerline should commonly be at least 15 inches from the nearest part of the finished vanity, including the countertop overhang. Approximately 18 inches provides a more comfortable separation.
What is the difference between toilet rough-in and toilet clearance?
The rough-in is the distance from the finished wall behind the toilet to the center of the closet flange. Toilet clearance describes the usable space beside and in front of the installed fixture. A toilet can have the correct rough-in but insufficient side or front clearance.
Is a 30-inch-wide toilet room large enough?
Thirty inches is a common minimum width for a conventional toilet zone, but it can feel tight. A width of approximately 36 inches is more comfortable. The room must also provide sufficient depth, front clearance, door operation, ventilation, and any required accessibility features.
How deep should a separate toilet room be?
The required depth depends on the toilet’s projection and applicable front-clearance rule. A toilet projecting 29 inches needs approximately 50 inches of total depth with 21 inches in front, 53 inches with 24 inches in front, or 59 inches with a comfortable 30-inch front clearance. Door and finish requirements may increase the room size.
Does a private home bathroom have to comply with the ADA?
A conventional owner-occupied private residence is not automatically covered by the ADA Standards. Other federal, state, local, housing, or project-specific accessibility requirements may apply. ADA dimensions can still be useful for accessible planning, but the complete bathroom layout must be evaluated.